The allure of the photocopy texture lies in its raw, unpolished charm. This aesthetic, born from the imperfections of analog machines, offers a unique visual language for designers seeking to inject a sense of history, grit, and retro flair into their work. Broken photocopiers, in particular, are renowned for producing some of the most compelling textures, characterized by their stark black and white tones and heavy grain, which are perfect for retrofying designs with aged looks. This article will guide you through the multifaceted world of photocopy textures in Photoshop, from understanding their origins and characteristics to mastering their creation and application.
The Genesis of Grungy Textures: From Machine Malfunctions to Digital Assets
Grungy textures are incredibly versatile resources, serving as effective backgrounds and overlays in design projects to impart a distressed, worn-out feel. The very nature of a malfunctioning photocopier, with its unpredictable toner distribution and paper feed, generates a wealth of unique visual artifacts. These imperfections, far from being flaws, become desirable design elements. The combination of high contrast, heavy grain, and occasional toner smears creates a distinct low-fidelity aesthetic that is highly sought after for its nostalgic and authentic quality.
The "Copy Shop" concept encapsulates this idea perfectly, offering a comprehensive toolkit to recreate the gritty, low-fi aesthetic of photocopied designs. This often involves a curated collection of resources designed to emulate the physical process. For instance, running photos through a specialized 'Photocopy Machine' Photoshop Action can generate a high-contrast photocopied look, complete with various dirty toner effect options. This can then be further enhanced by incorporating a range of grainy photocopier textures, halftone patterns, and authentic paper effects to build striking, multi-layered designs.
Historically, the appeal of these textures can be traced to the era before digital perfection. Old documents, often faded and bearing the marks of time and use, possess an inherent textural richness. These historical documents, with their unique aging processes, serve as a powerful inspiration. For those without access to vintage paper, a simple DIY approach can yield similar results. Pouring tea into a shallow cookie sheet and then setting a piece of paper in the tray can create an aged effect on the paper. This subtly stained paper, when then photocopied, can produce intriguing textures that mimic the look of aged documents.
Crafting Your Own Photocopy Textures: A Step-by-Step Guide
Creating your own photocopy textures for Adobe Photoshop, Affinity Photo, or your favorite raster-based design software can be a rewarding process. It allows for a personalized touch and ensures you have exactly the kind of texture you need for your project. This journey begins with experimentation at the source: the photocopier itself.
Step 1: Experimenting with the Photocopy Machine Settings
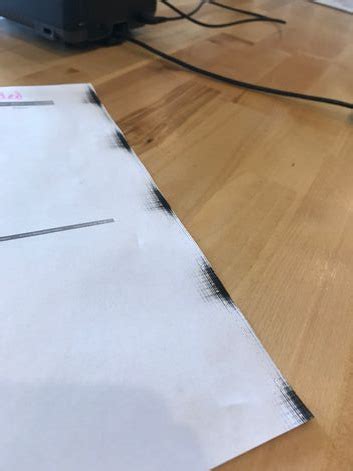
The first step to generating great-looking photocopy textures is to experiment with the photocopier's settings. Printing out a variety of grayscale gradients onto paper is an excellent starting point. During this process, you might discover that when a gradient is copied, certain areas of the copy machine begin to pick up the dark color more intensely, leading to interesting tonal shifts and density variations.
Beyond gradients, photocopying different pieces of material can yield surprising results. Consider what you have lying around your house that might make for interesting photocopy textures. Anything with a subtle surface variation or pattern can translate into a unique texture when run through the copier.
Step 2: Pushing the Extremes: Density, Sharpness, and Eco-Friendly Settings
Adjusting the photocopier's settings to their extremes can significantly impact the resulting texture.
- Density: This setting generally controls the contrast between black and white. Pushing the density to its maximum setting often results in more intense photocopy textures, with deeper blacks and starker whites.
- Sharpness: Setting the sharpness to a low value can sometimes lead to "toner bruising" type effects, where the toner appears to spread or bleed in a way that adds a unique character to the texture.
- Eco-Friendly Setting: This feature, designed to reduce toner usage, can be a boon for texture creation. When this setting is enabled, it turns down the amount of toner output by the machine. If you make enough copies under these conditions, you might get "lucky" with a machine jam. Such jams can result in some wonderfully weird and unpredictable toner smears, adding a level of serendipitous artistry to your textures.
Step 3: Scanning Your Masterpieces
Once you have a collection of promising copies, the next step is to scan them. Ideally, this is best done with a standalone photography scanner, as these typically offer higher resolution and better image quality. However, if a photo scanner isn't available, a regular scanner integrated into a printer will also work. Be aware that textures scanned with a regular printer scanner might not be as detailed or as large as those produced by a dedicated photo scanner.
For optimal detail, scanning at a high resolution, such as 1200 DPI, is recommended. While this process takes considerably longer than scanning at 300 or 600 DPI, the increased detail is often worth the extra time, especially if you plan to enlarge the textures or use them in high-resolution projects.
Step 4: Post-Processing in Photoshop for Maximum Impact
After scanning, your raw textures are ready for refinement in Photoshop. The goal here is to enhance their contrast and prepare them for use as design assets.
- Open the Texture in Photoshop: Simple enough, just open your scanned image file.
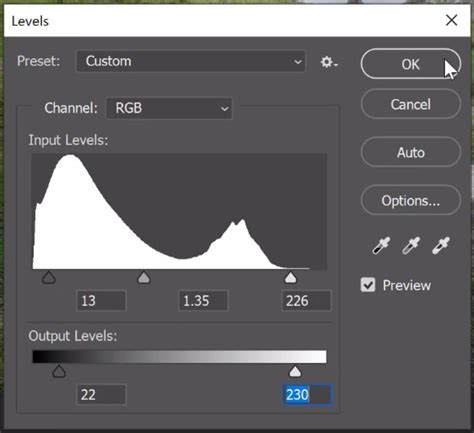
- Adjust Levels to Increase Contrast: Scanned textures often contain a wide range of gray shades. To achieve a more graphic and impactful look, it's beneficial to tighten up the Levels. Navigate to
Adjustments > Levelsand manipulate the sliders to create a purer black and a high-contrast range. This process effectively removes mid-tones and emphasizes the starker elements of the photocopy. - Convert to Bitmap (Optional but Recommended for Specific Use Cases): For certain applications, particularly when aiming for a true, high-contrast photocopy look without anti-aliasing, converting the image to Bitmap is an excellent choice. To do this, go to
Edit > Color Modeand change your work to Grayscale. Then, you can further refine the conversion to Bitmap, which will render the image in a purely black and white, pixelated format.
Step 5: Organizing and Utilizing Your Textures
The entire process of creating textures is, of course, pointless if they aren't used. Organizing your newly created assets is crucial for efficient workflow. Save your textures in a location that allows for quick access, perhaps in a dedicated "Textures" folder within your project files or a master library.
The way you present these textures can also vary. Common formats include Bitmap TIFFs, Photoshop ABR brushes, and Smart PSDs. Bitmap TIFFs are particularly useful for their clean, high-contrast output. ABR brushes allow you to "paint" the texture onto your designs. Smart PSDs offer a flexible way to apply effects to different images without redoing the entire process. These formats work seamlessly in vector software like Illustrator, where they can be placed transparently on top of designs and their colors easily changed.
Replicating the Photocopy Effect in Photoshop: Diverse Techniques
Beyond creating raw texture files, Photoshop offers several methods to digitally replicate the appearance of a photocopy directly on your images. These techniques range from simple filter applications to more complex layering and blending modes.
Technique 1: The Non-Destructive Smart Object Approach
This method focuses on creating a clean, black-and-white photocopy effect that is entirely non-destructive, meaning your original image remains untouched and all adjustments can be modified later.
- Start with Your Image: Open your chosen image in Adobe Photoshop.
- Convert to Smart Object: To ensure non-destructive editing, right-click on your image layer and select
Convert to Smart Object. This allows you to apply filters non-destructively. - Apply Grain: Go to
Filter > Filter Gallery. Within theTexturetab, select theGrainfilter. Experiment with settings likeGrain Type(e.g.,Speckle) and adjustIntensityandContrastto achieve a visible photocopy grain. For example,Intensityat 98 andContrastat 11 can provide a good starting point. - Add Reticulation for a Smudged Look: To introduce a more authentic, smudged toner appearance, add another filter layer. Duplicate your current layer (
Control-J) and double-click theFilter Galleryadjustment on the duplicated layer. Navigate to theSketchfolder and selectReticulation. AdjustDensity,Foreground Level, andBackground Levelto achieve the desired smudged effect. Values likeDensityat 14,Foreground Levelat 28, andBackground Levelat 10 can create a subtle yet effective smudging. - Introduce Pixelation: For an even more distinct photocopied feel, go to
Filter > Pixelate > Crystallize. This filter breaks down the image into small cells, mimicking the dot patterns often seen in photocopies. - Blend for Depth: To combine the effects and create a richer texture, you'll need to blend the layers. Double-click the layer containing the Crystallize filter. In the
Blending Optionssection, set theBlend ModetoMultiply. At the bottom, in theBlend Ifsection, drag the upper white marker to the left, to a level around 71. Then, hold theAltkey (orOptionkey on Mac) to split the marker and drag the left half to approximately 22. This sophisticated blending technique allows the texture to interact with the layer below, creating a more integrated and realistic photocopy effect. - Enhance with Noise and Color (Optional): To make the Xerox texture even dirtier and more varied, you can add another layer of noise. Create a
Layer > New Fill Layer > Solid Colorand set it to black. Then, go toFilter > Noise > Add Noise. A warning window will appear; clickConvert to Smart Object. Set theAmountto a high value, such as 162%, and ensureUniformandMonochromaticare selected. Follow this with aFilter > Blur > Gaussian Blurto soften the noise slightly. Finally, useImage > Adjustments > CurvesorInvertfollowed by aMultiplyblend mode to integrate this noise layer subtly.
Quick Photocopy Effect in Photoshop
Technique 2: Emulating Striped Photocopy Effects
This technique focuses on creating a specific type of photocopy distortion, often seen when paper is fed unevenly or when there are issues with the scanner bed.
- Prepare Your Image: Open your image in Photoshop. It's beneficial to set the image size to a specific dimension, for example, 2500 pixels in width, to ensure consistency. Convert the layer to a Smart Object.
- Adjust Levels for Contrast: Go to
Image > Adjustments > Levels. To increase contrast, set the black (left) marker to 41 and the white (right) marker to 214. - Apply Motion Blur for Streaking: Go to
Filter > Blur > Motion Blur. Set theAngleto 0 and theDistanceto a value that creates visible streaks, for example, 11. - Introduce Halftone Patterns: Navigate to
Filter > Filter Gallery. Open theSketchtab and selectHalftone Pattern. AdjustPattern TypetoDot,Sizeto 1, andContrastto 5. This creates a dot matrix effect reminiscent of older printing methods. - Add Noise: Go to
Filter > Noise > Add Noise. SetAmountto 15%,Monochromatic, withUniform Distribution. - Incorporate Grain: Go to
Filter > Filter Galleryagain. In theTexturetab, selectGrain. SetGrain TypetoHorizontal,Intensityto 40, andContrastto 50. - Add Craquelure for a Cracked Effect: For a weathered, cracked appearance, go to
Filter > Filter Galleryonce more. SelectCraquelurefrom theTexturetab. Experiment withSpacing(e.g., 64),Depth(e.g., 4), andBrightness(e.g., 9). - Layered Pixelation and Mezzotint: Duplicate the layer (
Control-J). Right-click on the duplicated layer and selectClear Smart Filters. Now, applyFilter > Pixelate > Pointillize. Then, go toFilter > Filter Gallery, selectGrainfrom theTexturetab, and setGrain TypetoStippled,Intensityto 40, andContrastto 50. Finally, applyFilter > Pixelate > Mezzotint. - Blending for Intensity: Duplicate the very first layer again (
Control-J) and drag it to the top of the layer stack. Set itsBlend ModetoMultiplyand reduce itsOpacityto 50%. - Further Grain and Dirt: Add another layer of black fill (
Layer > New Fill Layer > Solid Color). ApplyFilter > Noise > Add Noisewith a highAmount(e.g., 290%, Monochromatic, Uniform). Then, addFilter > Blur > Motion BlurwithAngle0 and a significantDistance(e.g., 208). - Invert and Mezzotint: Go to
Image > Adjustments > Invert. Then, applyFilter > Pixelate > Mezzotint. - Cloud-Based Masking: Create a
Layer > Layer Mask > Reveal All. Select the mask and use theGradient Tool (G)to apply a cloud-like pattern. PressControl-Lto adjust theLevelsof the mask, increasing contrast (e.g., black mark at 50, white mark at 210). - Final Blending: Double-click this final layer and set its
Blend ModetoColor Burn. In theBlend Ifsection, drag the lower white marker to 220. HoldAlt(orOption) to split the marker and drag it to 170. This creates a semi-transparent, selectively applied grain effect, controlled by the cloudy mask.
Technique 3: Smudged and Distorted Xerox Effects
This approach focuses on achieving a more dynamic, smudged, and distorted Xerox look, often resulting from physical manipulation or specific machine behaviors.
- Start with a Duplicated Layer: Open your image and duplicate the layer (
Control-J). - Intensify Motion Blur: Double-click the
Motion Bluradjustment in the duplicated layer's smart filter and increase theDistanceto a higher value, such as 208. - Apply Crystallize: Go to
Filter > Pixelate > Crystallize. This will break the image into distinct cells, creating a mosaic-like effect. - Masking with Gradients: Create a
Layer > Layer Mask > Reveal All. Select the mask and use theGradient Tool (G). Applying a gradient here will selectively reveal or hide the crystallized effect, creating a more organic and less uniform distortion.

Beyond Manual Creation: Leveraging Pre-made Resources
While creating your own textures offers unparalleled control, there are instances where pre-made resources can save significant time and effort. The market offers various add-ons and actions designed to achieve specific photocopy effects with ease.
- One-Click Smudged Xerox: For a trendy, smudged Xerox texture, a single-click add-on can be incredibly efficient, applying a complex set of effects instantly.
- Striped Photocopy Texture Smart Objects: Resources like those found on Envato often provide Photoshop Smart Objects. These allow you to simply replace a placeholder photo within the file to instantly create a cool, distorted striped photocopy image in seconds.
- High-Grain Black and White Actions: If you desire a dark, black-and-white effect with very visible grain, specific Photoshop actions are designed to achieve this, mimicking the output of older, high-contrast copiers.
- Drawing-Like Transformations: Some Smart Objects can transform your photos into something resembling a drawing, offering a unique artistic interpretation of the photocopy effect.
- Unique Large-Grain Effects: For those seeking a distinct look, certain Photoshop actions create a photocopy effect with a larger grain structure while crucially preserving the original image details, offering a balance between texture and clarity.
By understanding the principles behind photocopy textures and exploring the various digital tools and techniques available, designers can effectively integrate this distinctive aesthetic into their work, adding depth, character, and a touch of retro authenticity.