Achieving transparency in Photoshop is a fundamental skill for a wide range of image manipulation tasks, from creating seamless composite images and logos to transforming photos into digital paintings. While Photoshop offers powerful tools to achieve this, understanding the nuances of selections and transparency can sometimes present challenges, particularly when dealing with fully transparent pixels or older techniques. This article delves into the various methods for making images and selections transparent in Photoshop, addressing common issues and exploring advanced applications.
Understanding Transparency and Photoshop Selections
When working with an image in Photoshop that has a transparent background, a common point of confusion arises when attempting to select and copy the entire image. Pressing CTRL + A to select all, followed by CTRL + C to copy, often results in a selection that only includes pixels that aren't fully transparent. This means that areas with complete transparency are not captured. Similarly, when an image has a fully transparent border, using CTRL + A can lead to a selection that is smaller than the actual image dimensions.
Historically, a workaround for this was to manually paint a couple of pixels in all four corners of the image to create visible points for selection. Another method, acting as a shortcut, involved creating a new layer beneath the layer intended for copying and filling it with any color. Subsequently, both layers could be selected and converted into a Smart Object. Double-clicking this Smart Layer would open a new window containing both the transparency image and the background image, allowing for a more comprehensive capture.
However, these methods often require more steps than a simple copy-paste operation. A more direct approach to preserve the layer bounds and transparency when copying is to use Shift + CTRL + C ("Copy Merged"). This command ensures that the full size of the layer, including its transparency, is considered. It's important to note that while Shift + CTRL + C preserves the layer's dimensions, the actual data on the clipboard might still exclude fully transparent pixels. This can manifest when pasting into a new document, where Photoshop might suggest a trimmed document size based on the non-transparent content, or when pasting into another application, which may only receive the trimmed data.
Advanced Techniques for Transparency and Compositing
The ability to make images transparent, even partially, opens up a world of creative possibilities. It allows for the overlaying of images to create unique compositions, the placement of logos against any background without a visible border, and the combination of images to produce new product mockups.
Layer Opacity and Transparency
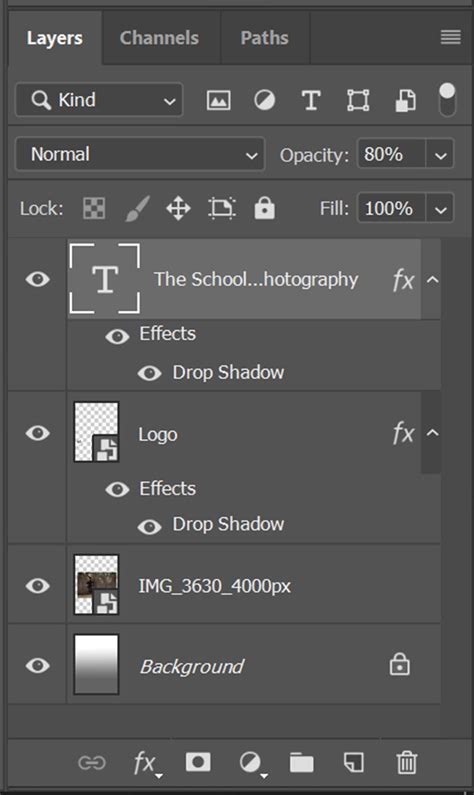
A fundamental way to achieve transparency in Photoshop is by adjusting the opacity of a layer. When you make a layer transparent, you can seamlessly integrate it into other images or place it onto products without worrying about distracting background edges or opacity levels. This is achieved by selecting the desired layer and then adjusting the opacity level in the box that appears at the top of the Layers panel.
Removing Backgrounds for Transparency
Often, the goal is to make the background of an image transparent while keeping the main subject clear and opaque. This is crucial for compositing images or isolating subjects to be placed elsewhere. With the correct layer selected, Photoshop offers a "Remove Background" button, typically found below the image or within the Properties panel, which can automatically detect and remove the background.
Once a background has been made transparent, it can be further refined using masking tools. The "Add to mask" and "Subtract from mask" options allow you to paint over areas that you wish to restore or remove, respectively. Alternatively, the Brush tool can be used to add back any elements that were inadvertently removed, while the Eraser or Magic Eraser tools can be employed to make additional areas of the picture transparent.
Tools for Precise Selections and Transparency
Creating precise selections is key to achieving effective transparency. Photoshop offers a suite of tools, each with its strengths, to facilitate this process.
Automated Selection Tools
For straightforward subjects, especially those with clear contrast against the background, automated selection tools can provide a quick starting point.
Select Subject: This menu option, found under the "Select" menu, is designed to automatically identify and select the main subject of an image. For subjects like people, it can yield impressive results, though it often requires refinement with other tools for more complex images.
How to Select Subjects and Refine Edges in Photoshop
Magic Wand Tool: The Magic Wand tool (shortcut
Shift + W) selects regions of similarly colored pixels. By setting the tool to "Add to Selection" at the top of the options bar, you can click on different areas to build your selection. Adjusting the "Sample Size" and "Tolerance" settings is crucial for controlling the sensitivity of the selection to color variations.Quick Selection Tool: This tool functions much like a brush, selecting similar-looking areas as you drag it over the image. It's generally more effective than the Magic Wand for images with multiple colors or more complex textures. To deselect unwanted areas, hold down the
Optionkey (orAlton Windows) while dragging.
Manual and Advanced Selection Techniques
When automated tools fall short, manual and more advanced techniques become essential.
Lasso Tools: While not explicitly detailed in the provided information, Photoshop's Lasso tools (Lasso, Polygonal Lasso, Magnetic Lasso) offer manual selection capabilities for freehand, straight-edged, or edge-snapping selections, respectively.
Pen Tool: For the highest level of precision, particularly for sharp, defined edges, the Pen Tool is indispensable. It allows you to create vector paths that can be converted into selections, offering unparalleled control.
Color Range Tool: This tool is particularly useful for selecting specific color ranges within an image, especially against a contrasting background. You can see a preview of the selection in a black and white box, allowing you to refine the selection before committing. Clicking "OK" will make the selected color range active for manipulation.
Refining Selections and Creating Transparency
Once a selection has been made, regardless of the tool used, refinement is often necessary. If an automated tool has selected too much or too little, you can use the "Add to Selection" or "Subtract from Selection" modes of other selection tools, or utilize layer masks.
For subjects that are blurry due to motion or a shallow depth of field, automated tools may struggle to define edges accurately. In such cases, manual refinement with brushes on a layer mask is often the most effective solution.
If you find that an automated tool has made an undesirable selection, you can invert it by going to Select > Inverse and then proceeding with actions like deleting or applying effects to the inverse selection.
Preserving Transparency When Saving
A critical step after creating transparent areas is to save the image in a format that supports transparency. If you don't, your transparent areas might be filled with a default background color (often white) when you reopen the file.
PNG Format: The most common and widely supported format for transparent images on the web is PNG. When saving your image, navigate to
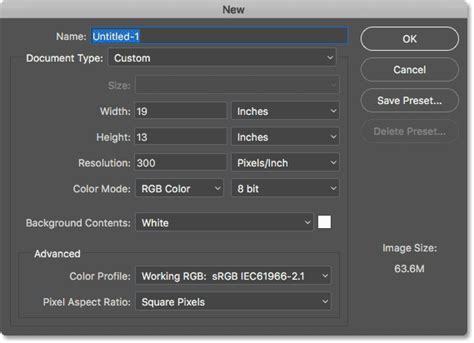
File > Save AsorFile > Save a Copyand select "PNG" from the Format dropdown menu.Color Mode Considerations: If you cannot find the PNG option, it might be because your image is in the CMYK color mode. CMYK is primarily used for print and does not support transparency. You will need to convert your image to RGB mode (
Image > Mode > RGB Color) before you can save it as a PNG.
Digital Painting with Transparency: A Modern Approach
The concept of using transparency and layers for digital painting, as described in the initial query, is a valid and powerful technique. However, the specific method of setting the Mixer Brush tool's color to "transparent" for blending has evolved in newer versions of Photoshop.
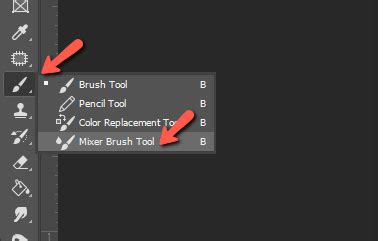
In earlier versions of Photoshop, the Mixer Brush tool offered a "Sample All Layers" option and the ability to set the "Color" to "Transparent." This allowed the brush to pick up underlying colors and blend them without introducing new opaque color. This was particularly useful for creating underpaintings by blending the colors of a reference photo to achieve a painterly effect.
In current versions of Photoshop, the direct "Transparent" color option for the Mixer Brush has been removed or altered. The functionality for blending and underpainting is now primarily achieved through a combination of:
- Layer Setup: Start with your reference photo on a background layer. Create a new layer above it for your underpainting.
- Mixer Brush Settings: Select the Mixer Brush tool. Instead of setting a "transparent" color, ensure that "Sample All Layers" is checked if you want to blend from layers below. The "Load the brush after each stroke" option can also be useful.
- Brush Load and Wetness: Experiment with the brush load and wetness settings. A lower brush load and moderate wetness can help achieve softer blending.
- Color Blending: The key is to sample colors from the underlying layer (your photo) and blend them onto the new layer. You can do this by holding down
Alt(orOptionon Mac) while the Mixer Brush is active to temporarily activate the Eyedropper tool and sample colors. Then, releaseAltto return to the Mixer Brush and blend those sampled colors. - Opacity and Flow: Control the intensity of your blending by adjusting the brush's opacity and flow.
While the direct "transparent color" setting might be gone, the underlying principle of sampling and blending remains. By understanding how to effectively use the Mixer Brush tool in conjunction with layer management and sampling, you can still achieve the desired digital painting effects. The process now involves more active color sampling rather than a passive "transparent" setting.
Alternatives and Further Exploration
For users who may not have access to the full Adobe Photoshop suite, or for simpler tasks, there are numerous free Photoshop alternatives and online transparent background makers available. These tools often provide a user-friendly interface for quick edits, though they may come with limitations in terms of advanced features, image quality, or file size. When using online tools, it's always advisable to review their privacy policies, as you will be uploading your images to their servers.
Understanding how to create transparent selections and backgrounds in Photoshop is a foundational skill that empowers a wide array of creative workflows. Whether you're preparing images for web use, creating complex composites, or embarking on a digital painting journey, mastering these techniques will significantly enhance your capabilities.
tags: #photoshop #make #selection #transparent