Adobe Photoshop stands as a revolutionary software platform that has forever changed the landscape of visual editing and design. Its array of tools can transform a blank canvas into an astounding piece of art, making it a must-learn for designers, photographers, and digital artists. Understanding these tools is crucial, and a robust selection of them at your disposal means you have the ability to single out, manipulate, and perfect specific parts of your artwork or image, down to the very last pixel. This guide delves into the core Photoshop icon tools, explaining their functions and how they contribute to creating professional-quality graphics.
Mastering Selections: Precision at Your Fingertips
The true prowess of Adobe Photoshop lies in the precision and versatility it offers, and the selection tools are a testament to this. These tools are fundamental for isolating specific areas of an image for editing, manipulation, or enhancement.
Marquee Tools: The Foundation of Simple Selections
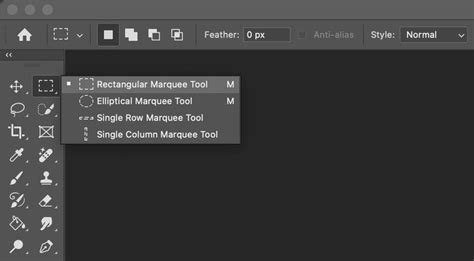
The Marquee tools, resembling the shape of a dotted rectangle or ellipse in the toolbar, are among the simplest tools to understand and are excellent for making basic geometric selections.
- Rectangular Marquee Tool: As the name suggests, it is used to make rectangular or square selections. By clicking and dragging, you define the boundaries of your selection. Holding the Shift key while using this tool constrains the selection to a perfect square.
- Elliptical Marquee Tool: This is used to make oval or circular selections. Similar to the Rectangular Marquee, clicking and dragging creates an ellipse, and holding Shift constrains it to a perfect circle.
Lasso Tools: Flexibility for Irregular Shapes
The Lasso tools are more free-form and allow for greater flexibility, making them great for selecting complex, irregular shapes.
- Lasso Tool: This tool helps you draw freehand selections. You click and hold the mouse button, then draw a freehand outline around the desired area. Releasing the mouse button completes the selection.
- Polygonal Lasso Tool: This version lets you make straight-edged selections. You click point to point, creating anchor points that define the edges of your selection. Moving the mouse between clicks creates straight lines. Double-clicking or clicking back on the starting point closes the selection.
- Magnetic Lasso Tool: This ingenious tool automatically follows and clings to the edge of the object you are tracing, based on the contrast between the object and its background. You click on the edge of an object, and as you move your cursor along the edge, the tool attempts to snap to it, creating anchor points automatically.
Photoshop Tools Tutorial | Lasso Tool, Quick Selection, Magic Wand and More | Adobe Photoshop
Quick Selection Tool: Speed and Intuition
The Quick Selection tool is a lifesaver when you need to make a fast selection. This tool selects an area based on color and tone. You simply click and drag over the area, and Photoshop will automatically select similar pixels. The size of the selection brush can be adjusted using the "[" and "]" keys for finer control. Holding the "Option" or "Alt" key while using this tool switches it to subtraction mode, allowing you to remove areas from an existing selection.
Magic Wand Tool: Color-Based Selection
The Magic Wand Tool works in a similar way to the Quick Selection Tool but with just a single click. It selects all contiguous (touching) pixels that are similar in color to the pixel where you clicked. The Tolerance setting in the Options Bar determines how wide a range of colors will be selected. A higher tolerance will select a broader range of similar colors.
Shaping Your Image: Crop and Slice Tools
A pivotal part of photo editing and graphic design is the ability to change the dimensions, perspective, or sections of your image or design. This is where Adobe Photoshop's Crop and Slice tools come into play. These tools are highly effective for shaping your image to the right size and extracting specific portions of it for varied purposes.
Crop Tool: Refining Your Composition
The Crop tool is a very commonly used tool in Photoshop. This tool allows you to cut out a portion of your image or design to remove undesired elements or to focus on a specific subject. You click and drag the tool across the picture to create a bounding box, defining the area you wish to keep. Once you are satisfied with the selection, pressing Enter confirms the crop, removing everything outside the bounding box.

Slice Tool: Dividing for Web and Assets
While the Crop tool in Adobe Photoshop focuses on removing parts of an image, the Slice tool takes a different approach. It enables you to divide your image into smaller sections, each of which can be exported as a separate file. This feature is particularly useful in web design, where different parts of an image may need to be saved separately for improved web performance, or for creating assets for user interfaces. You click and drag across your image to create a slice, and you can repeat the process to create additional slices.
Perspective Crop Tool: Correcting Distortion
The Perspective Crop tool is a more advanced version of the Crop tool. This tool not only allows you to crop your image but also corrects the perspective of the cropped area. This is invaluable when dealing with images taken at an angle, allowing you to straighten out lines and planes as you crop. You click and drag across your image to create a perspective bounding box, and then adjust the corners to match the perspective you want to achieve before pressing Enter.
Enhancing and Creating: Retouching and Painting Tools
Retouching and painting tools in Adobe Photoshop provide the means to tweak, enhance, correct, or completely transform your images. These tools are your best friends when it comes to perfecting an image, repairing flaws, or even creating digital paintings and special effects.
Brush Tool: The Versatile Painter
The Brush tool is known as one of the most versatile tools in Photoshop. It can paint colors onto your canvas using a variety of brush shapes, sizes, and modes. Brushes range from simple hard or soft round brushes to more complex brushes that mimic natural media like charcoal, oil paint, or watercolor. Custom brushes can be created or downloaded to achieve unique textures and effects.
Pencil Tool: Hard-Edged Lines
The Pencil tool, akin to the Brush tool, helps you draw freehand lines and strokes on your image, but unlike the Brush tool, it produces hard-edged lines. This makes it suitable for tasks requiring sharp, defined lines, such as pixel art or tracing.
Color Replacement Tool: Precise Color Swapping
The Color Replacement tool, as the name suggests, helps you replace a selected color with a new one, while preserving the original image's shadows, highlights, and textures. This is a powerful tool for subtle color adjustments or for changing the hue of specific elements.
Mixer Brush Tool: Blending Realism
The Mixer Brush tool goes beyond the basic Brush tool by allowing you to mix colors and create more realistic brush strokes that reflect the physical properties of paint. It can pick up color from your canvas and blend it with the color you are painting with, simulating traditional painting techniques.
Red Eye Tool: A Quick Fix for Flash Photography
The Red Eye tool is a highly specific retouching tool designed to remove the red-eye effect caused by flash photography. Simply click and drag over the red area of the eye, and the tool will correct it.
History Brush Tools: Reverting with Style
- History Brush Tool: This tool helps you paint previous states of your image into the current image. By selecting a state in the History panel, you can use the History Brush to revert specific areas of your image back to that earlier state.
- Art History Brush Tool: This is a variant of the History Brush Tool, but it paints with stylized strokes, using the selected state or snapshot. It offers more artistic control over the reversion process.
Eraser Tools: Removing Pixels with Control
- Eraser Tool: This is a fundamental tool that removes pixels from a layer as you drag over them. Its size, hardness, and opacity can be adjusted for precise control.
- Background Eraser Tool: This erases pixels of a similar color to the one you click on, effectively removing backgrounds while trying to preserve foreground elements.
- Magic Eraser Tool: This tool can delete similar colors of pixels from a photo with a single click, similar to the Magic Wand but with an erasing function.
Gradient and Paint Bucket Tools: Filling with Color
- Gradient Tool: This helps you create a gradual blend between multiple colors. You can define the colors, their positions, and the style of the gradient (linear, radial, angle, etc.).
- Paint Bucket Tool: This fills a specific area with a single color or pattern. It's useful for filling large areas quickly or applying solid colors to backgrounds.
Clone Stamp Tool: Duplicating and Repairing
The Clone Stamp tool is a powerful retouching tool that allows you to sample pixels from one part of an image and paint them onto another part. This tool is incredibly useful for removing unwanted objects from your image, for duplicating elements, or for seamlessly repairing damaged areas by sampling from intact parts of the image.
Healing Brush Tools: Seamless Imperfection Correction
The Healing Brush tools are a set of very effective retouching tools that Photoshop offers. They are designed to correct imperfections in your image by blending them with the surrounding pixels, often preserving texture and detail from the source.
- Spot Healing Brush Tool: This tool doesnât require a sample point. You simply click or drag over a blemish, and Photoshop automatically samples surrounding pixels to heal it.
- Healing Brush Tool: Similar to the Spot Healing Brush, but this requires you to define a source point by Alt/Option-clicking before painting over the imperfection.
- Patch Tool: This allows you to draw a freeform selection around a damaged area and then drag that selection to a clean area to sample from.
- Content-Aware Move Tool: This tool helps you select and move a part of your image to a new location. Photoshop then attempts to fill the original area intelligently based on the surrounding content.
Blur, Smudge, Dodge, Burn, and Sponge Tools: Subtle Adjustments
These tools offer nuanced control over image appearance:
- Blur Tool: This softens the area of your image where it's used, reducing detail.
- Smudge Tool: This tool mimics the action of dragging a finger through wet paint, smearing pixels and blending edges.
- Dodge Tool: This lightens the area where it's used, similar to increasing exposure.
- Burn Tool: This darkens the area where it's used, similar to decreasing exposure.
- Sponge Tool: This tool changes the color saturation in your image, either increasing or decreasing it.
Photoshop Tools Tutorial | Lasso Tool, Quick Selection, Magic Wand and More | Adobe Photoshop
Drawing and Typing: Vector and Text Creation
Adobe Photoshop's suite of drawing and typing tools offers a powerful medium for creating and manipulating shapes, lines, and text within your designs. Whether you're designing a poster with eye-catching typography, creating a logo, or sketching out a web design layout, these tools are indispensable.
Pen Tools: Precision Vector Paths
The Pen tools provide an incredible degree of precision for creating lines and curves. These are vector-based tools, meaning they create paths that can be scaled indefinitely without any loss of quality.
- Pen Tool: The basic Pen tool is used for creating straight lines and smooth curving paths by placing anchor points and defining Bezier curves. It's the foundation for creating precise vector shapes and selections.
- Freeform Pen Tool: Allows you to draw freehand paths, similar to the Lasso tool but creating vector paths.
- Add Anchor Point Tool, Delete Anchor Point Tool, Convert Point Tool: These are sub-tools that allow for precise manipulation of existing paths created with the Pen tool.
Shape Tools: Geometric and Custom Forms
Shape tools allow you to create geometric shapes, such as rectangles, ellipses, and polygons, but also lines and custom shapes. These shapes are vector-based, meaning they can be scaled and resized without losing quality. You can define fill colors, stroke colors, and stroke widths for these shapes.
- Rectangle Tool, Rounded Rectangle Tool, Ellipse Tool, Polygon Tool, Line Tool: These create standard geometric shapes.
- Custom Shape Tool: This allows you to select from a library of preset shapes or import your own custom vector shapes.
Type Tools: Adding Text with Control
The Type Tools are essential for adding text to your designs.
- Horizontal Type Tool: This is the default tool for typing text horizontally.
- Vertical Type Tool: Allows you to type text vertically.
- Type Mask Tools (Horizontal and Vertical): These tools create a selection in the shape of the text you type, allowing you to fill that selection with patterns, textures, or gradients.
Within the Type Tools, Photoshop also offers a wide variety of options for manipulating text, such as changing the font, size, alignment, color, leading, kerning, tracking, and more, accessible through the Character and Paragraph panels.
Navigation and Workspace Management: Efficient Workflow
Navigating efficiently within Adobe Photoshop is crucial to maintain a seamless workflow, particularly when working with complex designs or large files. That's where Photoshop's Navigation tools come into play, ensuring you have full control over how you view and move around within your projects.
Hand Tool: Panning Across Your Canvas
The Hand tool, accessible by pressing the 'H' key or selecting it from the toolbox, is a simple but essential tool for moving around your canvas. When you're zoomed into a document, you can click and drag the canvas to reposition your view without altering the artwork itself.
Zoom Tool: Magnifying Your View
The Zoom tool, available by pressing 'Z' or selecting it from the toolbox, is the main tool for changing the magnification of your image or artwork. You can click repeatedly to zoom in or out, or you can drag the Zoom tool over a specific area of your image to zoom directly into that area. Holding "Alt" or "Option" while using the Zoom tool reverses its function (zoom in becomes zoom out, and vice versa).
Rotate View Tool: Comfort in Angled Work
The Rotate View tool, accessible by pressing 'R' or selecting it from the toolbox, lets you non-destructively rotate your canvas view â perfect for more comfortable drawing and painting angles. This tool rotates your point of view without changing the actual orientation of the image data.
Navigator Panel: Overview and Quick Jumps
The Navigator Panel is another useful feature for navigating your image, especially large files. This panel, which can be found under 'Window' > 'Navigator', provides an overall view of your image. A red rectangle within the panel represents the area currently in view, and you can click and drag this rectangle to quickly jump to different parts of your image.
Icon Design Essentials in Photoshop
While Photoshop is primarily a raster-based editor, it offers powerful tools for creating scalable vector icons and mastering raster icon design.
Vector vs. Raster Icons
- Vector Icons: Vector icons are designed using mathematical equations, which means they can be infinitely scaled without any loss in quality. This makes them incredibly versatile for use across different platforms and sizes, from small UI elements to large print materials. Photoshop's Pen and Shape tools are instrumental in creating vector-based icons.
- Raster Icons: Raster icons, on the other hand, are pixel-based. This means they are composed of tiny squares of color. While they can be highly detailed, they have a limitation: when resized, especially enlarged, they can lose quality and appear pixelated or blurry. Raster icons are best used in specific, unchanging sizes.
Glyphs: Symbols as Characters
Glyphs are essentially characters that are used like text but represent symbols. These can be simple shapes, like arrows or checkmarks, or complex designs, like intricate icons. Glyphs are commonly used in fonts and are designed to be used in text flows, offering a consistent way to integrate symbols.
Setting Up Your Workspace for Icon Design
Before you even open the application, make sure youâre using a relatively recent version of Photoshop. Anything from Photoshop CS6 onwards will give you access to the most up-to-date tools and features youâll need. If youâre just starting, consider a subscription to Adobe Photoshop through Adobeâs Creative Cloud.
Photoshop offers customizable workspaces, allowing you to have the tools you use most frequently right at your fingertips. Essential panels for icon design include:
- Layers Panel: This will be your best friend for organizing elements, applying effects, and managing different states of your icon.
- History Panel: Ever wish you could undo a mistake like it never happened? The History panel allows you to revert to previous states of your design, offering a safety net for experimentation.
- Brushes Panel: Brushes come into play when youâre adding texture or details to your icons.
Saving your custom workspace layout ensures you can quickly revert to your preferred setup. To do this, go to Window > Workspace > New Workspace, name it, and save.
The Power of Layers in Icon Design
Imagine each layer as an ingredient in your digital "sandwich." In Photoshop, layers serve as the building blocks of your design. You can add texture on one layer, shapes on another, and text on yet another. The ability to work on different aspects of your design in isolation makes the editing process a breeze. Need to change the color of an element? Just select its layer and make the change without affecting other components. Layer styles, like drop shadows or bevels, can be applied to individual layers, allowing you to experiment with different effects without commitment. Grouping layers together, similar to putting ingredients in a specific section of the sandwich, makes managing complex icons much easier.
Resolution and Dimensions: The Cornerstone of Quality
When it comes to designing icons, the resolution and dimensions are often overlooked but crucial aspects that can make or break the quality of your end product.
- DPI (Dots Per Inch) and PPI (Pixels Per Inch): These essentially measure the density of dots or pixels in an inch of screen or printed space.
- 72 DPI: This is the standard resolution for web and screen displays.
- 300 DPI: This is the industry standard for print quality.Itâs always better to start with a higher DPI because you can scale down without losing quality. But remember, scaling up a low-res image will result in a pixelated disaster.
- Pixel Dimensions: The pixel dimensions of your icons depend on where you intend to use them. When starting a new project in Photoshop, you can set these dimensions in the âNew Documentâ dialog box. If youâre creating vector icons in Photoshop, the resolution and dimensions are less of a concern because vector images are scalable without quality loss.
Crafting Your Icon: Brushes, Effects, and Color
Creating icons in Photoshop is akin to painting a miniature masterpiece; every stroke, every shadow counts. When utilized effectively, brushes and effects can add texture, depth, and nuance that transforms a basic icon into a piece of art.
Brushes and Effects: Adding Texture and Depth
- Custom Brushes: The skyâs the limit with custom brushes, allowing you to mimic various textures, from gritty surfaces to soft watercolor effects. Pro Tip: Always create a new layer when experimenting with brushes for texture.
- Layer Styles (Bevel and Emboss, Drop Shadow, etc.): These effects can add a 3D appearance, depth, or subtle emphasis to your icons. Use them judiciously to enhance, not overpower, the design. Quick Note: When applying effects, itâs best to use them on separate layers or as layer styles to maintain flexibility.
Moderation is key. Too many effects can make an icon look gaudy or complicated. The platform where your icon will be used might have guidelines for effects and textures; for example, iOS often prefers flat design, while Android is more open to skeuomorphic elements. Think of brushes and effects as spices in cooking: they enhance flavor when used correctly, but too much can ruin the dish.
Color Theory: Evoking Emotion and Meaning
The color scheme is a significant player in design aesthetics.
- Harmony: Choose colors that work well together.
- Contrast: Utilize contrasting colors to make certain elements pop out.
- Context: Colors evoke emotions and meanings. Red can signify urgency or importance, while blue might represent calm or trust.Quick Hack: You can create your custom color palette by navigating to âWindowâ > âExtensionsâ > âAdobe Color Themesâ.
Text and SVG Symbols: Enhancing Usability
- Text Tool: The Text tool allows you to add letters, numbers, or words to your icons. Pro Tip: Always use the same font style, size, and color for all text elements within an icon set for consistency.
- SVG (Scalable Vector Graphics) Symbols: SVG symbols are great for more intricate elements that need to remain scalable. Incorporating text and SVG symbols can significantly enhance your icon setâs usability and aesthetic appeal.
Consistency and Best Practices for Icon Sets
In the realm of design, particularly with icons, consistency is not just keyâitâs the king. A cohesive icon set is more than just a random collection of pretty pictures; itâs a unified set where each icon feels like a part of a family.
Achieving Uniformity
- Uniform Style: Whether itâs flat, material, or skeuomorphic, stick to a single design style throughout your set.
- Consistent Size and Scale: The size and scaling of the icons should be uniform.
- Unified Color Scheme: This brings us back to color theory. Choose a palette and stick to it.
- Icon Purpose: Ensure each icon clearly represents its function or meaning.
Workflow and Quality Checks
- Saving: Always save your work in the PSD format to retain layers and editability.
- Review and Revise: Once the set is complete, review it in its intended environment. Test different sizes and in various applications.
- Quality Check: Before finalizing the export, always check the quality settings to ensure optimal performance. Remember, the devil is in the details.
Embracing Best Practices
- Align Your Icons: Proper alignment is the skeleton that holds your design upright.
- Test Different Sizes: Icons arenât one-size-fits-all. Ensure they look good at all intended scales.
- Keep It Simple but Expressive: The best icons convey their purpose with minimal elements, yet theyâre not so simple that they become bland.
- Iterate: Even after you think youâve nailed it, go back and tweak. Continuous refinement is key to exceptional design.
Mastering Photoshop icon sets is akin to holding a golden ticket in todayâs digital wonderland. In an era where visuals speak louder than words, the ability to create compelling and cohesive icons is invaluable. Remember, just like cooking or painting, mastering icon sets is an art that comes with practice. The canvas is blank, and the palette is vast; are you ready to apply these tips and tricks in your next design project?