In the realm of digital art and photography, conveying a sense of movement and dynamism is often crucial for creating impactful visuals. Photoshop's Radial Blur filter offers a powerful, albeit sometimes unintuitive, tool for achieving this. This tutorial delves deep into the intricacies of the Radial Blur filter, transforming it from a potentially frustrating tool into a precise instrument for adding action and excitement to your images. We will explore its application, the nuances of its settings, and crucially, how to overcome its primary limitation - the lack of a live preview - by leveraging Photoshop's non-destructive editing capabilities.
Understanding the Radial Blur Filter
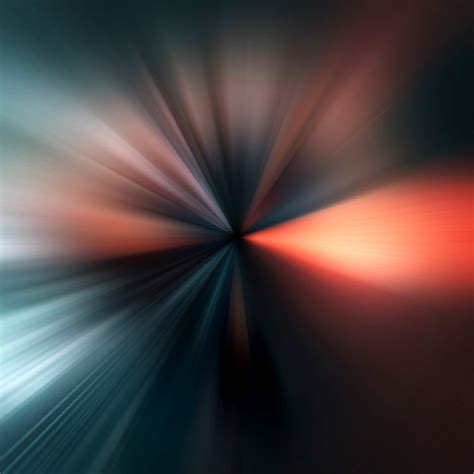
The core function of Photoshop's Radial Blur filter is to simulate the effect of rapid motion emanating from or converging towards a central point. This is achieved through two primary methods: "Zoom" and "Spin." The "Zoom" effect creates a sense of outward or inward motion, as if the viewer is either moving rapidly towards or away from the subject, or the subject itself is expanding or contracting. The "Spin" effect, on the other hand, simulates rotation around a central axis, useful for depicting circular motion.
The primary drawback often cited with the Radial Blur filter is its lack of a real-time preview within the filter's dialog box. This means that users cannot see the immediate impact of their chosen settings on the image before committing to them. This can lead to a trial-and-error process, potentially wasting time and resulting in suboptimal effects if not managed correctly. However, by employing specific techniques, this limitation can be effectively circumvented, ensuring a controlled and predictable outcome.
The Power of Smart Objects and Smart Filters
To overcome the preview limitation and ensure the Radial Blur effect remains fully editable and non-destructive, the use of Smart Objects and Smart Filters is paramount. A Smart Object is a layer that contains image data along with information about how it was created. When a filter is applied to a Smart Object, it becomes a "Smart Filter." This means the filter is not permanently applied to the pixels; instead, it's stored as a layer effect that can be modified, reordered, or even deleted at any time without degrading the original image quality.
The process begins by converting the layer containing your image into a Smart Object. This is typically done by right-clicking on the layer in the Layers panel and selecting "Convert to Smart Object." Once your layer is a Smart Object, any filter you subsequently apply, including Radial Blur, will automatically become a Smart Filter. This conversion is a foundational step for maintaining flexibility throughout your editing workflow.
Applying the Radial Blur Filter: Settings and Nuances
With the layer converted to a Smart Object, you are ready to apply the Radial Blur filter. Navigate to Filter > Blur > Radial Blur.... This action will open the Radial Blur dialog box, presenting you with several key controls:
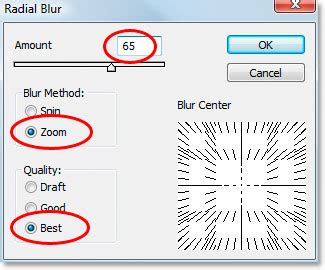
- Blur Method: Here, you select either "Zoom" or "Spin." For creating a sense of speed and action, "Zoom" is typically the preferred method.
- Amount: This slider dictates the intensity of the blur. Higher values will result in a more pronounced zoom effect. As mentioned, without a live preview, determining the ideal "Amount" requires careful consideration and often a bit of experimentation. The visual cues within the dialog box - the changing appearance of lines within the "Blur Center" square - can offer some indication, but the true effect is only revealed after application.
- Blur Center: This is a crucial control that defines the origin point of the zoom effect. A square representing your image is displayed, with a default center point. By clicking and dragging within this square, you can reposition the origin of the blur. This allows you to control where the "zoom" appears to be coming from, which is vital for aligning the effect with the perceived direction of motion. Precisely positioning this center is another area where the lack of a live preview necessitates careful placement based on visual estimation.
- Quality: This setting determines the rendering quality of the blur, offering options such as "Draft," "Good," and "Best." While "Best" provides the smoothest results, it also takes longer to render. For iterative adjustments, "Good" or even "Draft" can save time.
Once you have made your initial selections, click "OK" to apply the filter. Photoshop will then render the effect, which may take a few seconds depending on the image size and the chosen "Amount."
Refining the Effect with Layer Masks and Gradients
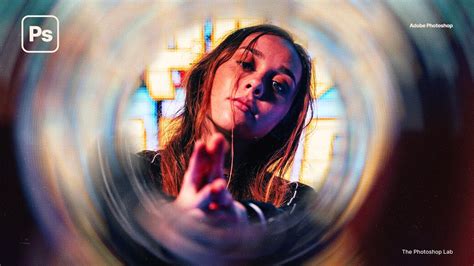
Upon applying the Radial Blur filter, you might find that the effect, while present, isn't precisely as desired. Perhaps the origin point is slightly off, or the intensity is too strong in certain areas. This is where the power of Smart Filters and layer masks truly shines. Below your Smart Object layer in the Layers panel, you will now see "Radial Blur" listed as a Smart Filter. Next to it is a mask thumbnail, initially white, indicating that the filter is applied across the entire layer.
To selectively reveal or hide the blur effect, you will work with this Smart Filter mask. Click on the mask thumbnail to select it. Now, you can use tools like the Gradient Tool to paint on this mask, controlling where the blur is visible. A common technique is to use a black-to-white radial gradient.
- Select the Gradient Tool: Choose the Gradient Tool from the Photoshop toolbar.
- Choose the Black, White Gradient: In the Options bar, select the "Black, White" gradient preset.
- Apply a Radial Gradient: Set the gradient type to "Radial Gradient."
- Draw the Gradient: Click and drag on your image, starting from the point where you want the original image to be fully visible (e.g., your main subject) and extending outwards. White on the mask reveals the filter (the blur), while black conceals it, showing the original image content. A gradient from black in the center to white at the edges will effectively bring your subject back into sharp focus while allowing the blur to emanate from around it.
The beauty of this approach is that you can see the mask being painted in real-time, allowing you to precisely control the transition between the sharp subject and the blurred background. If the zoom effect is still too intense even after masking, you can further refine it by adjusting the opacity of the Smart Filter itself. Double-clicking on the "Radial Blur" Smart Filter in the Layers panel will open its Blending Options, where you can lower the opacity to subtly integrate the effect.
Advanced Techniques for Motion Effects
Beyond the basic application of Radial Blur, several advanced techniques can enhance the realism and impact of your motion effects. One such scenario involves creating a convincing high-speed car photograph where the car remains sharp while the background is motion blurred.
How to Create Super Speed Effect in Photoshop
In this complex example, the process might involve:
- Subject Extraction: Precisely isolating the subject (e.g., a car) from its original background using tools like the Pen Tool for intricate selections.
- Background Compositing: Placing the extracted subject onto a new background designed to convey speed, such as a winding road with a vanishing point.
- Shadow Creation: Adding realistic shadows beneath the car to ground it in its environment and enhance the illusion of it being part of the scene.
- Lighting Adjustments: If the original subject was photographed stationary, turning on headlights or simulating light trails can further enhance the sense of motion.
- Perspective Correction: Slightly rotating the subject to match the curve of the road or the perceived motion can add a subtle but significant layer of realism.
- Smart Filter Application: Applying the Radial Blur filter as a Smart Filter to the background layers to create the motion blur.
- Masking Refinement: Carefully using layer masks and gradients to ensure the car remains sharp while the background exhibits the desired blur.
- Color and Brightness Adjustments: Boosting saturation and brightness can make the image more energetic and visually appealing.
- Flipping and Cropping: Sometimes, the direction of motion might need to be reversed, or the composition tightened through cropping to maximize the visual impact.
This example highlights how Radial Blur, when combined with other Photoshop techniques, can be instrumental in creating complex photographic illusions that would be difficult or impossible to achieve through traditional photography alone.
Considerations for Different Audiences and Applications
The Radial Blur effect can be adapted for a wide range of audiences and purposes. For a 5th-grade student, the concept can be simplified to "making things look like they're spinning really fast or zooming in" using a magic tool in Photoshop. The emphasis would be on the visual outcome and the fun of creating movement.
For a professional photographer or graphic designer, the focus shifts to the technical precision, non-destructive workflow, and creative control offered by Smart Objects and masks. They would be interested in how the filter can be integrated seamlessly into complex compositing projects or used to guide the viewer's eye through an image.
Beyond Photoshop: Alternative Tools
While Photoshop is a dominant force in image editing, it's worth noting that other software also offers radial blur capabilities. For Mac users, motion graphics editing tools often include robust Radial Blur filters. Furthermore, numerous mobile applications, both for Android and iOS, provide options to apply radial blur effects, either directly through the camera or during the editing process. Some popular examples include "Motion Blur Effect" and "Design Blur (Radial Blur)." These alternatives can be excellent for users who need quick and accessible ways to add motion to their photos without the extensive features of desktop software.
Conclusion: Unleashing the Power of Perceived Motion
Photoshop's Radial Blur filter, when approached with an understanding of its capabilities and limitations, becomes an indispensable tool for photographers and digital artists. By embracing Smart Objects and Smart Filters, users can maintain full control over the editing process, ensuring that the created motion effects are both dynamic and editable. The strategic use of layer masks and gradients allows for precise control over where the blur is applied, enabling the preservation of critical details in subjects while imbuing the surrounding scene with a sense of speed and energy. Whether simulating the thrill of a high-speed chase or simply adding a subtle sense of dynamism to a portrait, the Radial Blur filter, with these techniques, empowers creators to bring their images to life.