Creating realistic book cover mockups in Photoshop is an invaluable skill for anyone looking to visualize their creative projects. Whether you're a photographer showcasing your portfolio, an author presenting a novel, or a non-fiction writer preparing for publication, the ability to see your book design in a tangible, lifelike context can be incredibly impactful. This tutorial will guide you through a precise and effective method for achieving professional-looking book mockups, focusing on techniques that preserve the integrity of your original artwork.
Setting the Stage: Preparing Your Workspace
Before diving into the creative process, it's essential to prepare your Photoshop document. The initial step involves setting up guides that will act as precise reference points for aligning your book cover design.
To begin, open your chosen book cover image in Photoshop. Next, you'll need to create a new document that will serve as your mockup canvas. It's recommended to use a document size that is representative of a typical book. Once your canvas is ready, you'll need to bring in a template image of an open book. This template will be the foundation upon which your cover design will be applied.
Precision Placement: Utilizing Guides for Accurate Alignment
The accuracy of your mockup hinges on precise alignment. Photoshop's guides are instrumental in achieving this. To establish the correct placement for your book cover, you'll need to create both horizontal and vertical guides.
Click and drag from the rulers at the top and left of your Photoshop window to create these guides. The goal is to align these guides with the four corners of the book shown in your template image. This meticulous placement ensures that when you apply your cover design, it will conform to the book's perspective and dimensions naturally.
A helpful tip for managing guides: If you intend to create a vertical guide but accidentally drag out a horizontal one, you don't need to delete it. Simply hold down the Alt key (on Windows) or Option key (on macOS) while dragging the guide. This action will flip its orientation, allowing you to create the guide you intended without interruption.
Transforming Your Cover: The Power of Smart Objects
Once your guides are in place, it's time to prepare your book cover image for placement. For optimal flexibility and non-destructive editing, it's crucial to convert your book cover layer into a Smart Object.
To do this, locate your book cover layer in the Layers panel. Right-click on this layer and select "Convert to Smart Object." This conversion allows you to apply transformations and filters to the layer without permanently altering the original pixel data. You can always go back and edit the contents of the Smart Object later.
Now, with your book cover as a Smart Object, you can begin positioning it. Drag the corner handles of your book cover layer to the points where you placed your guides earlier. This step is where the guides truly shine, providing exact anchors for your cover image. Scale and position it carefully until it aligns perfectly with the four corners of the book template. Once you have properly placed the image, go to the Options bar and click on the checkmark to apply the changes.
Adding Depth and Realism: Warping and Adjustments
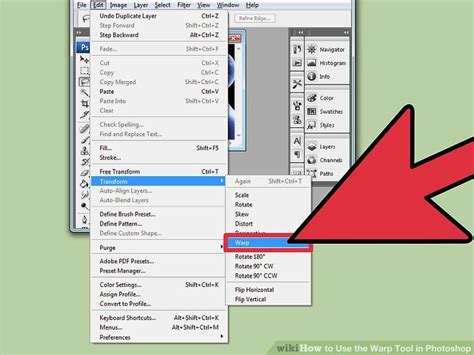
To make your mockup truly convincing, you need to account for the curvature and perspective of the book. This is where the Warp transformation comes into play.
First, clear out the document window to temporarily hide the guides, which can sometimes interfere with visual clarity. You can do this by pressing Ctrl ; (on Windows) or Command ; (on macOS). This action will not delete your guides; it will only hide them temporarily.
Now, select your book cover layer (which is a Smart Object) and press Ctrl T (Windows) or Command T (macOS) to activate the Free Transform tool. Right-click within the bounding box of the transformed layer and select "Warp." The Warp tool provides a grid with handles that allow you to manipulate the shape of your book cover to match the contours of the book. Carefully adjust the handles to bend and curve the cover image, making it appear as if it's naturally conforming to the book's spine and pages.
Integrating Shadows and Light: Enhancing the Photorealistic Effect
A key element in creating a realistic mockup is the proper integration of lighting and shadows. When you examine real photographs of books, you'll notice subtle shadows cast by the hands holding the book, or the way light falls on the cover.
On the original image, you will notice shadows created by the thumbs holding the book. At this point, the right thumb is covered by the Book Cover layer. To address this, you'll need to work with the layer masks of your book cover and potentially the background image. You may need to refine the mask of your book cover layer to reveal the thumb underneath, or use cloning and healing tools on the background layer to reconstruct the obscured area.
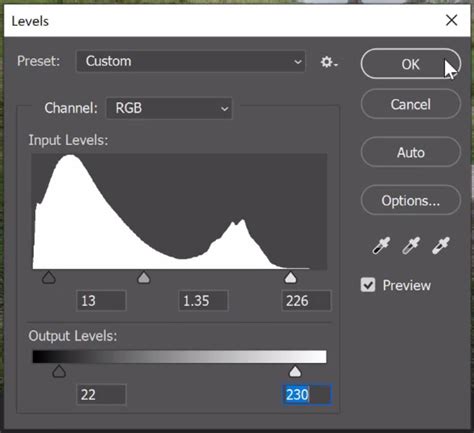
Furthermore, subtle adjustments to the brightness and contrast of your book cover layer can help it blend more seamlessly with the overall lighting of the scene. You can use adjustment layers like Curves or Levels to fine-tune these aspects.
A Pro Tip for adjusting the tonal range: Pay close attention to the Output Levels in the Levels adjustment. By default, the handle points to the darkest color of your image, which is black. Now, drag it to the right to make it less dark, subtly lightening the shadows on your cover. Do the same step for the white Output Level, dragging it to the left to increase the highlights if needed. These adjustments help to match the lighting on your cover with the lighting of the scene.
Advanced Techniques for Ultimate Realism
For those seeking an even higher degree of realism, consider these advanced techniques:
- Adding Subtle Texture: If your book cover design is a flat image, you might want to add a subtle paper or fabric texture to make it look more like a printed cover. You can achieve this by placing a texture image over your book cover layer and setting its blend mode to something like "Overlay" or "Soft Light," then adjusting the opacity.
- Refining Edges: Pay attention to the edges of your book cover. In a real photograph, there might be slight imperfections or variations. You can use soft brushes with low opacity to subtly feather or roughen the edges of your cover layer to enhance its realism.
- Creating Depth of Field: If your book mockup template has a shallow depth of field, you might want to apply a slight blur to your book cover layer to match the focus of the scene. This can be done using a subtle Gaussian Blur filter, often applied within a Smart Filter for non-destructive editing.
- Environmental Lighting: Observe the colors in the surrounding environment of your book template. You can use a Color Balance adjustment layer, clipped to your book cover layer, to subtly tint your cover with ambient colors, making it feel more integrated into the scene.
Mastering Selections and Masking for Professional Results
The ability to create precise selections and masks is fundamental to advanced Photoshop work, including the creation of realistic mockups. Understanding how to isolate elements, refine edges, and composite images seamlessly is crucial. If you're looking to elevate your Photoshop skills in this area, consider exploring comprehensive courses.
For instance, the "Selections and Masking Mastery Course" offers a deep dive into these techniques. This complete course includes 2.5 hours of step-by-step lessons, 6 structured modules, downloadable practice files, and custom Photoshop brushes designed to help you master the art of selections and masking. Learning these skills will not only enhance your book mockup abilities but also empower you in countless other Photoshop projects.
Jesús Ramirez, a renowned digital graphics expert, speaker, and educator specializing in Adobe Photoshop, is the creator of such valuable resources. He is best known as the founder of the Photoshop Training Channel, one of the most popular Photoshop YouTube channels worldwide, a testament to his expertise and ability to convey complex information effectively.
How to use Photoshop layer masks for beginners
By following these steps and incorporating advanced techniques, you can create highly convincing and professional book cover mockups in Photoshop that will effectively showcase your creative vision. Remember that practice and attention to detail are key to achieving the most realistic results.