Adobe Photoshop, a powerhouse for image editing and manipulation, offers various methods for saving your creations in the Portable Network Graphics (PNG) format. This file type has become indispensable for digital design, particularly for web applications, owing to its robust support for transparency and lossless compression. While the process can seem straightforward, understanding the nuances of each saving method and troubleshooting common issues can significantly enhance your workflow and the quality of your final output.
Understanding the PNG Format: Why It's a Designer's Favorite
The PNG file format stands out for several key reasons that make it a preferred choice for designers, especially those working with web graphics.
Transparency and Semi-Transparency Support
One of the most celebrated features of PNG files is their ability to support transparent backgrounds and semi-transparent images. This capability is crucial for web designers who need to overlay images onto different backgrounds without the appearance of a solid, unwanted border. Whether it's a logo that needs to blend seamlessly with a website's design or an icon that must adapt to various color schemes, PNG's transparency handling is unparalleled.

Lossless Compression: Preserving Image Quality
PNG files employ a lossless compression technique. This means that when an image is compressed, no data is lost in the process. Unlike lossy compression methods (like JPEG, which discards some image data to achieve smaller file sizes), PNG retains all the original pixel information. This is another reason why logo designers and anyone concerned with maintaining the absolute fidelity of their images love this file type. The integrity of the image is preserved, ensuring sharp edges and vibrant colors, even after repeated saves.
Versatility and Ease of Use
It's easy to work with PNG formats. Their widespread support across different browsers and operating systems, coupled with their ability to handle transparency and maintain quality, makes them incredibly versatile. For many common graphic design tasks, particularly those intended for digital display, PNG is often the go-to format.
Methods for Saving as PNG in Photoshop
Photoshop provides multiple avenues for exporting your work as a PNG file, each offering slightly different controls and workflows.
1. Using the "Save As" Command
The traditional "Save As" command is a familiar tool for many Photoshop users. While it offers a direct route to saving files, its PNG options are somewhat basic compared to more specialized export features.
To use this method:
- Go to
File > Save As.... - In the "Save As" dialog box, choose "PNG" from the "Format" dropdown menu.
- Select a location to save your file and click "Save."
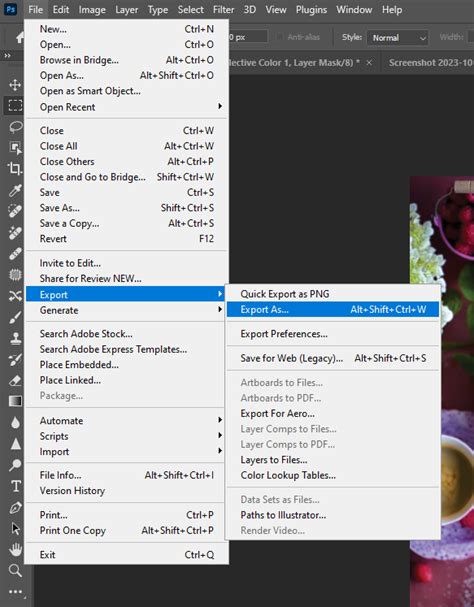
2. Leveraging the "Export As" Command
The "Export As" feature is a more modern and powerful tool within Photoshop, designed to give users greater control over their export settings. This is often the recommended method for saving PNGs due to its flexibility.
To use "Export As":
- Go to
File > Export > Export As.... - In the "Export As" dialog box, ensure "PNG" is selected as the format.
- You will see several options:
- Image Size: Adjust the dimensions of your exported image.
- Canvas Size: Modify the overall canvas dimensions.
- Resample: Choose your resampling method if resizing.
- Background: This is where you control transparency. Select "Transparent" to enable it. If you choose a color, it will be filled with that color.
- Color Space: You can convert to sRGB for web use.
- Metadata: Include or exclude copyright and contact information.
- Color Reduction: For PNG-8, you can reduce the color palette, but for standard PNG-24 (which supports full transparency and millions of colors), this is less relevant.
- Click "Export All" or "Export" to save your PNG file.
3. Utilizing the "Save for Web (Legacy)" Command
The "Save for Web (Legacy)" command is an older but still very capable feature that offers granular control over image optimization for the web, including PNG formats.
To use "Save for Web":
- Go to
File > Export > Save for Web (Legacy).... - In the "Save for Web" dialog box, select "PNG-24" from the "Preset" or "Format" dropdown menu.
- Ensure "Transparency" is checked if you need a transparent background.
- You can adjust other settings like image size and color palette.
- Click "Save…" to choose a location and name for your file.
While "Export As" is generally favored for its modern interface, "Save for Web (Legacy)" can still be useful for specific optimization tasks.
4. Quick Export as PNG
For users who frequently export PNG files with consistent settings, Photoshop offers a "Quick Export" option. This allows you to define default PNG export settings that can be applied with a single click.
To set up and use Quick Export:
- Go to
Edit > Preferences > Export...(orPhotoshop > Preferences > Export...on macOS). - Under "Quick Export," select "PNG" as the default format.
- Configure the PNG settings as desired (e.g., transparency, sRGB).
- Now, when you go to
File > Export > Quick Export as PNG, your image will be exported with these preset settings to a default location (usually a subfolder named "Exported" in your document's directory).
This method is excellent for rapid iteration and exporting assets without needing to go through a full dialog box each time.
Troubleshooting: Why Can't I Save My File as a PNG in Photoshop?
Despite the seemingly simple nature of saving as a PNG, users sometimes encounter situations where the option is unavailable or the resulting file isn't as expected. Here are common reasons and their solutions:
1. Incorrect Color Mode
One of the most frequent reasons you might not be able to save as a PNG is that your document is in an incompatible color mode. Photoshop will not make the PNG format available if the color mode is not suitable.
- Problem: Your document might be in CMYK color mode, which is primarily used for print and is not directly supported for PNG export with full transparency.
- Solution: To enable PNG saving, you need to convert your document's color mode.
- Go to
Image > Mode. - Select
RGB Color. If your image is currently 32-bit, you may need to convert to 8-bit first (Image > Mode > 8 Bits/Channel).
- Important Note: If you are working on a print project and need to maintain CMYK, you will need to duplicate your document or convert it specifically for web export.
- Go to
2. The Bit-Depth Is Too High
The bit-depth of an image determines how much data is stored in each color channel, directly impacting the quality and file size. While PNG supports various bit-depths, certain settings or combinations might interfere with saving.
- Problem: Extremely high bit-depth settings, particularly in conjunction with specific color modes or advanced features, can sometimes lead to saving issues.
- Solution: Ensure your document is set to an appropriate bit-depth for PNG.
- Go to
Image > Mode > 8 Bits/Channelor16 Bits/Channel.
- Consideration: Switching between different bit-depth values in the middle of a job will alter the image slightly. 8 Bits/Channel is standard for most web graphics, offering a good balance of quality and file size. 16 Bits/Channel provides greater color depth and is useful for high-end retouching and HDR images, but results in larger file sizes and may not be necessary for typical PNG exports. For most web use cases, 8 Bits/Channel is sufficient.
- Go to
3. Settings/Preferences Need Adjustment
Sometimes, a configuration issue within Photoshop's preferences can prevent certain export options from functioning correctly.
- Problem: Corrupted preferences or specific settings might be hindering the PNG export process.
- Solution: Resetting Photoshop preferences can resolve many underlying software glitches.
- To reset preferences: Close Photoshop. Then, press and hold
Ctrl + Alt + Shift(Windows) orCommand + Option + Shift(macOS) immediately after clicking the Photoshop icon to launch it. You will be prompted to delete the settings file.
- Caution: By resetting all preferences, you will lose all the customizations you have made to your Photoshop workspace, including custom shortcuts, actions, and layout settings.
- To reset preferences: Close Photoshop. Then, press and hold
4. Saving as PSD First (Newer Versions)
In some instances, particularly with newer versions of Adobe Photoshop, the direct "Save As PNG" option might be less prominent or behave differently.
- Problem: You might find that the direct PNG export is not immediately available or intuitive.
- Solution: Newer versions of Adobe Photoshop may allow you to do so if you save it as a PSD first. While this adds an extra step, it ensures compatibility and can then be followed by an export process.
- Save your work as a Photoshop Document (
.PSD) viaFile > Save As.... - Then, use the
Export As...orSave for Web (Legacy)...commands to save the PSD content as a PNG.
- Save your work as a Photoshop Document (
Advanced Techniques and Scripting
For users who perform repetitive export tasks or require highly customized batch processing, scripting offers a powerful solution.
Custom Scripts for Batch PNG Export
Adobe Photoshop supports JavaScript (JSX) scripts that can automate complex workflows. A well-written script can streamline the process of saving multiple files in PNG format, applying consistent settings, and organizing them into specific folders.
One such script, often referred to as SaveTo.jsx, can automate the saving process. This script, tested in Photoshop and Illustrator CC, can be placed in the "Photoshop/Scripts" folder, making it accessible via File > Scripts > SaveTo after a Photoshop restart.
Example Script Logic (Conceptual):
The core of such a script involves iterating through desired export formats, prompting the user for output locations, and applying specific save options. For instance, a script might look for a variable like output_folder and use Folder.selectDialog() to let the user choose where to save the files. It would then define save_options that specify the desired format (e.g., 'png'), and use the doc.saveAs() method to perform the export.
// Conceptual snippet of a SaveTo.jsx scriptvar doc_path = ""; // Initialize document path variablevar output_folder = Folder.selectDialog( 'Output folder', doc_path === "" ? doc.path : new Folder(doc_path) );if (output_folder) { // ... logic to define save options for PNG ... var save_options = new ExportOptionsSaveForWeb(); save_options.format = SaveDocumentType.PNG; save_options.transparency = true; // Example: enable transparency var dialog_filename = app.activeDocument.name.replace(/\.[^\.]+$/, ''); // Get base filename // ... loop through formats or perform single save ... app.activeDocument.saveAs( new File( output_folder + '/' + dialog_filename + '.png' ), save_options, true, Extension.LOWERCASE ); alert("File saved as PNG to: " + output_folder);} else { alert("Save cancelled.");}Photoshop Tutorial: How to do BATCH PROCESSING
Automating Shortcuts
For even greater efficiency, third-party applications on macOS like Alfred can be used to set global shortcuts for these scripts. This allows users to trigger complex export operations with a simple keyboard command, regardless of which application is currently active. This approach bypasses the need to manually navigate Photoshop's menus and the "Photoshop/Scripts" folder, especially useful when dealing with updates that might change script locations.
Conclusion: Choosing the Right Method
The best method for saving as a PNG in Photoshop ultimately depends on your specific needs and workflow. For most users, the "Export As" command offers the most balanced combination of control, clarity, and modern features. "Quick Export" is ideal for speed and repetitive tasks. The "Save As" and "Save for Web (Legacy)" commands remain viable options, while scripting provides the ultimate solution for advanced automation. By understanding these methods and troubleshooting common issues, you can ensure that your PNG exports are efficient, high-quality, and perfectly suited for their intended purpose.