Adobe InDesign offers powerful tools for designers to control every aspect of their typography. One such capability, often a subject of discussion and sometimes confusion, is the ability to convert text into editable paths, commonly known as creating outlines. This process fundamentally transforms characters from font data into vector shapes, offering unique advantages for print production and creative manipulation, while also presenting certain considerations that designers must be aware of.
Understanding the "Why" Behind Text Outlining
Before delving into the "how," it's crucial to grasp the rationale behind converting text to outlines. The primary motivations often revolve around ensuring the precise appearance of text, preventing font substitution issues, and enabling advanced manipulation of text as graphic elements.
One of the most significant benefits of outlining text is that it preserves the exact appearance of the text. This means that the characters will render identically on any system, regardless of whether the original font is installed. This is particularly important when preparing files for professional printing. If a printer does not have the specific font used in a document installed on their system, their software might substitute it with a different, albeit similar, font. This substitution can lead to unexpected changes in spacing, kerning, and overall aesthetic, potentially compromising the designer's vision. By converting text to outlines, designers ensure that the visual integrity of their typography is maintained, acting as a safeguard against such font substitution errors.
Furthermore, outlining text allows for advanced manipulation of text shapes. Once converted, each letter becomes a series of editable paths, much like any other vector graphic. This opens up a world of creative possibilities. Designers can modify individual letterforms, distort them, combine them with other shapes, or apply unique effects that wouldn't be possible with live text. This capability is invaluable for creating custom logos, distinctive headlines, or unique typographic treatments that stand out.
However, it is critically important to understand that once text is outlined, it is no longer editable as live text. This is a fundamental trade-off. The dynamic nature of text - the ability to easily change characters, words, or entire paragraphs - is lost. This means that any spelling errors, grammatical mistakes, or desired content revisions must be addressed before the outlining process.
The Two Paths to Outlining Text in InDesign
Adobe InDesign provides two primary methods for converting text to outlines: converting an entire text frame or converting only selected text within a frame. Both methods achieve the same fundamental outcome but offer flexibility depending on the designer's specific needs.
Converting Selected Text to Outlines
This method is ideal when you want to apply unique artistic treatments to specific characters or words without affecting the rest of the text.
- Select the Text: Using either the Selection Tool or the Type Tool, highlight the specific letter, word, or group of words you wish to convert.
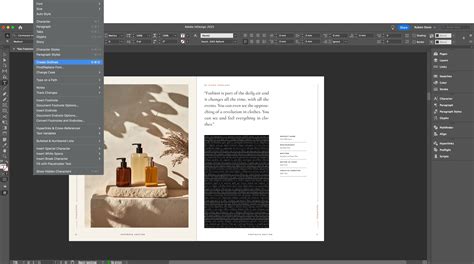
- Access the Create Outlines Command: Navigate to the Type menu in the InDesign toolbar.
- Choose "Create Outlines": Select the Create Outlines option.
It's important to be mindful of the spacing around the selected text before and after conversion. As noted by an instructor, "when I select it, watch the spacing around that letter R, see how it changed a little bit, the space between the R and the letters around it got smaller." This subtle shift can occur because the outlines are now treated as graphic shapes, and their bounding boxes might interact differently with surrounding elements than live text.
Converting an Entire Text Frame to Outlines
This approach is often used when preparing a document for a printer who specifically requests outlined fonts, or when the entire text block is intended to be a static graphic element.
- Select the Text Frame: Use the Selection Tool to click on the text frame containing the text you want to outline.
- Access the Create Outlines Command: Navigate to the Type menu.
- Choose "Create Outlines": Select the Create Outlines option.
When converting an entire frame, InDesign processes all the text within that frame, transforming each character into an editable path.
Crucial Preparatory Steps Before Outlining
To ensure a smooth and error-free outlining process, several preparatory steps are highly recommended. These actions help prevent potential issues and preserve the integrity of your design.
Ensure Text Is Not Overset
Overset text refers to text that does not fit within its designated text frame, indicated by a small plus sign in the text frame's out port. Overset text will not convert to outlines. Before proceeding, always ensure that all text is visible and that there are no overflow issues. You can resolve this by resizing the text frame, adjusting the font size, or editing the text content.
Check for Spell Errors or Final Edits
As mentioned, once text is converted to outlines, it loses its editability as live text. Therefore, it is imperative to make any final edits, including spell checks and grammatical corrections, before converting. This ensures that you don't have to re-create outlines or revert to an earlier version of your file to make simple text changes.
Save Your File Separately
This is perhaps the most critical piece of advice. Save your file with a new name before converting text to outlines. This creates a distinct, outlined version of your document while preserving the original file with live, editable text. This backup is invaluable. If you later need to make changes to the text, you can easily revert to the original file, make your edits, and then re-outline if necessary. This practice is strongly advocated by printing services like Thomas Group Printing, who state, "If we need to open and work with the original file format to make any corrections, we won’t be able to edit text unless it is embedded in the design file. This is why we prefer to receive design files with embedded fonts rather than outlined fonts."
The Controversial Practice: Why Outline (and Why Not To)
The practice of converting text to outlines is not without its detractors, and many experts argue that it is often unnecessary and can even be detrimental. Understanding these arguments is key to making an informed decision.
Debunking Common Arguments for Outlining
Historically, the idea of converting text to outlines gained traction as a perceived solution to various print production challenges. However, many of these concerns are now outdated or better addressed by modern workflows.
- "A font may result corrupted": The likelihood of a font file becoming corrupted during transfer is minimal, especially when using PDF. Converting text to outlines does not inherently prevent transfer errors.
- "The computer used by my printing service may contain a Font with the same name as mine, but of a slightly different version": While font versions can differ, the practice of embedding fonts within a PDF file effectively circumvents this issue. When fonts are embedded, they are packaged with the PDF, ensuring that the correct version is used for rendering.
- "The incorporated Font could lose some glyphs": Adobe InDesign is designed to embed all necessary font data into PDFs. This ensures that the font is visualized correctly, and there is no chance of glyphs being lost during the process.
Reasons Why You SHOULDN'T Convert Text to Outline
The consensus among many design and print professionals is that converting text to outlines should be avoided unless absolutely necessary. Here are the primary reasons:
- Quality Degradation: When text is converted to outlines, the glyphs transform into shapes. This process can cause the text to lose some of the font's inherent automations. These automations are designed to ensure high quality rendering, especially at smaller sizes or lower resolutions. Outlined text, while vector-based, might not possess the same level of optimized rendering as text handled by a proper font engine.
- Loss of Formatting: Certain text attributes are applied by InDesign as formatting and are not inherent to the character itself. This includes underline, overline, bullet points, and enumeration. These elements are often lost during the conversion process, requiring manual reapplication.
- Irreversibility: As stressed before, there is no going back. Once you convert your text into outline, you are working with shapes. You lose the ability to easily edit the text content.
- Increased File Size: Outlined text significantly increases the size of your PDF file. This is because each letter is no longer represented by a small font instruction but by a complex vector shape. A PDF with outlined fonts will be much larger than a normal one with embedded fonts.
The Printer's Perspective and Expert Opinions
Despite the drawbacks, the practice of outlining text persists, often due to requests from printing services. However, many industry experts, including Dov Isaacs, Adobe Principal Scientist, strongly advise against it. Isaacs states, "We are aware of various “print service providers” who are under the distinct wrong impression that converting text to outlines is somehow more reliable that leaving text as text realized by fonts. Other than some dicey, prehistoric RIPs based on non-Adobe technology going back over fifteen years or more, we are not aware of any problem during the RIP process due to fonts. If the font is embedded in the PDF and view correctly in Adobe Acrobat, it should RIP!"
Thomas Group Printing echoes this sentiment, preferring embedded fonts: "Thomas Group Printing is a fourth-generation family-owned and operated NYC professional printing company. … we prefer that customers embed fonts in their design files instead, which allows for us to make edits to your file if needed in order to ensure it prints correctly." They further explain that embedding fonts allows their preflight team to "easily make adjustments to the artwork even without owning the font when you have them embedded."
Legal Considerations
From a legal standpoint, InDesign incorporates characters in PDFs if the End-User License Agreement (EULA) for the font permits it. If a font's EULA prohibits embedding, it also likely prohibits conversion to outlines. Legally speaking, if you plan on going beyond those restrictions by converting text into outline, you should be aware that fonts that can’t be incorporated, can’t be converted into outline either.
Alternative and Preferred Methods: Embedding Fonts
Given the disadvantages of outlining, the industry-standard and preferred method for ensuring font fidelity in print is embedding fonts within the PDF. This process packages the necessary font data with the document, allowing it to be displayed and printed correctly on any system without altering the text's editability.
How to Embed Fonts in a PDF from InDesign
When exporting your InDesign document to PDF, ensure that font embedding is enabled.
- Go to File > Export.
- Choose Adobe PDF (Print) as the format.
- In the Export Adobe PDF dialog box, navigate to the Compression or Advanced tab (depending on your InDesign version).
- Under the Font section, ensure that "Embed all fonts" or a similar option is selected.
- Proceed with your export settings.

Outlining Fonts in Adobe Acrobat: A Workaround
While the direct outlining method in InDesign is straightforward, some designers prefer to outline fonts at the PDF stage as a workaround for potential formatting loss in InDesign. This is particularly useful if specific text effects are critical and might be lost during InDesign's outlining process.
- Create a PDF from InDesign: Export your InDesign document as a PDF, ensuring fonts are embedded.
- Open in Adobe Acrobat Pro DC: Open the generated PDF file in Adobe Acrobat Pro.
- Access Print Production Tools: Click on "More Tools" on the right-hand bar. In the sub-menu, under "Protect & Standardize," click on "Print Production."
- Utilize PDF Fixups: On the right-hand panel that opens, click on "PDF fixups." Alternatively, you can search for "Convert fonts to outlines" in the search field at the top right.
- Apply the Fixup: Double-click the "Convert fonts to outlines" option or click "Analyze and Fix."
- Save the New PDF: Acrobat will prompt you to save the modified PDF with a new name.
Verifying Font Conversion in Acrobat
To confirm that all fonts have been successfully converted to outlines in your PDF:
- Open the PDF in Acrobat.
- Go to File > Properties.
- Select the "Fonts" tab.
- You should see that there are no longer any fonts listed; all characters have been converted into paths.
ADOBE ACROBAT XI PRO - CONVERT TEXT TO OUTLINE
Best Practices for Print-Ready Files
Ultimately, the goal is to deliver print-ready files that printers can work with efficiently and accurately.
- Use Fonts That Allow Embedding: Opt for fonts that permit embedding in their EULA. Many fonts from sources like Adobe Fonts (formerly TypeKit) allow for this.
- Allow InDesign to Incorporate Characters: When creating PDFs from InDesign, ensure that the default setting of embedding fonts is active.
- Prioritize Embedded Fonts Over Outlined Fonts: Unless explicitly instructed otherwise by a printer for a very specific reason, embedding fonts is the superior method. It maintains editability and often results in smaller file sizes.
- Communicate with Your Printer: If a printer insists on outlined fonts, understand their specific reasons. Sometimes, older or specialized printing equipment might have limitations. However, always try to advocate for embedded fonts first.
By understanding the nuances of text outlining, its advantages, and its significant drawbacks, designers can make informed decisions that ensure both creative control and efficient, high-quality print production. While the ability to convert text to outlines in InDesign is a powerful feature, it should be employed judiciously, with a clear understanding of its implications.