Creating clear, defined outlines around subjects in images is a fundamental skill in digital art and graphic design. Whether you aim to enhance product photography for e-commerce, design eye-catching social media graphics, produce professional logos, or prepare images for print and cutting, understanding how to effectively outline in Adobe Photoshop is crucial. This guide delves into various techniques for generating outlines, from simple image borders to intricate detailing around complex edges, catering to users of all skill levels.
The Power and Purpose of Image Outlines
In the realm of digital imaging, computer graphic systems offer a plethora of tools for image manipulation. While advanced software like Adobe Photoshop, Adobe Illustrator, and Adobe InDesign provide sophisticated features for editing and resizing 2D images without compromising quality, the specific task of creating a precise outline often requires dedicated methods. Image outlining, in essence, is the process of generating a clear border around a subject within an image. This border can be soft, sharp, colored, or creative, depending on the intended design outcome.

The utility of image outlines in Photoshop is multifaceted:
- Enhanced Subject Visibility: An outline acts as a visual anchor, drawing the viewer's attention to the main subject by lifting it against the background. This is particularly effective for elements like YouTube thumbnails, where immediate recognition is key.
- Product Presentation: Online stores rely on crisp, clear product images to drive sales. A subtle outline can make a product appear sharper and more vibrant, improving its overall appeal.
- Custom Sticker Creation: By applying a thick, often white, outline to an image, you can transform it into a visually appealing sticker, ready for digital or physical use.
- Logo Design: Clean and bold logos are paramount for brand recognition. Outlining shapes or icons within a logo provides a sharp edge, ensuring readability and prominence on both light and dark backgrounds.
- Attention-Grabbing Graphics: In busy online feeds, an outlined image can stand out, adding a modern stylistic flair and increasing its eye-catching potential.
- Subject Separation: When an image suffers from background clutter, a clean outline effectively isolates the main subject, making it easier for the viewer to discern.
- Print and Cutting Preparation: Many print shops, sticker companies, and label manufacturers utilize image outlines as guides for their machinery, ensuring precise cutting and printing.
Preparing for Image Outlining
Before diving into the outlining process, a few preparatory steps can ensure a more professional and seamless workflow.
- Photoshop Version Compatibility: Most modern versions of Photoshop, including Photoshop CC, CS6, and Photoshop Elements, support various outlining techniques. While older versions might have slightly different menu layouts, the core functionalities remain consistent.
- File Type Selection: For optimal outlining, especially when transparency is desired, PNG files are highly recommended due to their support for transparent backgrounds. JPEGs can also be used, but it's important to remember they always include a background.
- Accurate Image Selection: Photoshop will outline whatever is selected. Therefore, achieving a clean and precise selection of your subject is paramount. For beginners, the Quick Selection Tool or the "Select Subject" feature can automatically detect edges. For highly precise selections, the Pen Tool or Lasso Tool are invaluable.
- Outline Style Consideration: Before starting, contemplate the desired aesthetic. Do you envision a thin, subtle border, or a bold, prominent outline? The intended use of the image will dictate this choice.
- Save a Copy: Always work on a duplicate of your original image. This ensures that your original file remains intact and provides a safety net in case of any editing errors.
Method 1: The Layer Style "Stroke" for Simple Outlines
This is arguably the most straightforward and editable method for creating outlines in Photoshop. It's ideal for images where the subject is clearly defined and doesn't possess complex edges like fine hair or fur.
Steps:
- Open Image: Launch your chosen image in Photoshop. Ensure that the layer containing your image is unlocked.
- Select Layer: In the Layers panel, click on the layer you wish to outline. This tells Photoshop precisely where to apply the outline.
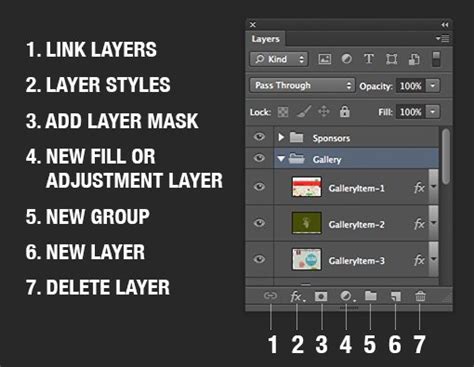
- Access Layer Styles: Click the "fx" icon at the bottom of the Layers panel and select "Stroke" from the dropdown menu.
- Adjust Stroke Settings: A Layer Style dialog box will appear, focused on the "Stroke" options. Here, you can fine-tune the outline:
- Size (1-50 px): Controls the thickness of the outline. Smaller values create subtle outlines, while larger values result in bolder ones.
- Position:
- Inside: The stroke is applied to the inside edge of the selection.
- Center: The stroke is centered on the edge, straddling both inside and outside.
- Outside: The stroke is applied to the outside edge of the selection, creating clean outlines without altering the perceived shape of the object.
- Blend Mode: Typically set to "Normal" for a solid, opaque outline.
- Opacity: Determines the transparency of the outline.
- Color: Click on the color swatch to open the Color Picker.
- Choose Outline Color: Select a color that contrasts effectively with your image's background. For instance, a white stroke stands out on dark backgrounds, while black or dark strokes work well on light backgrounds.
- Preview and Refine: Observe the outline on your image in real-time as you adjust the settings. For subjects with thin lines, a slightly thicker stroke might be necessary for visibility.
- Confirm: Once satisfied with the appearance, click "OK." The outline is now applied and remains fully editable. You can revisit the Layer Style settings at any time to change the color, size, or position of the stroke.
Method 2: Outlining Text in Photoshop
Adding outlines to text can significantly improve its readability and aesthetic appeal, especially in designs where text needs to stand out.
Steps:
- Type Your Text: Select the Type Tool (T) and input your desired text. Choose a font that complements your design. Bold or thicker fonts are often preferable for outlines as they provide more space for the stroke to be visible.
- Open Layer Style: Double-click the text layer in the Layers panel to open the Layer Style window.
- Configure Stroke: Click on "Stroke" in the Layer Style panel. You can adjust the following:
- Size: Controls the outline thickness.
- Position: "Inside," "Center," or "Outside" affects how the stroke is applied relative to the text's edge. "Outside" often yields clean results.
- Blend Mode: Usually "Normal."
- Opacity: Controls transparency.
- Color: Select a color that provides good contrast with the text's fill color and the background.
- Enhance with Additional Styles (Optional): The Layer Style window offers other effects like Drop Shadow, Inner Glow, and Outer Glow, which can further enhance the text's appearance.
- Consider Fill Opacity: To achieve a lighter look where the text fill is less opaque while preserving the outline, reduce the "Fill Opacity" of the text layer.
Advanced Text Outlining:
For more intricate control, you can convert text into a vector shape. This offers greater customization but can make text editing more challenging later. Another technique involves adding multiple strokes. After applying the first "Stroke" layer style, click the "+" icon next to "Stroke" in the Layer Style panel to add a second stroke. You can then adjust the color and size of each stroke independently, creating layered outline effects.
Note on Photoshop iPad: Currently, outlining text directly on Photoshop for the iPad is not supported. Text customization on the iPad version is limited to font changes, opacity adjustments, and similar basic modifications.
Method 3: Handling Soft Edges and Complex Details
Outlining subjects with soft edges, such as hair, fur, smoke, fabric fibers, or feathers, presents a unique challenge due to their fine details and gradual transitions. Basic selection tools often fall short here.
Steps:
- Precise Selection: Begin by making the most accurate selection possible. Start with tools like the Quick Selection Tool or "Select Subject," and then meticulously refine the selection.
- Enter Select and Mask: Navigate to the "Select and Mask" workspace. This environment is specifically designed to handle complex and soft edges more effectively. Use the Refine Edge Brush Tool within this workspace to paint over areas with messy edges.
- Export as Layer Mask: Once your selection is refined, export it as a Layer Mask. Layer Masks allow for non-destructive hiding or revealing of image areas using brushes.
- Create a New Layer for Outline: Above your masked subject layer, create a new, blank layer. Apply the "Stroke" layer style to this new layer, rather than directly to the masked layer.
- Fine-Tune Stroke for Soft Edges: For soft objects, a hard outline can appear unnatural. Switch the "Position" of the stroke to "Outside" to ensure the outline remains visible and doesn't cut into the subject's details. Experiment with stroke size and color to achieve a balanced look.
- Masking Imperfections: If parts of the outline still appear uneven, use a soft black brush on the Layer Mask to hide any unwanted outline elements.
Method 4: Creating Borders and Frames
Adding a border or frame around an image is a simple yet effective way to enhance its presentation.
Steps:
- Prepare Your Image: Open your photo in Photoshop. If you have multiple layers from previous edits, it's often best to flatten the image by going to
Layer > Flatten Image. This consolidates everything onto a single "Background" layer. - Create a Working Layer: To preserve the original image, create a new layer from the background by going to
Layer > New > Layer from Background. - Adjust Canvas Size: Go to
Image > Canvas Size. Ensure the "Relative" checkbox is selected. Enter the desired number of pixels to add around your image for the border. Each value entered is divided between opposite edges, so entering 200 pixels in each field results in a 100-pixel border width. Using positive numbers enlarges the border, while negative numbers can create a thinner border (though this is less common for framing). - Add a Solid Color Fill: Click the "Create a New Fill or Adjustment Layer" button at the bottom of the Layers panel and choose "Solid Color." This will fill the added canvas space with your chosen color, creating the border.
- Save a New Version: To maintain flexibility, save this framed image as a new file using
File > Save As.
Advanced Techniques and Considerations
Multiple Outlines: For a more dynamic and visually interesting effect, you can apply multiple strokes. After adding the first "Stroke" layer style, click the "+" icon next to "Stroke" in the Layer Style window to add subsequent strokes. Each stroke can have its own color, size, and blend mode, allowing for layered outlines. This technique is useful for creating a "pop" effect or a stylized border.
Vector Paths for Scalability: For graphics that need to be scaled infinitely without losing quality, converting selections into vector paths is ideal. After making a selection, you can save it as a "Work Path" in the Paths panel. This path can then be used to generate custom shapes or be stroked with precise control. This is particularly relevant when turning drawings or screenshots into icons, ensuring sharp edges at any size.
How to Convert Raster Image to Vector with Pen tool (Shape) | Lecture: 52 part: 1 | Adobe photoshop
Icon Creation from Drawings/Screenshots: The process of turning a sketch or screenshot into a reusable icon involves several steps. After importing the sketch (often via a phone photo), you might need to apply a slight blur to smudge areas together, then use "Levels" (Ctrl/Cmd+L) to define edges. Inverting the selection (Ctrl/Cmd+Shift+I) and then creating a work path from it allows for vector-based icon elements. These can then be added to custom shapes within Photoshop or saved into CC Libraries for easy access across Adobe applications.
Common Mistakes to Avoid
- Overcomplicating the Process: While Photoshop offers many tools, sticking to the most appropriate method for the task at hand will yield better results and save time.
- Poor Initial Selection: The quality of your outline is directly proportional to the quality of your initial selection. Invest time in making a clean and accurate selection, especially for complex subjects.
- Ignoring Soft Edges: Applying a standard stroke to soft or fuzzy edges can look unnatural. Utilize the "Select and Mask" workspace and Layer Masks for these scenarios.
- Not Saving Originals: Always work on duplicates to avoid losing your original image data.
Professional Outsourcing
For businesses or individuals who require high-quality, precise image outlining and other photo editing services, professional services like Clipping Path Experts (CPE) offer a solution. Their team of experienced designers specializes in various Photoshop services, including multiple clipping paths, image masking, raster-to-vector conversion, photo retouching, and color correction. Outsourcing can save valuable time and ensure a professional, polished final product.
By understanding and applying these techniques, users can effectively create compelling outlines in Photoshop, enhancing the visual impact and utility of their images across a wide range of applications.