Removing solid black or white backgrounds in Adobe Photoshop is a common requirement for many image editing tasks, from creating product shots for e-commerce to preparing graphics for web design. While various tools exist within Photoshop, understanding and effectively utilizing blending sliders offers a remarkably efficient and often overlooked method for achieving transparency. This guide delves into the intricacies of this technique, exploring its application, nuances, and alternatives for achieving clean, professional results.
The Power of Blending Sliders for Solid Backgrounds
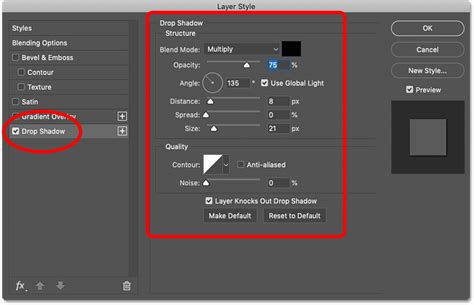
Blending sliders in Photoshop present a powerful, non-destructive way to adjust the visibility of layers based on pixel brightness. They are specifically located within the Layer Style dialog box, accessible by right-clicking on a layer and selecting "Blending Options." Within this dialog, you'll find the "Blend If" section, which contains two crucial sets of sliders: "This Layer" and "Underlying Layer."
These sliders operate by targeting specific brightness values within a layer. The "This Layer" sliders directly affect the active layer's transparency. The sliders on the left of each pair represent the shadows (darker pixels), while the sliders on the right represent the highlights (lighter pixels).
Removing White Backgrounds
When faced with a solid white background, the goal is to make those bright white pixels transparent. To achieve this using blending sliders:
- Access Blending Options: Right-click on your image layer in the Layers palette and choose "Blending Options."
- Locate "Blend If": Scroll down to the "Blend If" section. You'll see two sliders under "This Layer" - one for shadows (black triangle) and one for highlights (white triangle).
- Adjust the Highlight Slider: Drag the white triangle slider (representing highlights) from right to left. As you move it, you will observe the white areas of your image disappearing, revealing the checkerboard pattern that signifies transparency. You'll want to drag this slider until all the white background has vanished.
- Refine for Smoothness: For a cleaner edge, you can split the white slider. Hold down the Alt key (or Option key on Mac) and drag the white triangle inwards. This action splits the triangle into two, allowing you to feather the transition and avoid harsh, jagged edges. Experiment with the position of both halves of the slider to achieve the desired look.
Removing Black Backgrounds
The process for removing a solid black background is analogous, but you'll be manipulating the shadow sliders:
- Access Blending Options: As before, right-click on your image layer and select "Blending Options."
- Locate "Blend If": Navigate to the "Blend If" section.
- Adjust the Shadow Slider: This time, you'll be working with the black triangle slider (representing shadows) under "This Layer." Drag this slider from left to right. As you do, the black background will become transparent. Continue dragging until the entire black background is gone.
- Refine for Smoothness: Similar to the white background removal, hold down the Alt key (or Option key on Mac) and drag the black triangle inwards to split it. This allows for a smoother transition and helps to mitigate any artifacts that might appear around the edges of your subject.

Understanding the Mechanics: How Blending Sliders Work
The core principle behind blending sliders lies in their ability to analyze and manipulate pixel brightness values. Each pixel in an image has a brightness value ranging from 0 (pure black) to 255 (pure white).
"This Layer" Sliders: These sliders directly control the transparency of the pixels within the currently selected layer.
- Shadow Slider (Left Triangle): When you drag this slider to the right, you instruct Photoshop to start making darker pixels (those with lower brightness values) transparent.
- Highlight Slider (Right Triangle): When you drag this slider to the left, you instruct Photoshop to start making lighter pixels (those with higher brightness values) transparent.
"Underlying Layer" Sliders: These sliders are used for more advanced blending scenarios and control how the current layer interacts with the layers beneath it. For simple background removal, you typically focus on the "This Layer" sliders.
The "Blend If" sliders enable you to define a range of brightness values that will remain opaque and a range that will become transparent. When you drag a slider, you are essentially defining the threshold at which transparency begins. The split slider functionality (using Alt/Option) creates a gradient transition between opaque and transparent areas, which is crucial for achieving natural-looking edges, especially around complex details like hair or fur.
When Blending Sliders Shine (and When They Don't)
The blending sliders method is exceptionally effective when your image features a solid, single-color background that has a distinct brightness contrast with your subject. This makes it an ideal choice for:
- Product photography with a plain white or black backdrop.
- Graphics or icons designed with a uniform background.
- Images where the subject is clearly distinguishable from the background in terms of lightness or darkness.
However, this method is less suitable for images with complex or multi-colored backgrounds. If your background has gradients, intricate patterns, or colors that closely match your subject's tones, the blending sliders will struggle to differentiate and isolate the background effectively. In such cases, more advanced selection tools become necessary.
How to Create Selection on Complex Objects/Subjects | Fast and Easy | Photoshop Tutorial
Beyond Blending Sliders: Alternative Background Removal Techniques
While blending sliders are excellent for specific scenarios, Photoshop offers a robust suite of tools for more challenging background removals. Understanding these alternatives expands your capabilities:
Quick Selection Tool and Magic Wand Tool
These tools are intuitive for selecting areas of similar color.
- Magic Wand Tool: This tool selects contiguous pixels of similar color based on a "Tolerance" setting. By unchecking the "Contiguous" option, you can select all pixels of a similar color throughout the image, which can be useful for removing scattered specks of a specific color.
- Quick Selection Tool: This brush-like tool intelligently selects areas as you paint over them, adapting to edges and contours. It's generally more efficient than the Magic Wand for many selection tasks.
Select and Mask Workspace
This is Photoshop's dedicated environment for refining selections. After making an initial selection with tools like the Quick Selection or Magic Wand, you can enter the "Select and Mask" workspace to:
- Refine Edge: This powerful tool helps to intelligently soften and improve the selection around complex areas like hair and fur.
- Adjustments: You can fine-tune the radius, smoothness, feathering, and contrast of your selection.
- View Modes: Different view modes (like Overlay or On Black) help you meticulously inspect the edges of your selection.
Pen Tool
For ultimate precision, the Pen Tool is unparalleled. It allows you to create vector-based paths around your subject. These paths can then be converted into selections. While it has a steeper learning curve, the Pen Tool offers the most control for creating clean, accurate selections, especially for objects with sharp, defined edges.
Background Eraser Tool
This tool is designed to erase areas of an image based on color. You can set it to sample colors once or continuously. It works by sampling the color under the cursor and then erasing pixels of that color as you drag. It's particularly useful for removing backgrounds with subtle variations.
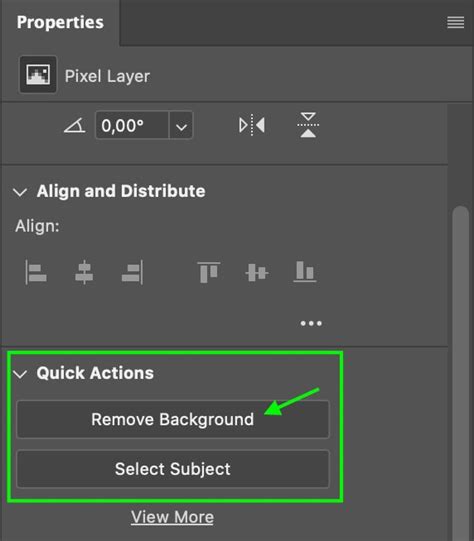
Remove Background (Quick Action)
In recent versions of Photoshop, a "Remove Background" quick action is available in the Properties panel. This AI-powered feature attempts to automatically detect and remove the background from an image. It's incredibly fast and often yields good results, especially on images with clear subject-background contrast. However, it may require manual refinement for more complex images.
Fine-Tuning and Advanced Considerations
Splitting Blending Sliders for Smoother Transitions
As mentioned, holding down the Alt (Windows) or Option (Mac) key while dragging a blending slider splits it into two. This creates a softer transition between the opaque and transparent areas. This is essential for avoiding the "halo effect" or jagged edges that can occur with abrupt transparency changes, particularly around detailed areas like hair or fur. Experimentation is key to finding the sweet spot for these split sliders.
Dealing with Imperfect Removals
Even with the best tools, you might encounter leftover bits or artifacts after removing a background. This is where a bit of manual cleanup comes in:
- Eraser Tool: For simple stray pixels.
- Clone Stamp Tool: To copy pixels from one area to another, effectively covering up imperfections.
- Healing Brush Tool / Spot Healing Brush Tool: These tools blend sampled pixels with the surrounding area for a more natural retouch.
Saving Layer Styles for Reusability
While you cannot directly save blending slider settings as a standalone preset, you can save the entire Layer Style. After you've achieved your desired background removal using blending sliders, click the "New Style" button within the Layer Style dialog box. Give your custom style a descriptive name, and you can then apply this style to other layers, preserving your blending settings.
Batch Processing Limitations and Workarounds
Unfortunately, blending sliders cannot be directly applied in a batch process in Photoshop. Each image requires individual adjustment. However, for repetitive tasks, consider these workarounds:
- Photoshop Actions: Record a series of steps, including opening an image, applying blending sliders, and saving, and then play this action on a batch of images.
- Third-Party Software: Specialized batch image processing software may offer more advanced automation capabilities.
Blending Sliders on Text Layers
The "Blend If" sliders aren't just for image layers; they can also be applied to text layers. This opens up creative possibilities for text effects, allowing text to blend seamlessly with underlying images or colors, creating unique typographic designs.
Conclusion: Choosing the Right Tool for the Job
Removing solid black or white backgrounds in Photoshop is often most efficiently handled with blending sliders, especially when a clear contrast exists between the subject and the background. This method is quick, non-destructive, and provides excellent results for such scenarios. However, for images with more complex backgrounds, leveraging tools like the Quick Selection tool, the Select and Mask workspace, or the Pen Tool becomes essential. By understanding the strengths of each method and practicing their application, you can master background removal in Photoshop and elevate your image editing workflow.