In the realm of digital art and photo manipulation, the ability to precisely control individual elements within an image is paramount. Photoshop, as the industry-standard software, offers a robust suite of tools to achieve this, with layer transformations being among the most fundamental and versatile. Whether you aim to enhance composition, create symmetrical designs, correct imbalances, or simply breathe new life into your creative vision, understanding how to flip and rotate layers is an essential skill. This guide will delve into the intricacies of these transformative techniques, empowering you to manipulate your layers with finesse and unlock a world of design possibilities.
Understanding the Core Concepts: Flipping and Rotating Layers
At its heart, manipulating layers in Photoshop involves altering their orientation and form. Two primary transformations are flipping and rotating, each serving distinct purposes.
Flipping a Layer in Photoshop: Creating Mirrored and Inverted Views
Flipping a layer is a transformative technique that allows you to mirror or reverse the content of a specific layer horizontally or vertically. This process is akin to looking at your layer in a mirror or turning it upside down.
Horizontal Flip: When you perform a horizontal transformation, you create a mirrored version of your layer's contents. This is as if you are viewing the layer in a reflection. This technique is particularly useful for achieving symmetrical compositions, correcting imbalances in an image, or creating engaging visual effects where mirroring is desired. For instance, if you have a portrait and want to create a perfect symmetrical face for a stylistic effect, a horizontal flip would be your go-to.

Vertical Flip: Conversely, a vertical flip produces an inverted version of the content, effectively turning it upside down. This can be incredibly useful for artistic projects and editing tasks, such as adjusting perspectives, creating interesting visual metaphors, or crafting captivating compositions where an upside-down element is key. Imagine needing to place a reflection of an object on water; a vertical flip would be instrumental in achieving that illusion.
How to create realistic reflection in Photoshop with Generative fill ai
Simply put, flipping a layer in Photoshop is a versatile tool that elevates your creative work, enabling exploration, experimentation, and the realization of fresh design possibilities.
Rotating a Layer: Achieving the Perfect Angle
Rotation allows you to spin a layer around a specific point, enabling you to adjust its orientation to any desired angle. This is crucial for aligning elements, creating dynamic compositions, or simply correcting a tilted horizon. Photoshop offers both precise numerical input and intuitive manual rotation.
Step-by-Step Guide: Flipping and Rotating Layers in Photoshop
Mastering these transformations is straightforward with a clear understanding of the Photoshop interface and tools.
Step 1: Locating and Preparing the Layers Panel
To begin any layer manipulation, you first need to access the Layers panel. This panel is typically located on the right side of your screen. If you cannot see it, you can access it by going to the Window menu in the menu bar and selecting Layers.
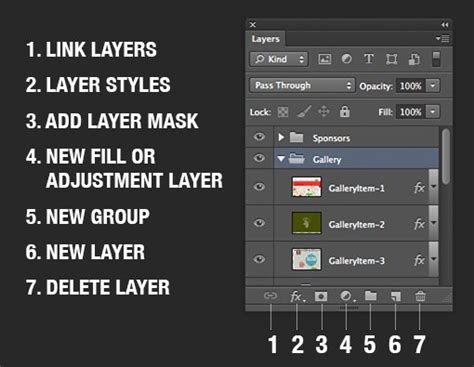
Once the Layers panel is visible, select the layer you intend to flip or rotate. Ensure that the layer containing the element or image you wish to transform is highlighted, indicating it is the active layer.
Step 2: Utilizing the Free Transform Tool for Mirroring and Rotation
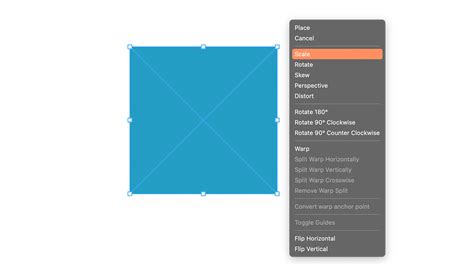
The Free Transform tool is your primary gateway to a multitude of layer manipulations, including flipping and rotating.
Accessing Free Transform: You can activate the Free Transform tool in two primary ways:
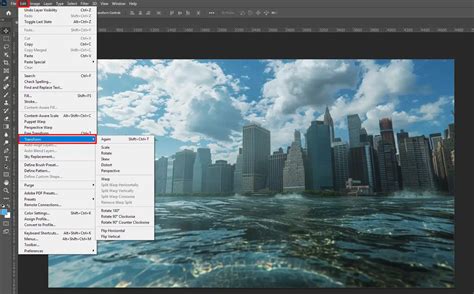
- Go to the Edit menu in the menu bar and select Transform. From the submenu, you can choose specific transformations like Flip Horizontal, Flip Vertical, or Rotate.
- Alternatively, and often more efficiently, use the keyboard shortcut Ctrl+T (Windows) or Cmd+T (Mac). This will outline your selected layer with a bounding box and transformation controls.
Performing a Horizontal Flip: With the Free Transform tool active, go to the Edit > Transform menu and select Flip Horizontally. The selected layer will instantly be mirrored along its vertical axis.
Performing a Vertical Flip: Similarly, navigate to Edit > Transform and choose Flip Vertically. This will flip the selected layer along its horizontal axis, inverting it.
Manual Rotation: While the Free Transform tool is active (Ctrl+T or Cmd+T), you can manually rotate your layer. Hover your cursor just outside of the bounding box until it changes into a curved, double-headed arrow. Click and drag your mouse to rotate the layer. You can rotate it freely by moving your cursor. For more precise rotation, you can enter specific degree values in the options bar that appears at the top of the screen when Free Transform is active.
Step 3: Alternative Methods for Flipping and Rotating
While Free Transform is a comprehensive tool, Photoshop offers other ways to achieve these transformations, especially when dealing with the entire image canvas.
Flipping the Entire Canvas: If you need to flip your entire document, including all layers, go to the Image menu, then select Image Rotation. Here, you will find options like Flip Canvas Horizontal and Flip Canvas Vertical. This action affects the entire document, so use it judiciously.
Rotating the Entire Canvas View: For temporary adjustments or to assess your composition from a different perspective without altering the actual content, use the Rotate View Tool (shortcut R). Clicking and dragging with this tool rotates your canvas view, allowing you to see your work from various angles. This is a non-destructive operation that only affects your viewing perspective.
Advanced Layer Transformation Techniques
Beyond simple flipping and rotating, Photoshop provides a powerful array of tools for more sophisticated layer manipulation, allowing for intricate adjustments and unique effects.
Scale: Adjusting the Size of the Layer: The Scale tool, accessible within the Free Transform options, allows you to resize a layer proportionally or non-proportionally. You can scale it up or down while maintaining the aspect ratio or by independently adjusting width and height. This is perfect for adding detail, reducing the prominence of elements, or fitting layers into specific compositions.
Skew: Tilting the Layer for a Slanted Effect: Skewing allows you to tilt a layer along its horizontal or vertical axis, creating a slanted or warped appearance. This is ideal for simulating perspective changes, achieving dynamic angles, or adding a sense of motion to your elements.
Distort: Modifying the Shape for Unique Effects: The Distort tool offers a high degree of control over a layer's geometry. You can deform a layer by independently dragging its corner and edge control points, bending and shaping it into virtually any desired form. This tool is invaluable for creating surreal or abstract effects, complex distortions, or highly customized shapes.
Perspective: Altering the Layer’s View for a Three-Dimensional Effect: The Perspective tool allows you to adjust the perspective of a layer as if it were viewed from a different angle in 3D space. By dragging the corner control points, you can create a vanishing point effect, making a flat layer appear to recede into the distance. This tool is indispensable for adding depth, a sense of three-dimensionality, and realism to your compositions, especially when placing objects in scenes with existing perspective.
Manual Rotation and Transformation: Taking Full Control: Within the Free Transform bounding box, you can manually rotate, resize, and transform each layer with great precision. Beyond dragging handles, you can also enter specific numerical values for rotation, scale, skew, and position directly into the options bar. This level of control is critical for achieving exact placements and consistent transformations across multiple elements. Changing the layer's orientation can dramatically alter the mood and feel of your image, allowing you to create a mirrored version that conveys a different emotional tone or perspective, adding depth and intrigue to your visual narrative.
Enhancing Compositions and Creating Realistic Effects
The ability to flip and rotate layers is not merely about technical execution; it's about artistic intent and achieving specific visual outcomes.
Creating Realistic Reflections: As mentioned, a horizontal mirroring of an element can be used to simulate the look of a reflection, adding authenticity and depth to your compositions. By combining a flipped layer with subtle adjustments to opacity, blur, and color, you can create convincing reflections on water, glass, or other surfaces.
Adjusting the Composition of Your Image: The transform tools are fundamental for improving the overall composition of your image. By repositioning, resizing, and reorienting elements, you can correct asymmetry, enhance symmetry, or experiment with different arrangements to achieve a more harmonious and visually appealing result. This iterative process of adjusting and refining is key to a strong composition.
Achieving Symmetry and Balance: Flipping and rotating are powerful tools for creating perfect symmetry, which can be a cornerstone of balanced and aesthetically pleasing designs. Whether it's mirroring a face, a building, or a pattern, these transformations ensure exact replication.
Considering Alternatives and Advanced Workflows
While Photoshop remains the industry standard, other software solutions offer different approaches to layer editing.
Comparison: Adobe Photoshop vs. Luminar Neo: Adobe Photoshop has long been the benchmark for layer editing and image manipulation. However, Luminar Neo is emerging as a notable competitor, particularly in its AI-driven features. Luminar Neo boasts a user-friendly interface, making it accessible for beginners, and its advanced AI tools, like AI Sky Replacement and AI Augmented Sky, simplify complex tasks. Its AI-driven Layer Mask can assist in flipping elements with impressive results. Furthermore, Luminar Neo emphasizes non-destructive editing, allowing users to experiment freely without altering original image data. Its simplified layer management and AI enhancements can streamline certain workflows, offering creative flexibility through a variety of filters and effects.
How to create realistic reflection in Photoshop with Generative fill ai
Smart Objects for Non-Destructive Transformations: To ensure that your transformations, especially scaling and rotating, do not degrade image quality, it is highly recommended to convert your layers into Smart Objects. Right-click on your layer in the Layers panel and select "Convert to Smart Object." This wraps your layer's content in a special container that allows for non-destructive scaling and transformations. You can resize and rotate a Smart Object multiple times without losing pixel information. If you need to re-edit the original content of the Smart Object, you can simply double-click on its thumbnail in the Layers panel.
Layer Masks and Transformations: When a layer has a Layer Mask attached to it, and you transform the layer, the mask will transform along with it. This means the mask's position and orientation will also be mirrored or rotated relative to the transformed layer. Understanding this interaction is crucial for predictable results when working with masked elements.
Working with Text and Shapes: Rotating text and vector shapes in Photoshop is generally straightforward using the Free Transform tool. For text, you can rotate the entire text block. If you need to rotate individual letters, you will first need to rasterize the text layer (right-click the text layer and select "Rasterize Type"). However, be aware that rasterizing converts text into pixels, making it no longer editable as text. Vector shapes, on the other hand, can be rotated without losing their scalability or vector properties.
Transforming Selections: You can also transform selections themselves. If you need to rotate or flip a specific area you've selected, go to Select > Transform Selection. This will bring up a bounding box around your selection, allowing you to rotate, scale, or flip it independently of the layer content. This is useful for creating precise selections with specific orientations.
Streamlining Your Workflow with Shortcuts and Extensions
Efficiency is key in any creative process. Photoshop offers numerous shortcuts and possibilities for extensions to enhance your workflow.
Keyboard Shortcuts: As mentioned, Ctrl+T (Cmd+T on Mac) is invaluable for activating the Free Transform tool. Learning other shortcuts for specific transformations (e.g., Ctrl+J for duplicating a layer, Ctrl+E for merging down) can significantly speed up your editing process. Using keyboard shortcuts or hotkeys decreases the number of steps needed, making tasks more efficient for advanced users.
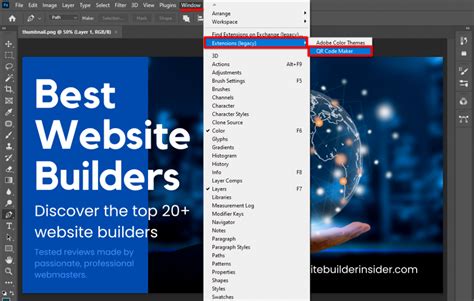
Photoshop Extensions: The capabilities of Photoshop can be further augmented with specialized extensions. These add-ons can help with various tasks, such as:
- Efficiently transforming layers by allowing quick selection by type or batch renaming.
- Automating complex pattern creation, similar to Adobe Illustrator.
- Advanced layer management, enabling selection of layers by properties (e.g., opacity, size).
- Quickly altering the appearance of text.
- Streamlining the process of copying layers between multiple files.
By mastering the techniques of flipping and rotating layers, and by leveraging the advanced transformation tools and workflow enhancements available in Photoshop, you gain precise control over your visual elements. This control is fundamental to creating compelling compositions, achieving desired artistic effects, and ultimately, realizing your creative vision with clarity and precision.