Crafting an eye-catching business card is one of the best ways to build your company’s brand and garner the attention of potential clients. Your business card is a pocket-sized advertisement for your business, so it has to not only provide clients with important contact information but also give them an idea of what your company does. In this article, we’ll take you through the step-by-step process of how to make a business card using Adobe Photoshop. Since its invention in 1987, Photoshop has been the industry standard for digital art and raster graphics editing. Additionally, Photoshop supports high-resolution formats and CMYK color mode, which is perfect for producing crisp, professional-quality printed graphics. Photoshop is a robust editing tool with hundreds of different features.
Setting Up Your Document for Success
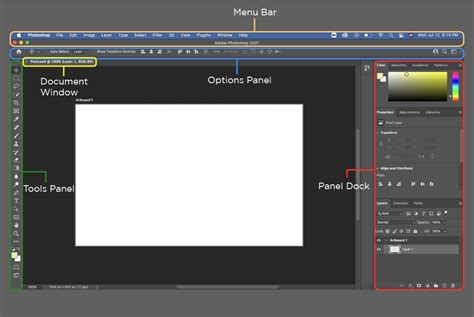
Before diving into design, it's crucial to set up your Photoshop document correctly to ensure professional print results. The standard business card size in Photoshop is 3.5 x 2 inches. To begin, click the "File" button on the menu bar at the top of the screen. Then, click the "New" button, which is the first option in the File drop-down menu. In the New Document dialog box, ensure that the unit of measurement is set to "Inches." For a standard business card, input 3.5 inches for the width and 2 inches for the height.
Crucially, be sure to set the resolution to 300 DPI (dots per inch) for high-quality printing. Type 300 next to "Resolution." This creates a file that has a resolution of 300 pixels per inch to ensure a sharp and clear design. For print services, it is essential to select "CMYK" for the color mode. This step is optional but will greatly help you when designing your business cards, as CMYK is the color mode used in professional printing, ensuring accurate color reproduction on the printed material.
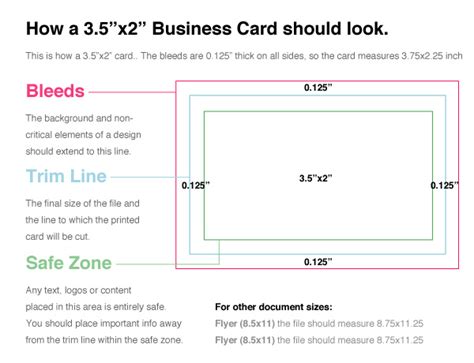
For print services, such as Vistaprint or Moo, or a local print shop, make sure you use their recommended Photoshop settings. Often, these services require a slightly larger canvas to accommodate a "bleed area." This bleed area ensures that the colors "bleed" out over the edges when the cards are cut, preventing unprinted white borders. To incorporate this, you might adjust your document size to 3.75 x 2.25 inches.
To create guides that help you maintain consistent margins and safe zones for your content, turn on the rulers by going to the "View" menu and selecting "Rulers." It's about halfway down the "View" menu. To create a guideline, click on the ruler at the top-left of your document and drag it inwards. Do this to create two horizontal guidelines. One at 0.125 inches and one at 2.125 inches. Then, create two more vertical lines at 0.125 inches and 3.625 inches. These guidelines will visually demarcate your safe area, ensuring that crucial text and logos are not accidentally trimmed during the printing process.
Mastering Color and Backgrounds
Color is an incredibly important aspect of a successful business card design. The colors you use can have a psychological effect on your audience, so make sure to choose wisely. To select a color, locate the two overlapping colored squares at the bottom of the toolbar on the left-hand side of the screen. The one on top is for the foreground color, and the one on the bottom is for the background color. Click the square for the foreground color to open the color picker. Here, you can click a color in the rainbow (spectrum) colored bar and then click the exact hue you want in the large square on the left.
To fill an entire area with your selected foreground color, select the Paint Bucket tool. The paint bucket tool is used to fill an entire area with the foreground color. If you want your business card to really stand out, you can add a gradient, which will gently transition from one color to another. To do this, click and hold the Gradient tool in the toolbar. If you want to create a color-gradient fade, use the background color square to select the color you want the gradient fade to transition to. Then, click the Gradient tool, and click and drag across the entire area you want the color transition to take place. Another option is to use brushes with color fades. These brushes have an icon that resembles a square with a white-to-black color fade.
Marketing Color Psychology: What Do Colors Mean and How Do They Affect Consumers?
Incorporating Text and Typography
What your business card says is just as important as how your business card looks. To add text, click the "T" icon on the toolbar on the left side of your screen to select the text tool. Click where you want the text to go in the document. This creates the first text item on your business card. In the Character panel, you can also choose the font color, font style (i.e., bold, italic), and font size. Use the drop-down menu in the upper-right corner to select your font. The text that says "Sample" next to each font in the drop-down menu shows what the font looks like. It's important to keep your font consistent throughout your business card. Be sure to pick a color that's easy to read against your background color. If your background color is dark, pick a light-colored font.
Repeat this process for as many text items as you want on your business card. Tip: You can use the Layer Menu to organize all the text layers, keeping them separate from the graphics layer. This displays the Layer menu with a list of layers. It's at the bottom of the Layer menu in the lower-right corner. This creates a new layer, which should appear above the background layer. This allows you to type a new name for the layer. For example, renaming it to "Contact Info" or "Company Name."
To adjust the size and position of your text, select the Move tool (which resembles a black arrow at the top of the toolbar). Then, click a text item to select it. Click one of the small boxes in the corners around the text and drag it to adjust the size. Hold the Shift key (⇧ Shift) to keep the size proportional. To align your text, click the Move tool. Hold Shift and click all the text items you want to align. Then, click one of the alignment icons with a square and a rectangle and a line. Look at how the square and the rectangle are arranged with the line to see how the icon will arrange your text items. For instance, the icon with the line to the left of the square and rectangle will arrange the text items evenly to the left.
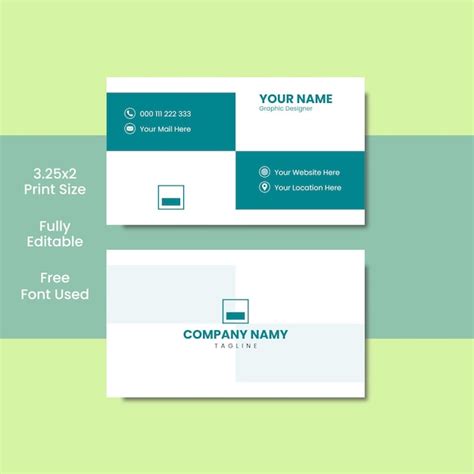
A well-structured business card typically features your name at the top in larger letters, followed by your position in smaller text. Place your contact information (phone number, email, website) on separate lines using medium-small text. Ensure your text items are properly aligned to whichever side of the card they are on.

Enhancing with Graphics and Logos
There is a wide range of interesting graphics that you can add to your business card. However, the most important graphic that you need to add is your company logo. To add graphics or your logo, you can either create them directly in Photoshop or import existing images.
To import an image, go to the "File" menu and select "Place." Use the file browser to navigate your computer. You can click folders in the sidebar to the left to find your image. Select the image file and click "Place." The image will appear on your canvas. To adjust the size of the photo, click and drag the corners. Hold Shift to keep the image dimensions proportional to the rest of the business card. To change its position, click and drag the image. Once you're satisfied with the placement and size, click the checkmark icon at the top of Photoshop to confirm. This places the image as a new layer.
It's a good idea to create a new layer for each new object you add, even for different sections of text or graphics. To create a new layer, click the icon that resembles a sheet of paper. It’s at the bottom of the Layer menu in the lower-right corner. This creates a new layer, which should appear above the background layer. To change the position of a layer, click and drag the layer in the Layer menu in the sidebar to the right.
You can use the Brush tool to create simple patterns and graphics for your business card document. The Brush tool has an icon that displays the current brush type and the brush size below it. Click an image in the drop-down menu to select a brush type. The solid circle brushes create solid lines of varying sizes, while the faded circle brushes create soft lines of varying sizes. To adjust the size of the brush, drag the slider bar labeled "Size" at the top of the drop-down menu. Drag it left to reduce the size of the brush. Click and drag on the document to draw shapes and lines using the circle brushes. If you are using texture or image brushes, you can click once to place an image, pattern, or texture item. If you make a mistake, click "Edit" in the menu bar at the top, and then click "Undo" to undo what you just did.

Saving and Preparing for Print
As you create business cards using Photoshop, you should be saving your files as you go to ensure you don’t lose any progress. It's a good idea to save frequently while working in Photoshop. Click the "File" button and then the "Save As" button to save your business card file. Make sure to select "PSD" as the file format. PSD is the file format that is native to Photoshop. Saving your files in Photoshop format is the best way to preserve the color detail and editable layers. PSD is the file format that is native to Photoshop. After saving your PSD file, which is your Photoshop-only format, you can export the design into a widely used format such as .PNG or .JPG or even .PDF if you want it to be printed in high quality materials.
For print services, save a copy in PDF or TIFF format. Always use CMYK mode when you create business cards you intend to print to ensure accurate color reproduction on the printed material. Check with your print shop for the required file format, which can be Photoshop, PDF, or JPEG. Save your file in the required format.
The printing process is the final step when you create business cards for distribution. This is where things can go wrong if you’re not careful. Always print a test copy to check the colors and layout before printing a large quantity. To print your card, go to the "File" menu and click "Print." It's near the bottom of the "File" drop-down menu. It's always a good idea to print your work to get a better idea of how it looks when printed.
Beyond the Basics: Templates and Professional Help
Photoshop is a powerful tool that can create some amazing business cards. However, the process can be quite difficult for beginners. No need to hire a professional graphic designer; you simply choose a template that suits your business needs and style. Then customize the template by editing the text, inserting your logo, and modifying other design elements. Yes! There are many free business card templates available online. You can download and open them in Photoshop to customize. By leveraging Adobe Photoshop’s advanced design tools and customizable features, you can create business cards that not only reflect your brand but also leave a lasting impression. If you’re having trouble creating business cards with Photoshop, resources like LogoMaker have a large library of full-color business card templates from a variety of industries. Creating business cards that stand out involves using contrasting colors, professional fonts, and unique design elements like gradients, simple patterns, and graphics. Tired of being stuck with run-of-the-mill business card templates? Experiment with these techniques to make your card truly memorable.