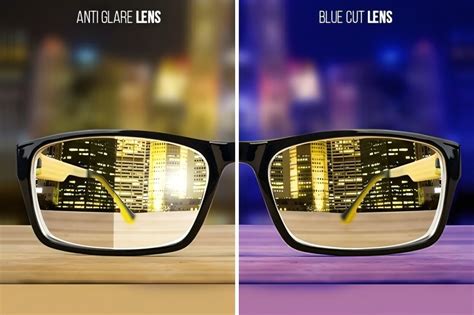
Glare on eyeglasses is a persistent and frustrating problem in photography, often obscuring the subject's eyes and facial features. This common issue can detract from an otherwise perfectly composed portrait, making it appear unprofessional or distracting due to bright reflections. Whether you took your picture with a flash or it was just a sunny photoshoot, glasses glare can be an unwanted and distracting addition to your picture. Fortunately, you have several options to get rid of glasses glare without compromising your original image.
Understanding the Challenge of Eyeglass Glare
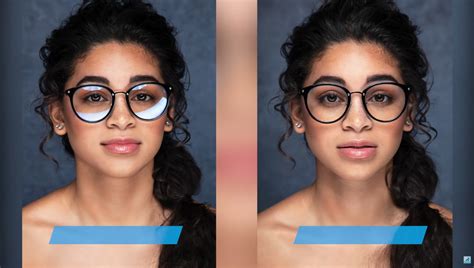
Eyeglasses help people see the world better, but they also make it harder for the world to see one of the most important features of a subject - their eyes. Glasses glare happens when light reflects off the lenses of someone’s glasses in a photograph. The subject’s right eye above has an annoying green glare from the camera’s flash. Don’t let bright reflections from a camera flash detract from a friend or family member’s face. As you can see in the photo above, a bright green glare is taking up a large section of the subject’s right eye.
While eyeglasses help people see the world better, they also make it harder for the world to see one of the most important features of a subject - their eyes. In the below video and tutorial, Dinda shows you how to “magically” remove the glare from glasses in photos in Adobe Photoshop. The absolute best way to fix glare is through using two photographs of the subject in the same position, with and without glasses, and overlaying them in Adobe Photoshop. But if the only image you have has some detail around the eyes, we can make it work.
Proactive Measures: Preventing Glare During the Shoot
A pro tip for when photographing people wearing eye glasses: slightly tilt the glasses and the reflections will usually be gone. As demonstrated by myself. This is often the simplest and most effective approach, negating the need for extensive post-processing.
Photoshop's Evolving Toolkit for Glare Removal
Photoshop is constantly evolving, offering a range of tools to tackle this common photographic nuisance. There are many ways to do things in Photoshop. I discover most of my techniques from trying lots of different things, and this is one of those, “I wonder if it will work” scenarios, and oh boy, does it ever work. I’m not going to promise that this will work on every image, no one technique does, that’s why we need to know different ways of doing things. However, I think you will find when this does work, it’s better than the other ways, because you are maintaining the true character of the persons face.
The Power of Generative Fill and AI
For minor glare areas not covering distinct facial features (e.g., over the frame or forehead), consider using Generative Fill for quick edits. Adobe rolled out the coolest Reflection Removal update, and it does not disappoint. This feature, particularly in newer versions of Photoshop, leverages artificial intelligence to intelligently remove distractions.
To utilize this, ensure your Photoshop is updated to the latest version through the Creative Cloud App. Crucially, capture your images in RAW format, as JPEGs and HEICs are not compatible with this feature. Instead of launching Photoshop directly, find your photo in Finder or Explorer and right-click to open it in Photoshop. Camera Raw should automatically open to your photo. In Camera Raw, navigate to the top-right settings, then to Technology Previews, and enable the feature. Subsequently, go to the 'Remove' panel, check 'Distraction Removal,' and let the AI work its magic.

Precision with Traditional Tools: Clone Stamp and Healing Brush
However, for glare directly over sensitive facial features like the eyes, relying solely on AI risks generating entirely new features that do not resemble the subject, leading to unnatural outcomes. For precise and realistic glare removal, particularly over the eyes, the Clone Stamp Tool is indispensable. This technique involves copying a glare-free section of the subject's face, typically the symmetrical area from the other eye or side of the face, onto the affected area.
The Clone Stamp Method: A Step-by-Step Approach
- Start with a Clean Layer: Always work on a new layer when using the Clone Stamp Tool. Set the Sample option to "Current and Below" for non-destructive editing.
- Sample the Source: Press and hold the Alt key (Option key on Mac) and click on the glare-free area you’d like to clone. Aim to copy from a clean, symmetrical area of the subject's face (e.g., the unaffected eye) to ensure the cloned content integrates naturally and maintains realism.
- Paint Over the Glare: With the Clone Stamp Tool active, paint over the glare on the glasses.
- Transform and Align: After cloning, use Free Transform (Ctrl/Command + T) to accurately size and position the copied area. Remember to flip horizontally if copying from the opposite side.
- Refine with Layer Masks: Layer masks are crucial for blending the cloned content seamlessly. After cloning and positioning the glare-free section, apply a layer mask to the new layer. Painting with black on this mask selectively conceals parts of the cloned image, allowing precise control over what is revealed and ensuring that only the glare is covered while the subject's original eye and facial contours remain visible. Painting with black on this mask selectively hides parts of the cloned image, allowing precise control over what is revealed and ensuring that only the glare is covered while the subject's original eye and facial contours remain visible. This non-destructive method preserves image quality and allows for detailed adjustments.
Clone Stamp Tool Explained – Remove Objects & Retouch Like a Pro
Utilizing the Eraser Tool for Subtle Blending
For subtle blending after using the Clone Stamp Tool, the Eraser Tool can be a valuable asset. Step 11 demonstrates this: Select the Eraser Tool and set the Opacity to around 33%. This allows for a gradual transition, ensuring the cloned area integrates flawlessly with the surrounding image.
The Lasso Tool Technique: A Quick Fix
Photoshop’s Lasso Tool is an easy way to remove glare spots from photos. Just stick the image in Photoshop to simply and quickly remove any glare from your favorite pictures using the handy Lasso Tool.
- Duplicate the Layer: Press Ctrl+J (PC) or Cmd+J (Mac) to copy the original image to a new layer. This preserves your original image.
- Select the Glare: Use the Lasso or another selection tool to select the glare on the glasses.
- Copy and Transform: Copy the glare-free glasses lens that you copied over the existing lens in the image. Hold your mouse over one of the Free Transform box corners to rotate it just right. Drag the top corners to slightly enlarge the lens to cover up the seam. Right now you might be thinking, you slightly enlarged an eye, but maybe no-one will notice.
- Blend and Refine: Sometimes you’ll encounter a particularly bright patch of glare that requires some finesse and fine-tuning to remove.
When you’re done, you should have something like the above photo. As you can see, that annoying green glare from the camera flash is gone. That’s it for this quick tutorial.
Advanced Hybrid Approach: Combining AI and Manual Control
A robust hybrid approach to tackling eyeglass glare in Photoshop combines the efficiency of AI-powered Generative Fill for minor touch-ups with the precision of the classic Clone Stamp tool for more critical areas. This methodology ensures natural-looking results, preserving original facial details and significantly enhancing photo editing workflows for portrait photographers.
The Unmesh Dinda Method: Dodge and Burn for Transparency
Unmesh Dinda over at PIXimperfect has released an exceptional photo editing tutorial that you’ll want to bookmark if you shoot portraits. In this video, he shows a detailed step-by-step method for removing glare from glasses in Photoshop-something all of us have probably had to do at one point or another. As Unmesh explains at the very beginning, this is one of those situations where Photoshop can only do so much. You need some level of detail to work with underneath the glare-if it’s all gone, you’re simply out of luck.
This workflow involves four broad steps:
- Burning away the glare: Using a Curves adjustment layer and a Dodge & Burn layer.
- Fixing the color: By simply painting on a new layer set to the Color blend mode.
- Fixing the eyes: By using two more Curves adjustment layers.
- Cleaning up the details: By using the Healing Brush Tool.
Detailed Steps for the Dodge and Burn Technique:
- Desaturate for Focus: First, desaturate the image so its color doesn’t distract from matching the brightness.
- Adjust Brightness with Curves: Create a Curves adjustment layer. Adjust the middle node downwards until bright areas appear natural. Then, invert the mask selection (Ctrl/Cmd+I). Before the mask was white, and now all of it is black - this means changes will only show up on areas we paint white. Start painting. If you have practice and a tablet, this process will be faster than you think. For further refinement, create additional dodging and burning layers to enhance results.
- Match Glare Color: Next, we must match the glare color to the surrounding image. If you disable the desaturation, you’ll see the colors don’t match at all. Easily fix this by creating a new layer, choosing a brush with 5-10 percent flow, and setting the blend mode to Color.
- Darken Eyes (If Needed): Darken the eyes using another Curves adjustment layer, focusing on eye areas and painting with white on the inverted mask.
- Clean Edges with Clone Stamp: Now, the last thing we need to fix are glare edges. Keep in mind the Stamp tool doesn’t work on an empty layer, so we’ll have to create a visible layer for it. Ensure alignment of spectacle edges by sampling adjacent areas and painting carefully. To avoid overcorrection, maintain natural features by adjusting layers as needed.
To recap this method: First, match brightness using curve and dodge/burn layers. Second, correct colors with a Color blend mode layer to sample from surrounding areas and paint to match. Third, clean the edges with tools like Clone Stamp, Healing Brush, and Spot Healing Brush.
Camera Raw Filter for Integrated Edits
For those who prefer working within a more integrated environment, the Camera Raw Filter in Photoshop offers powerful tools. From the top of the window, select Filter › Camera RAW Filter. This filter provides a suite of adjustments that can be applied directly to your image.
When using the Adjustment Brush in Camera Raw, you can:
- Adjust brush size: Use the [ and ] keys to adjust the brush size.
- Reset settings: Right-click on the adjustment brush and choose "Reset Local Correction Settings."
- Work on one lens: Don’t even worry about the reflection on our left; we just need one lens to look good. Step 4 indicates it’s looking good, but there is still a little glare over an eyebrow and an outline around the top.
To fix these remaining issues: Press Alt+Ctrl+Shift+E (Windows) / Option+Cmd+Shift+E (Mac) to create a merged copy of the visible layers. Using the Quick Selection Tool, make a rough selection around the glasses lens. Drag the top corners to slightly enlarge the lens to cover up the seam. Right now it matches, but we aren’t done, as no 2 eyes are alike and we want to preserve his actual eye.
Pro Tip (optional): If the 2 eyes aren’t straight on, but angled, right-click and choose "Distort" to adjust the perspective.
The Layer Mask Trick for Seamless Transitions
A clever trick involves using Layer Masks for seamless transitions. Hold down the Alt/Option key and click on the Layer Mask icon in the Layers panel (3rd from the left). Only the areas you paint with white will now appear visible. This technique is invaluable for blending cloned or transformed elements so that the line just disappears! This is actually kinda fun to do.
Step 12 involves pressing Alt+Ctrl+Shift+E (Windows) / Option+Cmd+Shift+E (Mac) to create another merged layer. Use the Quick Select Tool to make a selection around the lens. Drag it over the left eye. Right now it matches, but we aren’t done, as no 2 eyes are alike and we want to preserve his actual eye.
And we are all done. Congratulations if you go this far. I really hope that you found this video and written steps useful and that this helps you remove reflections for glasses and generally assists with your retouching.
Learning from the Masters: Resources for Deeper Understanding
Unmesh Dinda is known for tutorials featuring some of the most dramatic and striking transformations possible with Adobe Photoshop. PiXimperfect is one of the premier free online resources for learning Adobe Photoshop and Lightroom. With over five million subscribers on YouTube, it’s clear that his high-quality tutorials are some of the best.
Recommended Tutorials and Further Learning
- Magically remove glare from glasses in Photoshop: This tutorial by PiXimperfect offers a detailed method.
- 3 Simple Steps to Remove Complex Glare from Glasses in Photoshop! Another excellent tutorial from PiXimperfect, focusing on advanced dodging and burning to make the glass completely transparent.
- Add freckles to a face in Photoshop: While not directly about glare, this tutorial by Aaron Nace from Phlearn demonstrates advanced brush creation and color range selection, applicable to detailed retouching.
- 35 Creative Portrait Effects Photoshop Tutorials: This curated list explores innovative Photoshop techniques beyond basic filters, offering inspiration for complex edits.
For those seeking to enhance their Photoshop skills, exploring these resources and practicing the techniques discussed will undoubtedly lead to more polished and professional-looking portraits.
Conclusion of Techniques
The core strategy for glare removal in Photoshop involves a strategic combination of artificial intelligence and traditional manual tools. For small, less critical areas of glare, such as those over an eyebrow or along the frame, Photoshop's Generative Fill can provide quick and acceptable results. However, for glare directly over sensitive facial features like the eyes, the Clone Stamp Tool is indispensable for precise and realistic glare removal. Layer masks are crucial for blending the cloned content seamlessly.
Practical tips include always working on a new layer, copying from a clean, symmetrical area, using Free Transform to size and position, and leveraging layer masks extensively for seamless transitions. By mastering these techniques, photographers can effectively eliminate distracting eyeglass glare and ensure their subjects’ eyes shine through, enhancing the overall impact of their portraits.