In the dynamic world of digital art and photo manipulation, precise selections are the bedrock of effective editing. Adobe Photoshop, a titan in the industry, offers a suite of tools designed to empower users in isolating elements within an image. Among these, the Lasso Tool family stands out as a versatile, albeit sometimes challenging, set of instruments for creating intricate selections. This guide delves deep into the functionalities, applications, and nuances of Photoshop's Lasso tools, aiming to equip both novice and experienced users with the knowledge to wield them effectively.

Understanding the Lasso Tool: The Foundation of Selection
The Lasso Tool in Adobe Photoshop is a fundamental utility that allows users to select specific objects or areas within an image by drawing around them. It's a default tool, readily accessible within the Photoshop workspace. While it excels at creating selections around subjects with relatively simple edges, its efficacy diminishes when dealing with intricate details like hair or fine branches. The primary characteristic of the regular Lasso Tool is its reliance on the user's cursor movement. To draw a path, one clicks on a point on the canvas to initiate the selection and then drags the cursor around the desired object. The lasso will meticulously follow the exact trajectory of the cursor from the starting point to the end.
This direct correlation between cursor movement and selection path means that the regular Lasso Tool is best suited for straightforward selections where a steady hand can accurately trace the contours of an object. Attempting complex selections with this tool, especially those involving numerous curves or fine details, can often lead to imperfect results, potentially ruining the intended isolation of the subject. Therefore, a prerequisite for using the regular Lasso Tool effectively is the ability to move the mouse with a degree of slowness and control to ensure the drawn path aligns closely with the object's edges.
The Trio of Lasso Tools: Regular, Polygonal, and Magnetic
Photoshop CC offers three distinct types of Lasso tools, each possessing unique selection options, specific use cases, and inherent advantages. Understanding these differences is key to selecting the appropriate tool for a given task.
The Regular Lasso Tool: Freehand Precision
As the primary and most straightforward of the three, the Regular Lasso Tool is the quintessential freehand selection tool. It grants the user complete control over the drawing of paths, allowing for entirely freehanded selections. Unlike more automated tools, the Regular Lasso Tool will not automatically snap to the edge of objects or attempt to predict the user's intended selection. Wherever the lasso is drawn, that is precisely where the selection will remain. This tool is ideal for situations where the user has a clear idea of the exact path they wish to select and possesses the dexterity to execute it.
To draw a path with the Regular Lasso Tool, the process begins by clicking over a point on the canvas to mark the start of the selection. The user then drags the cursor over the object they wish to select. The lasso tool will create paths that precisely follow the cursor's movements from the initiation point to the conclusion. This direct, unassisted drawing capability makes it a powerful tool for artistic control, provided the user can maintain a steady hand.
The Polygonal Lasso Tool: Straight Lines for Defined Edges
For tasks that involve objects with predominantly straight edges, the Polygonal Lasso Tool offers a more efficient and precise solution. This tool is designed to create selections composed of straight line segments. To operate the Polygonal Lasso Tool, the user selects it from the toolbar and then clicks at various points around the object. Each click creates an anchor point, and the tool automatically connects these points with accurate straight lines, forming a polygonal selection path.
This method is particularly useful for selecting geometric shapes, architectural elements, or any object with clear, defined straight edges. The process involves clicking at each corner or change in direction along the object's perimeter. The Polygonal Lasso Tool then constructs the selection by joining these clicked points with straight line segments. This eliminates the need for the steady hand required by the regular Lasso Tool, making it easier to achieve clean, sharp selections on rectilinear subjects.
The Magnetic Lasso Tool: Automated Edge Detection
The Magnetic Lasso Tool represents a more advanced and automated approach to selection. This tool is designed to automatically detect the edges of an object based on color and contrast differences between the object and its background. To use the Magnetic Lasso Tool, the user clicks once on a point near the edge of the object they wish to select. As the cursor is dragged along the edge, the tool attempts to "snap" to the nearest contrasting edge, creating anchor points automatically.
The effectiveness of the Magnetic Lasso Tool relies heavily on the clarity of the contrast between the object and its surroundings. It works best when there is a significant difference in color, brightness, or texture. While it automates much of the selection process, it's not infallible. Sometimes, it might incorrectly snap to an unintended edge or fail to detect an edge altogether. Therefore, it's often beneficial to use this tool in conjunction with manual adjustments.
The Magnetic Lasso Tool's settings can be fine-tuned to improve its performance. The "Width" setting determines how far the tool searches for an edge. A larger width can help it detect edges from a greater distance, but if set too large, it might incorrectly identify and select elements outside the desired object. The "Contrast" setting dictates the minimum contrast level required for the tool to detect an edge. Adjusting the "Frequency" setting controls how many anchor points are created; a higher frequency results in more anchor points, allowing for more precise adjustments but also potentially creating a more complex path.
Step-by-Step Guide to Using Lasso Tools
Regardless of the specific Lasso Tool chosen, the general workflow for making selections in Photoshop involves a few key steps.
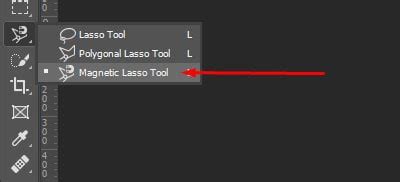
Step 1: Locate and Select the ToolThe Lasso tools are typically grouped together in Photoshop's toolbar. To access them, click and hold the Lasso Tool icon. A fly-out menu will appear, revealing the Regular Lasso Tool, the Polygonal Lasso Tool, and the Magnetic Lasso Tool. Select the desired tool by clicking on its icon.
Step 2: Adjust Tool Settings (Feathering and Anti-aliasing)Before commencing your selection, it's advisable to adjust certain tool settings. The "Feather" setting, found in the options bar, determines the softness of the selection's edges. A feather value of 0 pixels results in sharp, defined edges, while a higher value creates a softer, blurred transition. For precise selections, a feather of 0px is often preferred. The "Anti-alias" option, usually enabled by default, helps to smooth the jagged edges of selections, particularly those created by the Polygonal Lasso Tool, resulting in a more professional appearance.
Step 3: Initiating the SelectionThe process of initiating a selection varies slightly depending on the tool:
- Regular Lasso Tool: Click on the canvas to set the starting point, then drag the cursor around the object.
- Polygonal Lasso Tool: Click at each point where the edge changes direction to create straight line segments.
- Magnetic Lasso Tool: Click once near the edge of the object to begin, then drag the cursor along the edge.
Step 4: Creating the Selection PathContinue drawing the path around your subject. For the Regular Lasso Tool, this involves continuous dragging. For the Polygonal Lasso Tool, it involves a series of clicks. For the Magnetic Lasso Tool, it involves dragging while the tool attempts to snap to edges.
Step 5: Completing the SelectionTo finalize the selection, you need to close the path:
- Regular and Magnetic Lasso Tools: Drag the cursor back to the starting point and click. Alternatively, you can often simply release the mouse button, and the tool will automatically connect the endpoint to the starting point.
- Polygonal Lasso Tool: Click on the initial starting point to close the polygon.
Once the path is closed, Photoshop will display a "marching ants" outline, indicating that the area is now selected.
Step 6: Refining and Utilizing the SelectionWith the selection active, you have several options:
- Delete the background: Press the Delete key (after possibly creating a layer mask or duplicating the layer to avoid destructive editing).
- Create a Layer Mask: This is a non-destructive method. With the selection active, click the "Add layer mask" icon in the Layers panel. The selected area will become visible, and the rest will be hidden.
- Cut and Paste: You can cut the selected object (Ctrl+X or Cmd+X) and paste it onto another image or a new layer.
- Further Refinement: Use the "Select and Mask" workspace (available from the Options bar when a selection tool is active) to further refine edges, smooth selections, and adjust feathering.
Advanced Techniques and Shortcuts
The true power of the Lasso tools often lies in combining them and utilizing shortcuts to enhance efficiency and precision.
Combining Lasso Tools for Complex Selections
For intricate subjects that defy a single Lasso tool's capabilities, the ability to switch between them on the fly is invaluable. For instance, you might start with the Magnetic Lasso Tool to get a general outline, then switch to the Polygonal Lasso Tool for sharp, straight edges, and finally use the Regular Lasso Tool for freehand adjustments in curved areas.
To switch between tools without deselecting:
- Hold down the Option key (Mac) or Alt key (Windows) while using the Magnetic Lasso Tool to temporarily switch to the Regular Lasso Tool.
- Hold down Shift + Option (Mac) or Shift + Alt (Windows) to temporarily switch to the Polygonal Lasso Tool.
This ability to fluidly transition between selection modes allows for highly customized and accurate selections, even on the most challenging subjects.
Essential Selection Shortcuts
Mastering keyboard shortcuts can significantly speed up your workflow:
- Add to Selection: Hold down the Shift key while drawing a new selection. This will add the newly drawn area to the existing selection.
- Subtract from Selection: Hold down the Alt key (Windows) or Option key (Mac) while drawing a new selection. This will subtract the newly drawn area from the existing selection.
- Intersect with Selection: Hold down Shift + Alt (Windows) or Shift + Option (Mac) while drawing a new selection. This will create a selection that is only the intersection of the existing selection and the new selection.
- Deselect: Press Ctrl + D (Windows) or Command + D (Mac) to deselect everything.
- Delete Anchor Point: With the Polygonal or Magnetic Lasso Tool active and an anchor point selected, press the Delete key to remove it.
How to Use the Lasso Tools in Photoshop
Fine-Tuning Your Selections
Imperfect selections are a common challenge, especially for beginners. Fortunately, Photoshop provides ample tools for refinement.
Adjusting Feathering and Edge Refinement
As mentioned, the "Feather" setting in the options bar is crucial for controlling edge softness. For more advanced edge refinement, the "Select and Mask" workspace offers a comprehensive suite of tools, including edge refinement brushes, radius adjustments, and smoothing options. This workspace is particularly useful for complex selections like hair or fur, where subtle adjustments are needed to create a natural look.
Correcting Anchor Points
If you've used the Polygonal Lasso Tool and placed an anchor point incorrectly, you can remove it by selecting the point and pressing the "Delete" key. For the Magnetic Lasso Tool, if it snaps to an unwanted edge, you can press "Delete" to remove the last anchor point and try again.
When to Use Which Lasso Tool
The choice of Lasso Tool depends heavily on the subject matter and the desired outcome.
- Regular Lasso Tool: Best for freehand selections on objects with organic, irregular, or smooth curves where precise manual control is paramount. It requires a steady hand and is less forgiving of shaky movements.
- Polygonal Lasso Tool: Ideal for objects with distinct straight lines and sharp corners, such as buildings, geometric shapes, or products with defined edges. It simplifies the selection process for rectilinear subjects.
- Magnetic Lasso Tool: Suited for objects with well-defined edges that have a clear contrast with the background. It's a good starting point for many selections, especially when combined with manual adjustments, and can save time by automating edge detection.
Beyond the Basics: Integrating Lasso Tools into Your Workflow
The Lasso tools are not isolated instruments; they are part of a larger ecosystem of selection tools within Photoshop. Often, the most effective approach involves combining Lasso tools with other selection methods, such as the Marquee Tools (for basic shapes), the Quick Selection Tool (for rapid, brush-based selections), or the Pen Tool (for ultimate precision with Bézier curves).
For instance, you might use the Marquee Tool to create a rough rectangular selection, then switch to the Lasso Tool to refine the edges of a specific object within that selection. The ability to add to or subtract from existing selections using the Shift and Alt/Option keys is fundamental to building complex selections piece by piece.
The ultimate goal of using any selection tool, including the Lasso family, is to isolate elements for manipulation. This could involve removing a background, changing the color of an object, compositing multiple images, or applying special effects. The freedom that the Lasso tools, particularly the Regular and Magnetic variants, provide in creating selections that don't conform to simple geometric shapes makes them indispensable for creative photo editing and graphic design.
By understanding the strengths and weaknesses of each Lasso tool, practicing their application, and mastering the associated shortcuts and refinement techniques, users can elevate their Photoshop skills and achieve professional-grade results in their image editing endeavors. The journey from a basic selection to a perfectly isolated subject is one of practice, experimentation, and a deep understanding of the tools at your disposal.