While Photoshop may not feature a dedicated "Star Tool" in the traditional sense, its versatile Polygon Tool offers a surprisingly powerful and flexible method for crafting a wide array of star shapes. This tutorial delves into the intricacies of creating star designs, from basic point configurations to intricate hollowed-out forms, and explores their application as both shape layers and pixel-based elements. Whether you're a beginner looking to add a celestial touch to your projects or an experienced designer seeking advanced techniques, this guide will illuminate the path to creating stellar star graphics within Photoshop.
Harnessing the Polygon Tool for Star Creation
The absence of a distinct "Star Tool" in Photoshop is often a point of confusion for new users. However, the existing Polygon Tool, with a few key adjustments, becomes your primary gateway to generating star shapes. The fundamental principle lies in manipulating the "Star Ratio" setting within the Options bar.
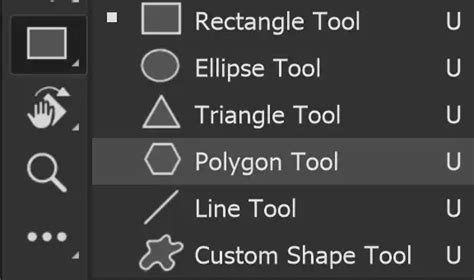
When you select the Polygon Tool, you'll notice options for "Sides," "Star Ratio," and "Inducted Corners." To create a star, you'll primarily focus on the "Star Ratio." By default, this is set to 100%, which produces a perfect polygon. To introduce the characteristic points of a star, you must reduce this value to less than 100%. Experimentation is key here; a lower "Star Ratio" results in more pronounced and sharper star points. For a classic, intensely pointed star, a "Star Ratio" of 5% is an excellent starting point. The "Inducted Corners" option, when used in conjunction with a reduced "Star Ratio," allows for further customization of the star's appearance, creating more complex, multi-pointed effects beyond a simple five-pointed star.
Leveraging Tool Presets for Instant Stars
One of the most efficient ways to expedite the creation of frequently used star designs is through Photoshop's Tool Presets feature. This powerful function allows you to save the current settings of a tool, including those for the Polygon Tool when configured as a star, for quick recall.
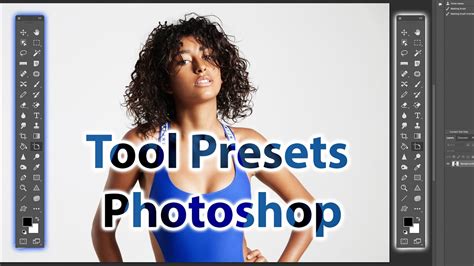
In the top-left corner of your Photoshop workspace, you'll find the Tool Presets panel. Here, you can create custom presets for various star configurations. Imagine having a one-click solution for a perfect five-point star, a gracefully curved star, or even a complex, multi-pointed celestial body. Simply configure the Polygon Tool with your desired "Sides," "Star Ratio," and any other relevant options, then click the "Create new tool preset" button in the Tool Presets panel. You can name your preset descriptively, making it instantly recognizable.
These tool presets are incredibly versatile and work seamlessly in both shape layer and pixel modes. When you select a preset and drag on your canvas, Photoshop generates a star based on the saved parameters. This method can store numerous properties, including the number of star points, the star ratio, and even color if you choose to include it in the preset. Furthermore, you can configure tool options like "Fixed Size" to ensure your stars are consistently rendered at a specific dimension. The ability to create hundreds of instant stars through presets offers a significant boost to workflow efficiency, particularly when dealing with projects that require a multitude of star elements.
While the Tool Presets panel is a powerful feature, its tucked-away location might lead some users to overlook its potential. However, for tools like the Polygon Tool, where specific configurations are repeatedly needed, it's an invaluable asset. You can customize presets for all tools, but their utility is particularly pronounced for shape-generating tools like this. The "Create command" on the right-side menu offers another avenue for managing and creating your own presets, allowing for a highly personalized Photoshop experience.
Shape Layers vs. Pixel Designs: Understanding the Differences
When creating star shapes in Photoshop, you have two primary approaches: as a shape layer or as a pixel-based design. Each offers distinct advantages and is suited for different applications.
Shape Layers: The Power of Vector Flexibility
Adding a star as a vector shape layer provides unparalleled flexibility. Vector graphics are resolution-independent, meaning you can scale, rotate, and transform them to any size without any loss of quality or pixelation. This makes shape layers ideal for designs that might need to be resized later or incorporated into projects with varying resolution requirements.
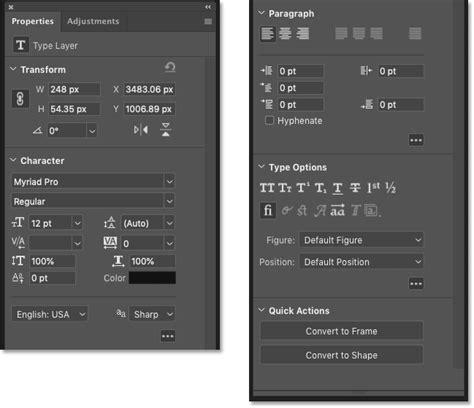
Once a star is created as a shape layer, you can easily manipulate its properties. The "Properties" panel, accessible through the "Window" menu, is your command center for interactive modifications. Here, you can dynamically adjust the number of points, alter the "Star Ratio," and refine other parameters in real-time. This is a significant advantage over the Options bar, which primarily dictates settings for new shape creations.
Furthermore, shape layers can be combined with other vector shapes using Photoshop's powerful "Combine Shapes" commands found in the "Layer" menu. Operations like "Unite," "Subtract Front Shape," "Intersect Shape Areas," and "Exclude Overlapping Areas" open up a universe of possibilities. By combining multiple star shapes or other vector elements, you can construct incredibly intricate and unique designs, literally creating millions of different star variations. This collaborative approach to shape building is a cornerstone of advanced vector illustration within Photoshop.
The ability to tweak individual star points, both inner and outer, is another significant benefit of using vector shape layers. The "Direct Selection Tool," found in the Tools panel, allows you to precisely target and manipulate the anchor points and handles of your star shape. This level of granular control enables you to refine the curves, sharpen or soften points, and achieve highly customized star forms that go beyond the initial creation parameters.
Pixel Designs: Direct Manipulation and Effects
Alternatively, you can add star shapes as a pixel design. This can be done by rasterizing a shape layer or by using the Polygon Tool in "Pixel" mode. When a star is created as pixels, it becomes part of the raster image, and its properties are fixed at the time of creation.
In pixel mode, tool presets are applied as a pixel, utilizing the current foreground color and not a stored color. This means that if you change your foreground color after creating a pixel star, the star itself won't update. However, pixel-based stars can be easily integrated into existing raster artwork and are readily compatible with a wide range of Photoshop's filter effects and layer styles.
You can apply effects via the "Filter" menu and add layer styles such as drop shadows, glows, and bevels directly to the pixel star. This offers a different creative pathway, focusing on textural and stylistic embellishments rather than structural modifications. While you lose the scalability benefits of vector shapes, you gain immediate access to Photoshop's extensive array of raster-based manipulation tools.
Crafting Hollow Star Designs
A popular and visually striking star design is the hollowed-out star. This effect can be achieved with remarkable ease using Photoshop's vector shape capabilities, specifically the "Subtract Front Shape" command.

Begin by creating your first star as a vector shape layer using the Polygon Tool. Ensure it has the desired number of points and "Star Ratio." Next, hold down the Alt (Windows) or Option (Mac) key. This action will activate the duplicate function as you drag the existing star shape. Duplicate the star and then resize it to be smaller than the original, using the bounding box handles.
For precise alignment, it's crucial to center the smaller star within the larger one. Use the alignment tools available in the Options bar or the Properties panel to align the centers both horizontally and vertically. Once both stars are perfectly aligned, navigate to the "Layer" menu, select "Combine Shapes," and then choose "Subtract Front Shape." This operation will effectively "cut out" the smaller star from the larger one, leaving you with a hollowed-out star design. This technique is incredibly powerful for creating a variety of outlines and frame-like elements.
Advanced Star Customization and Applications
The versatility of Photoshop's star creation methods extends far beyond basic shapes. By combining techniques and exploring advanced options, you can produce truly unique and dynamic star designs.
Modifying Individual Points: As mentioned earlier, the Direct Selection Tool is indispensable for refining the individual points of a vector star. You can select a single anchor point and adjust its position, manipulate the bezier handles to create curves or sharp angles, and even add or delete points to alter the fundamental structure of the star. This granular control allows for organic, hand-drawn star aesthetics or highly geometric, precise forms.
Combining Shapes for Complex Forms: The "Combine Shapes" commands are not limited to just creating hollow stars. You can unite multiple stars of different sizes and orientations to create intricate patterns or layered star effects. Intersecting shapes can be used to create star-like masks or to isolate specific areas of a design. Experimenting with different combinations and orders of operations can lead to unexpected and creative results.
Applying Layer Styles and Filters: For both vector shape layers and pixel-based stars, layer styles and filters offer a vast playground for stylistic enhancement. Drop shadows add depth, inner and outer glows can create luminous effects, and bevels and embosses can give a three-dimensional appearance. Filters from the "Filter Gallery" can introduce textures, distortions, and artistic interpretations to your star designs, transforming them into everything from distressed vintage elements to futuristic glowing orbs.
How to make a star with the polygon tool only in Photoshop | 4 point star, star shape and outline
Creating Starbursts and Radiating Effects: While not a direct "star tool" function, the principles of creating stars can be adapted to generate starbursts and radiating effects. By creating a central point and then duplicating and rotating smaller star shapes or lines around it, you can construct dynamic bursts of light or energy. This often involves using the "Transform Again" command (Ctrl+Alt+Shift+T or Cmd+Option+Shift+T) after an initial transformation and duplication.
Integrating Stars into Larger Compositions: Whether used as focal points, decorative elements, or background textures, stars can significantly enhance a wide range of designs. They are commonly employed in branding, website design, illustrations, and digital art to convey themes of brilliance, achievement, guidance, or magic. The ability to create them as scalable vector shapes ensures they integrate seamlessly into designs of any dimension, from small icons to large-format prints.
The journey of creating star shapes in Photoshop is one of exploration and creative application. By understanding the capabilities of the Polygon Tool, mastering the use of tool presets, and leveraging the flexibility of shape layers, you can unlock a universe of stellar design possibilities. Whether you aim for simple, elegant stars or complex, dynamic compositions, Photoshop provides the tools to bring your celestial visions to life.