Face swapping, also known as head swapping, has become one of the most popular and engaging uses of Adobe Photoshop. Far from being an exclusive skill for seasoned professionals, the ability to seamlessly transfer a face from one image to another is now accessible to everyone, offering a wealth of creative possibilities from subtle touch-ups to outright comedic effect. This tutorial will guide you through the essential techniques, from basic selections to advanced blending, ensuring you can achieve realistic and impressive results. Whether you aim to fix a momentarily closed eye in a cherished family portrait, create amusing profile pictures, or simply explore the fun side of digital manipulation, understanding Photoshop's face-swapping capabilities is an invaluable skill.
Selecting Your Subjects and Understanding the Basics
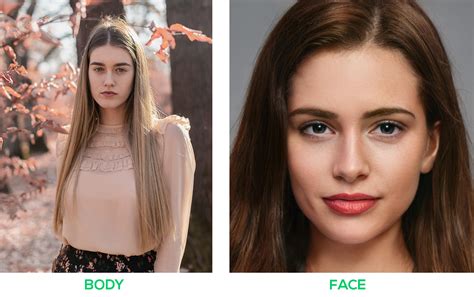
The foundation of any successful face swap lies in careful image selection. For the most convincing results, it's advisable to choose two photographs where the subjects are facing in a similar direction and the lighting conditions are comparable. Pay close attention to the placement of shadows on both faces; images with minimal shadows and soft lighting generally prove easier to work with. While novelty face-swap apps offer quick, often humorous transformations, achieving a truly realistic look requires the granular control that Photoshop provides.
When you have your chosen images, the first step is to bring them into Photoshop. You can do this by navigating to File > Open or by using the keyboard shortcut Ctrl+O (Windows) or Command+O (macOS). For clarity in the process, we'll refer to the image providing the face as the "Face" photo and the image containing the body as the "Body" photo.
Choosing the Right Tools for Selection
The initial stage involves isolating the face you wish to transplant. Photoshop offers several powerful tools for this purpose, each suited to different scenarios.
- The Lasso Tool: This is a fundamental tool for freehand selections. It's useful for drawing a rough outline around the key features of the face you want to swap. When using the Lasso Tool, it's generally a good idea to select slightly more than you think you'll need, encompassing important features like cheekbones and eyebrows, but typically avoiding the hair to prevent complications later.
- The Object Selection Tool: For more complex selections or when you need to isolate specific elements like an eye, nose, or an entire head, the Object Selection Tool is highly effective. It allows Photoshop's AI to identify and select distinct objects within an image, making the process of cutting out a face more streamlined.
- The Marquee Tool: While primarily for geometric selections, the Marquee Tool can be a starting point for defining areas before refining them with other selection tools.
Once you have made your selection with a tool like the Lasso Tool, you will see a dashed marquee line, often referred to as "marching ants," around your chosen area. To prepare this selected face for transfer, press Ctrl+C (Windows) or Command+C (macOS) to copy it.
Transferring and Positioning the New Face
With the desired face copied, the next step is to paste it onto your main image. Navigate to your "Body" image in Photoshop and use Ctrl+V (Windows) or Command+V (macOS) to paste the copied face. At this point, the pasted face will likely not be aligned or sized correctly, and that's perfectly normal.
Aligning and Resizing with Precision
The key to a believable face swap lies in meticulous alignment and resizing. The Layers panel in Photoshop (accessible via Window > Layers) is crucial here. Ensure the newly pasted face layer is selected.
- Rename Your Layer: It's good practice to rename layers to keep your workflow organized. Double-click on the layer name (e.g., "Layer 1") and rename it to something descriptive, like "Face."
- Adjust Opacity: To accurately gauge the size and position of the new face relative to the original, reduce the opacity of the "Face" layer. Setting it to around 50% allows you to see the underlying features of the "Body" image.
- Transform and Scale: Select
Edit > Transform > Scale. A bounding box will appear around the pasted face. To resize proportionally, click and drag one of the corner handles while holding down theShiftkey. As you resize, align key features like the eyes, nose, and mouth with their counterparts on the "Body" layer. The reduced opacity will aid in this alignment. Once you are satisfied with the size, pressEnter(Windows) orReturn(macOS) to commit the transformation. - Warping for Nuance: Sometimes, a simple scale and move aren't enough. The Warp feature (
Edit > Transform > Warp) offers more granular control. In Photoshop CC 2019 and older, this uses a 3x3 grid. Newer versions (2020 and above) allow for a customizable grid, offering even greater flexibility. You can split the warp grid further by using the "Split Warp Horizontally," "Split Warp Vertically," or "Split Warp Crosswire" options in the Options bar. For instance, clicking on the top point while holdingShiftbefore clicking the bottom point can create a useful vertical split. This allows you to distort and bend the pasted face to better match the contours and perspective of the target head. - Using Reference Points: For precise scaling, you can utilize a reference point. Select the transform tool, and on the Options bar, you'll see an option to enable the Reference Point (it looks like a small crosshair icon). Drag this reference point to a key feature on the face you're transforming, such as the inner corner of an eye. Then, hold
Alt(Windows) orOption(macOS) and drag a corner handle. This will scale the face towards or away from that reference point, ensuring that critical features remain anchored.

Blending for Seamless Integration
Achieving a natural look requires careful blending of the new face with the existing image. This involves masking, adjusting colors and tones, and potentially using advanced AI features.
Layer Masks and Brushwork
Layer masks are fundamental to non-destructive editing in Photoshop, allowing you to selectively reveal or hide parts of a layer.
- Create an Inverted Layer Mask: With the "Face" layer selected, click on the "Add layer mask" icon at the bottom of the Layers panel (it looks like a rectangle with a circle inside). To make the entire pasted face disappear initially, hold down
Alt(Windows) orOption(macOS) while clicking the mask icon. This creates a black mask, hiding everything on that layer. - Reveal the Face: Select the Brush Tool. Ensure your foreground color is set to white. With the layer mask still selected, begin painting over the area where the original face was. As you paint with white, the "Face" layer will begin to reveal itself over the "Body" layer. Use a soft-edged brush for a more natural transition, particularly around the edges of the face and hairline. If you make a mistake, switch your foreground color to black and paint over the erroneous area to hide it again.
Matching Tones and Colors
The lighting and skin tones between two different photographs can vary significantly. To make the composite look convincing, these differences must be addressed.
- Match Color Feature: Photoshop's
Image > Adjustments > Match Colorfeature can be a powerful tool. Select the "Face" layer, go to this menu, and choose the "Body" image as the source. You can then adjust sliders for Luminance, Color Intensity, and Neutralize to better match the tones. - Adjustment Layers (Curves and Hue/Saturation): For more precise control, use Adjustment Layers.
- Curves: Create a Curves Adjustment Layer (
Layer > New Adjustment Layer > Curves). To ensure this adjustment only affects the "Face" layer, create a clipping mask by pressingCtrl+Alt+G(Windows) orCommand+Option+G(macOS). Now, you can drag the curve to adjust the brightness and contrast of the new face to match the lighting of the body image. Dragging up increases brightness, while dragging down decreases it. - Hue/Saturation: Similarly, a Hue/Saturation Adjustment Layer, also clipped to the "Face" layer, can be used to fine-tune colors. You can adjust the overall hue, saturation, and lightness. For more targeted color correction, use the channel dropdown menu within the Curves or Hue/Saturation panel to adjust individual color channels (Red, Green, Blue). Understanding complementary colors (Red-Cyan, Green-Magenta, Blue-Yellow) can help you correct color casts effectively. For instance, if the new face has a green tint, you would drag down the Green channel curve to add magenta.
- Curves: Create a Curves Adjustment Layer (
Advanced Color Matching Process in Photoshop
Advanced Blending and AI Assistance
Modern versions of Photoshop offer sophisticated tools that can significantly simplify the blending process.
Auto-Blend Layers
The Edit > Auto-Blend Layers feature, originally designed for stitching panoramas, is incredibly effective for face swapping.
- Load Selection: On the "Body" layer, go to
Select > Load Selection. In the dialog box, choose "Face transparency" under Channel and ensure "Invert" is unchecked. This loads the transparency of the "Face" layer as a selection on the "Body" layer. - Contract Selection: To create a slight overlap that aids blending, go to
Select > Modify > Contractand enter a small value, such as 10 pixels. - Delete Area: With the "Body" layer still selected and the contracted selection active, press
Backspace(Windows) orDelete(macOS). This removes the area of the original face on the body layer, creating a clean edge for the new face to fit into. Deselect withCtrl+D(Windows) orCommand+D(macOS). - Enable Auto-Blend: Now, select both the "Face" and "Body" layers in the Layers panel (holding
Shift). Navigate toEdit > Auto-Blend Layers. Choose "Panorama" and crucially, check the boxes for "Seamless Tones and Colors" and "Content-Aware Fill Transparent Areas." This powerful combination attempts to intelligently blend the edges, match lighting, and fill any transparent gaps, often resulting in a remarkably seamless transition.
Generative Fill with AI
For truly complex issues like overlapping hair or "double ears" (where parts of both faces are visible in the wrong places), AI-powered Generative Fill offers a groundbreaking solution.
- Identify Problem Areas: After initial blending, identify any areas that still look unnatural or require correction.
- Create a New Layer: Add a new, empty layer above your composite.
- Select and Generate: Use the Lasso Tool to select the specific area that needs fixing. Then, go to
Edit > Generative Fill. You can leave the prompt field empty and simply click "Generate." Photoshop's AI will analyze the surrounding pixels and generate content to seamlessly blend the selected area, often providing multiple variations from which to choose. This is particularly useful for reconstructing lost details or harmonizing disparate elements.
Final Touches and Refinements
Even with advanced tools, a final review and touch-up phase can elevate your face swap from good to professional.
- Refine Hair and Edges: If hair strands from the original image are obscured by the new face, you might need to use the Eraser Tool (with a soft brush and low opacity) on the "Face" layer to carefully reveal the original hair underneath. Conversely, if the new face's hair doesn't quite match, you might need to carefully blend or even composite elements from both original images.
- Compositing Ears: A common challenge is mismatched ears. Sometimes, it's more convincing to composite the original ears from the "Body" image onto the final face swap. This requires careful selection and masking of the original ears and placing them appropriately on the new face.
- Overall Color and Brightness Check: Zoom out and examine the entire image. Does the lighting feel consistent? Are there any lingering color casts? A final Curves or Color Balance adjustment layer (applied globally or with a clipping mask) can help unify the overall look.
By combining meticulous manual techniques with the power of Photoshop's automated and AI-driven features, you can achieve highly convincing and creative face swaps. Remember that practice is key; experimenting with different images and tools will hone your skills and expand your creative potential.
Jesús Ramirez and the Photoshop Training Channel
This comprehensive approach to face swapping is championed by experts like Jesús Ramirez, a renowned digital graphics expert, speaker, and educator specializing in Adobe Photoshop. As the founder of the Photoshop Training Channel, one of the most popular Photoshop YouTube channels globally, Ramirez has consistently provided in-depth tutorials and insights into mastering Photoshop's capabilities. His courses, such as the "Selections and Masking Mastery Course," offer structured learning paths for users aiming to deepen their understanding of fundamental and advanced Photoshop techniques. These resources are invaluable for anyone looking to move beyond basic edits and achieve professional-grade results in complex manipulations like face swapping.
The techniques discussed, from basic selections and transformations to advanced blending with Auto-Blend Layers and AI-powered Generative Fill, empower users to tackle challenges like mismatched hair, overlapping features, and inconsistent lighting. The ability to fix closed eyes in group photos, create unique profile pictures, or salvage an otherwise perfect family portrait by swapping a blinked expression for a smile, underscores the practical and creative utility of mastering Photoshop face swapping.
The user-provided content highlights that while novelty apps offer a quick fix, Photoshop provides the control necessary for truly realistic edits. The process often involves layering images, using layer masks, and carefully aligning features. The advice to work with photos of similar size and composition, and to pay attention to shadow placement, are crucial starting points. For more complex swaps, such as a cat face swap or meme creation, tools like the Object Selection tool become essential for isolating specific elements. The idea of turning down the opacity of the new face layer to better align it with the original features is a widely recommended practice. Furthermore, the Match Color feature is noted as a powerful tool for harmonizing disparate skin tones and lighting conditions across different images.
The tutorial segments also emphasize the importance of converting the face layer to a Smart Object. This non-destructive editing approach ensures that any scaling or transformations applied to the face layer do not degrade its original image quality, allowing for flexibility and re-editing without loss of detail. When transforming, using a reference point and holding Alt (Windows) or Option (macOS) to scale towards that point is a precise method for aligning features. The manual approach, while potentially more time-consuming, offers unparalleled control, keeping edits fully customizable.
The concept of creating an inverted layer mask by holding Alt (Windows) or Option (macOS) while clicking the mask icon is a key technique for starting with a hidden layer and then painting in the desired elements with white. This method is essential for selectively revealing the new face over the body. The need to match brightness and saturation is consistently stressed, with adjustment layers like Curves and Hue/Saturation being the preferred tools for fine-tuning these aspects. The complementary color pairings (Red-Cyan, Green-Magenta, Blue-Yellow) are a useful reminder for color correction.
Finally, the integration of Generative Fill for blending problematic areas and the suggestion to consider compositing original features like ears demonstrate a progression towards leveraging AI and advanced compositing to overcome the trickiest aspects of face swapping, leading to professional-grade results. The recurring mention of the "Selections and Masking Mastery Course" and the founder of the Photoshop Training Channel reinforces the value of structured learning and expert guidance in mastering these techniques.