In the realm of digital art and design, achieving precise control over your work is paramount. Adobe Photoshop, a cornerstone of creative workflows, offers a suite of tools designed to empower artists with this very capability. Among these, the "Lock Transparent Pixels" feature, often colloquially referred to as "Alpha Lock," stands out as a fundamental yet powerful technique. Understanding how to effectively utilize this function can significantly enhance your efficiency and the polish of your final creations, preventing unintended alterations and streamlining complex editing processes.
The Layers Palette and the Lock Icons
Navigating the Layers palette in Photoshop reveals a series of lock icons situated near the top. These icons, from left to right, represent "Lock Transparent Pixels," "Lock Image Pixels," "Lock Position," and "Lock All." Each serves a distinct purpose in safeguarding your layer's integrity.
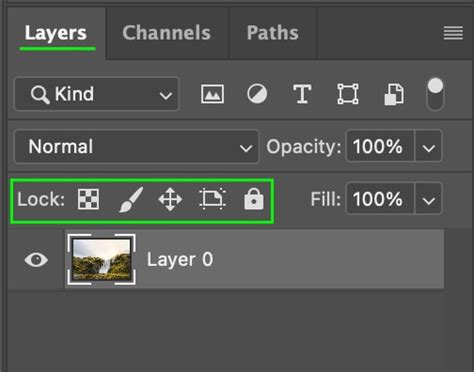
The "Lock Transparent Pixels" icon, the first in this series, is the key to understanding Alpha Lock. When activated, it acts as a digital guardian for the empty spaces within your layer, ensuring that your creative energy is directed solely towards the existing content.
Understanding Alpha Lock: The Concept
At its core, Alpha Lock is a technique used to prevent changes to the transparent areas of a layer. Imagine it as drawing invisible walls around the painted areas of your canvas, allowing you to work exclusively within those boundaries. This feature is particularly useful when you want to paint or edit only the opaque portions of a layer without affecting the transparent pixels. It allows for more precise editing and can save a significant amount of time, especially when working with complex images or designs.
When Alpha Lock is active on a layer, any brush strokes, fills, or edits will only affect the pixels that already contain color or information. The transparent areas, those that are completely empty, become off-limits. Think of them as bouncers on your digital canvas, preventing any unauthorized entry. This is crucial for maintaining clean edges and preventing accidental smudges or color spills into unintended areas.
For example, if you have a colored shape with defined edges, and you wish to modify its color or add details, Alpha Lock ensures that your edits remain confined to the shape itself. If you have a green heart shape and want to change it to red using the Paint Bucket, and the heart has soft edges, Alpha Lock is your ally. Without it, the Paint Bucket might inadvertently affect the background or bleed beyond the intended area.
How to Engage Alpha Lock in Photoshop
The process of activating Alpha Lock is straightforward and accessible within Photoshop's interface.
- Select the Layer: In the Layers panel, click on the layer you wish to protect.
- Locate the Lock Icons: At the top of the Layers panel, you will find the row of lock icons.
- Click "Lock Transparent Pixels": Click on the first icon, which depicts a padlock with transparent squares. A lock symbol will appear next to the layer's name, indicating that the transparent pixels are now locked.
Alternatively, some applications, like Procreate, offer a gesture-based shortcut. In Procreate, you can swipe left-to-right with two fingers on the desired layer to quickly toggle Alpha Lock on or off. While Photoshop's primary method is through the icon, understanding these variations can be helpful if you work across multiple digital art programs.
The Practical Benefits of Locking Transparent Pixels
The utility of Alpha Lock extends across various digital art and design tasks. Its primary advantage lies in its ability to facilitate precise edits without the risk of unintended alterations.
Maintaining Edges and Preventing Color Bleed
One of the most common scenarios where Alpha Lock proves invaluable is when working with colored shapes or elements that have distinct or soft edges. If you want to add highlights, shadows, or simply change the color of an existing element without affecting the surrounding transparent space, Alpha Lock is the solution.
Consider a scenario where you've meticulously painted a character's hair. If you then decide to add strands of light or a different hue within that hair, activating Alpha Lock on the hair layer ensures that your new strokes remain confined to the existing hair pixels. This prevents you from accidentally painting on the background or other parts of your illustration.
Streamlining Workflow for Complex Designs
When working on intricate illustrations or designs with numerous layers, the ability to isolate and modify specific areas without disrupting others is crucial. Alpha Lock allows you to "stay inside the lines" of your existing artwork, making it an indispensable tool for detailed work. This is particularly helpful when you have limitations on the number of layers you can use, as it allows you to build up detail on a single layer without needing to create numerous new layers for every minor adjustment.
Destructive vs. Non-Destructive Editing
It's important to note that Alpha Lock is a form of "destructive" editing in the sense that once you make changes to the pixels of a locked layer, those changes become permanent on that layer. If you were to erase something after applying Alpha Lock, you would erase the entire layer, including the original artwork. This contrasts with "non-destructive" techniques like Clipping Masks or Layer Masks, which allow for easier reversibility and modification of changes.
However, for tasks where you are confident in your edits and simply want to add detail or color within existing boundaries, Alpha Lock is highly efficient. It's about working with what's already there, rather than adding new elements that are then constrained.
Alpha Lock vs. Other Locking and Masking Techniques
While Alpha Lock offers significant control, it's essential to understand its distinction from other related features in Photoshop and other digital art programs.
Alpha Lock vs. Layer Lock
The "Lock All" icon in Photoshop, often referred to as Layer Lock, is a more comprehensive form of protection. When a layer is fully locked, you cannot make any edits whatsoever - no painting, moving, transforming, or deleting. It's a complete freeze of the layer. Alpha Lock, on the other hand, specifically targets the transparency of the layer, allowing edits only to the opaque pixels.
Alpha Lock vs. Clipping Masks
Clipping Masks are a powerful non-destructive technique. When you create a clipping mask, a layer is "clipped" to the layer directly below it. This means that the content of the clipped layer will only be visible where the layer below it has pixels. Imagine drawing a pattern on one layer and clipping it to a shape on another; the pattern will only appear within the boundaries of that shape.
The key difference is that clipping masks are independent layers. You can move, edit, or delete the clipped layer without affecting the base layer. This offers greater flexibility for experimentation and revisions, as changes are not permanently applied to the original pixels. Clipping masks are often described as the "cooler cousin" of Alpha Lock due to their non-destructive nature.
How to Use Alpha Lock, Clipping Mask & Layer Mask in Procreate - Procreate Tips
Alpha Lock vs. Layer Masks
Layer Masks are another fundamental non-destructive editing tool. A layer mask allows you to selectively hide or reveal portions of a layer without actually erasing any pixels. You paint on the mask using black, white, and shades of gray. White reveals the layer's content, black conceals it, and shades of gray create varying degrees of transparency.
The analogy of a lottery scratch card is often used: a layer mask allows you to "scratch off" parts of a layer to reveal what's beneath, but you can "unscratch" it at any time by painting with white on the mask. This preserves the original layer's data, offering immense flexibility.
Technical Considerations and File Formats
The concept of "alpha" is intrinsically linked to transparency information in digital imaging. In an RGBA (Red, Green, Blue, Alpha) color model, the alpha channel is the fourth channel, which specifically communicates transparency information for each pixel. Many file formats can store this alpha channel, including Adobe Photoshop (.PSD), TIFF (.TIF), PNG (.PNG), and Targa (.TGA). When a file format specifies color depth with a plus sign (e.g., Millions of Colors+), it often denotes the inclusion of an alpha channel.
The Knoll Unmult plug-in, for instance, can be used to generate an alpha channel from the dark areas of a layer, which is particularly useful for compositing light effects like lens flares or fire onto other layers. A "matte" is essentially a layer or channel that defines these transparent areas, where white typically indicates opaque and black indicates transparent.
Beyond Photoshop: Alpha Lock in Other Applications
The principles of Alpha Lock are not exclusive to Photoshop. Many other digital art applications, including Procreate on iPad, incorporate similar functionalities, often under the same name or a closely related one. Esther Nariyoshi, a designer and illustrator, highlights how the concepts of Alpha Lock, Clipping Masks, and Layer Masks are transferable across different programs, allowing artists to maintain a consistent workflow regardless of their chosen tools.
In Procreate, Alpha Lock is easily accessible through the layer options menu or via a two-finger swipe gesture. This widespread availability underscores the fundamental importance of this technique for digital artists seeking precise control over their work.
Frequently Asked Questions About Alpha Lock
To further clarify the functionality and application of Alpha Lock, here are some common questions and their answers:
Can I unlock transparent pixels once they are locked?
Yes, you can easily unlock transparent pixels in Photoshop. To do this, simply click on the "Lock Transparent Pixels" icon again. The lock symbol next to the layer will disappear, indicating that the transparent pixels are now unlocked and can be edited.
What happens if I try to paint over locked transparent pixels?
When you lock transparent pixels and then try to paint over them, Photoshop will only apply the paint to the opaque areas of the layer. The transparent pixels remain unaffected. This allows you to make changes to the visible parts of the layer without worrying about accidentally altering the transparent areas.
Can I use the ‘Lock Transparent Pixels’ feature with all types of layers?
The "Lock Transparent Pixels" feature can be used with any layer that contains transparent pixels. However, it cannot be used with background layers as these do not have any transparent pixels. To use this feature with a background layer, you would first need to convert it to a regular layer by double-clicking on it in the Layers panel.
Does locking transparent pixels affect other editing tools in Photoshop?
Locking transparent pixels primarily affects painting tools. However, it can also impact other editing tools that change pixel information, such as the Clone Stamp or Healing Brush tools. When transparent pixels are locked, these tools will only affect the opaque areas of the layer.
Can I lock transparent pixels in multiple layers at once?
Photoshop does not currently support locking transparent pixels in multiple layers simultaneously. You would need to select each layer individually and lock its transparent pixels.
What is the difference between ‘Lock Transparent Pixels’ and ‘Lock Image Pixels’?
"Lock Transparent Pixels" prevents changes to the transparent areas of a layer, while "Lock Image Pixels" prevents any changes to the layer’s pixel information, including opaque areas. When "Lock Image Pixels" is enabled, you cannot paint on, transform, or otherwise modify the layer's content.
Are there any shortcuts for locking and unlocking transparent pixels?
While Photoshop's primary method is clicking the icon, some users report using the '/' key as a shortcut in certain contexts or older versions. However, the most reliable method remains the direct click on the icon. In applications like Procreate, a two-finger swipe is a common shortcut.
By understanding and effectively employing the Alpha Lock feature, digital artists can achieve a higher level of precision, protect their work from accidental modifications, and streamline their creative process, leading to more polished and professional results.