Creating visually appealing graphics often involves more than just placing standard text on a canvas. For designers looking to add a unique flair, typing text along a path in Photoshop is an essential skill. This technique allows for intricate text placement, particularly useful for logos, circular designs, and custom layouts. Whether you're aiming to create a brand logo or simply experiment with creative typography, understanding how to manipulate text along a defined path is invaluable. This guide will walk you through the process, from setting up your document to fine-tuning your text's position and appearance.

Setting Up Your Photoshop Document
Before diving into text manipulation, a well-prepared document is key. For this tutorial, we'll work within a 1000px by 1000px canvas. This size is versatile for various projects, including social media graphics and logo mockups.
Enabling Rulers and Guides
To ensure precise placement, it's crucial to have your rulers visible. Navigate to View > Rulers (or use the shortcut CMD + R for Mac, Ctrl + R for PC). Once rulers are enabled, you can create guides. Click and drag from the top ruler down to the center of your document to create a horizontal guide. Similarly, drag from the left ruler to the center to establish a vertical guide. These guides will intersect precisely at the center of your canvas, providing a perfect anchor point.
For optimal accuracy, ensure that snapping is enabled. Go to View again and make sure Snap is checked. This feature will cause your guides and subsequently your created shapes to "snap" into place, guaranteeing alignment. To confirm your rulers are set to the correct scale, you can right-click on a ruler and select Percent.
Creating Your Path with the Ellipse Tool
A path is the foundation upon which your text will flow. Photoshop offers several tools to create paths, including the Pen Tool for freehand shapes, custom shape tools, and basic shape tools like the Ellipse Tool. For a circular path, the Ellipse Tool is ideal.
Drawing the Circle Path
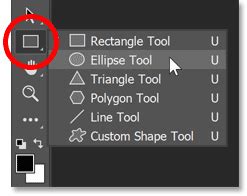
- Select the Ellipse Tool: Locate the Ellipse Tool on the left-hand toolbar. It's often nested behind the Rectangle Tool.
- Set Tool Mode to "Path": In the Options Bar at the top of the screen, ensure that the
Pathoption is selected, notShapeorPixels. This is critical for creating a vector path that text can follow. - Center and Drag: Click directly on the intersection point of your horizontal and vertical guides. This will be the center of your circle.
- Create from Center: To draw the circle outwards from the center point, hold down the
Optionkey (Mac) orAltkey (PC) as you begin dragging. - Constrain to a Perfect Circle: To ensure your shape is a perfect circle and not an oval, hold down the
Shiftkey while still holding down theOptionorAltkey. Drag the circle outwards until it reaches your desired size. - Release: Once you're satisfied with the size, release the
ShiftandOption/Altkeys first, followed by your mouse button.
This process creates a vector path that is now ready to accept text. The beauty of using a path is that it's resolution-independent, meaning you can scale it without losing quality.
Adding Text to the Path
With your circular path created, you can now add text that will conform to its shape.
Typing on the Top Half of the Circle
- Select the Type Tool: Choose the "Horizontal Type Tool" from the toolbar.
- Set Foreground Color: Ensure your foreground color is set to white, or your desired text color. This makes it easier to see the text against darker backgrounds.
- Click on the Path: Hover your Type Tool cursor over the path you created. You'll notice the cursor change from an I-beam to an I-beam with a dotted wavy line. Click anywhere on the top half of the path.
- Begin Typing: Start typing your desired text. As you type, the text will automatically follow the curve of the path.
- Commit Text: Press
Enter,Return, or select the "Move" tool to commit your text entry.
Aligning and Positioning Top-Half Text
After typing, the text might not be perfectly positioned. The Path Selection Tool is your key to fine-tuning its placement.
- Select the Path Selection Tool: This tool is typically located near the Type Tool and Ellipse Tool. It usually appears as a black arrow.
- Select Your Text: Make sure your text layer is active. Then, hover your Path Selection Tool cursor over the text itself. The cursor will change into an I-beam with a small arrow on the side, indicating you can manipulate the text's position along the path.
- Drag to Position: Click and drag your text along the path. You can move it forwards or backward.
- Align to Center: For a more refined look, you can use the
Propertiespanel (Window > Properties). With your text layer selected, look for alignment options. Clicking the "Center" align option in the Properties panel will center your text relative to its current position on the path. - Adjust Start Point: Drag your text to your ideal starting point. For text to fill the top half of a circular logo, aligning it with the horizontal guide is a good strategy.
Reformatting Your Text (Optional)
You can easily modify your text's appearance at any time.
- Select the Type Tool: Double-click on your text layer or select the Type Tool and click directly on your existing text.
- Adjust Font Properties: Use the Options Bar or the
Propertiespanel to change the font size, font family, color, or leading, kerning, and tracking. If the text is too large or long, it might appear cut off.
Addressing the Bottom Half of the Circle
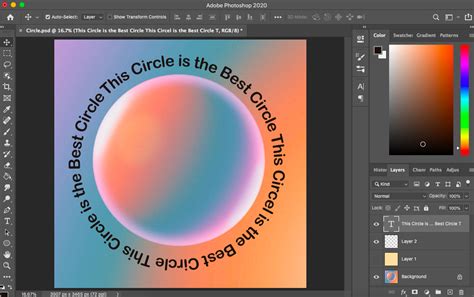
Typing on the top half is straightforward, but aligning text on the bottom half requires a slight adjustment. Often, text placed on the bottom half can appear too close to the center, looking awkward.
Aligning Bottom-Half Text
- Use the Character Panel: Open the
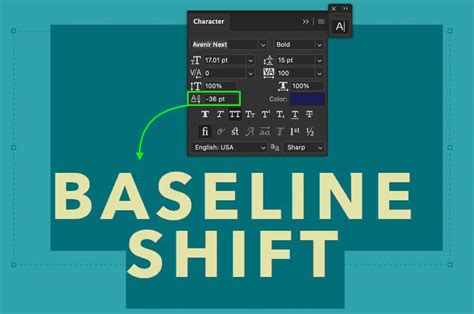
Characterpanel by going toWindow > Character. - Adjust Baseline Shift: This is the crucial step for aligning text on the bottom of a path. Select your text layer. Locate the "Baseline Shift" option within the Character panel.
- Decrease Baseline Shift: To move the text further away from the center and align it with the curve of the bottom half, you need to decrease the Baseline Shift value. You can either type in a negative value or click and drag the value to the left. Experiment until the bottom text visually aligns with the top text and sits comfortably on the lower arc.
Flipping and Reversing Text
Sometimes, text might appear on the "wrong" side of the path, or in reverse. This is a feature, not a bug, and can be easily corrected.
- Flipping Text: If your text appears on the opposite side of the path than intended, use the Path Selection Tool to click and drag the text across the path. This will flip it to the other side. Be careful not to drag across the path itself, as this can sometimes invert the text direction.
- Reversing Direction: If the text is written backward, ensure you're dragging the text cursor along the path in the correct direction. You can also achieve this by selecting the text and using the Path Selection Tool to drag it back across the path until it reorients correctly.
Advanced Text Manipulation Techniques
While typing directly on a path is powerful, Photoshop offers additional methods for creating curved and warped text.
Warping Text
For more stylized effects, the "Warp Text" feature can be immensely useful.
- Type Your Text: First, create your text normally, not necessarily on a path.
- Access Warp Text: With the text layer selected, go to the Options Bar and click the "Create warped text" icon (often looks like a "T" with a curve above it). Alternatively, you can use
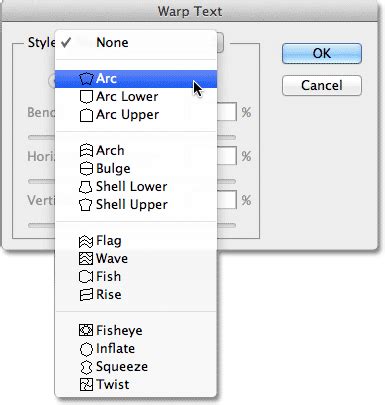
CTRL/CMD + Tto activate the Free Transform tool, then right-click and select "Warp." - Choose a Style: A dropdown menu offers various warp styles like Arc, Flag, Wave, and Shell.
- Adjust Bending and Distortion: Use the
Bend,Horizontal Distortion, andVertical Distortionsliders to fine-tune the curvature and shape of your warped text.
Using Smart Objects for Text Transformation
Smart Objects provide a non-destructive way to transform text, allowing you to scale, rotate, and warp it without losing original quality.
- Create Text: Type your text as usual.
- Convert to Smart Object: Right-click on your text layer in the Layers panel and select
Convert to Smart Object. - Transform: Now you can use Free Transform (
CTRL/CMD + T) to scale, rotate, or apply warp transformations. The transformations will be applied to the Smart Object, preserving the original text data within. This is particularly useful if you plan to apply complex distortions or if you need to easily revert to the original text.
Fine-Tuning and Finalizing Your Design
Once your text is positioned along the path, several final touches can elevate your design.
Editing Text Properties
Remember that text on a path in Photoshop remains editable as text. You can:
- Change the font family and size.
- Adjust the color, leading, kerning, and tracking.
- Modify the baseline shift for precise vertical alignment.
- Even completely rewrite the text.
To edit, simply select the Type Tool and click on your text. The path will become visible again, allowing you to make changes.
Hiding the Path
Once you are satisfied with the text placement and appearance, you may want to hide the path itself. The path is part of the vector shape. To hide it from view, simply select any layer other than your Type layer in the Layers panel. The path line will disappear, leaving only your styled text on the canvas.
Applications and Further Exploration
Typing text along a path is a versatile technique with numerous applications:
- Logo Design: Creating circular or curved text elements for brand logos.
- T-shirt and Merchandise Design: Adding text that wraps around graphics or follows specific shapes.
- Poster and Flyer Design: Incorporating unique typographic arrangements for visual interest.
- Web Design Elements: Using curved text for banners or decorative accents.
For those interested in mastering more advanced Photoshop techniques, resources like the "Selections and Masking Mastery Course" offer in-depth training on crucial graphic design skills. Courses led by experts like Jesús Ramirez, founder of the Photoshop Training Channel, provide step-by-step lessons and practical application files.
How To Type In A Circle In Photoshop (Best Way)
Learning to control text within designs is a fundamental skill that significantly enhances the visual appeal and flow of your projects. By mastering the art of typing along a path, you unlock a new level of creative control in Photoshop, allowing your text to become an integral and dynamic part of your overall design. The ability to manipulate text in this way is not just about aesthetics; it's about effective communication and visual storytelling.