Adding, editing, or changing text on an image unlocks a vast realm of creative possibilities. This capability allows for the seamless embedding of messages, the creation of compelling advertisements, or the addition of professional watermarks to your photographs. This tutorial aims to demystify the fundamental aspects of manipulating text within Photoshop CC, guiding you through the most prevalent text-based editing tasks.
Opening Your Image and Selecting the Type Tool
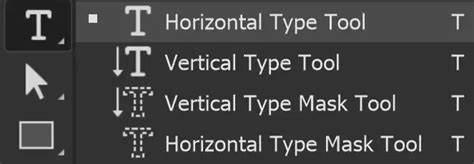
The initial step in any Photoshop text editing endeavor is to open the desired image. Once your photograph is visible on the screen, the next crucial action is to select the Horizontal Type Tool. This can be accomplished either by pressing the 'T' key on your keyboard or by locating and left-clicking its icon within the Photoshop toolbar.
Strategic Text Placement: Leveraging Design Principles
Before you begin typing, it is paramount to consider the optimal placement of your text. Adhering to established principles of photography, such as the Golden Ratio, the Rule of Thirds, or other compositional guidelines, will elevate the professionalism of your text integration. These frameworks provide visual anchors that enhance readability and aesthetic appeal.
To facilitate precise placement, Photoshop offers a powerful feature for creating guides. Navigate to View >> New Guide Layout… to access this functionality. Within the dialog box, you can define the number of rows and columns. For a standard Rule of Thirds layout, a configuration of three rows and three columns, with no gutter, is often ideal. Once your guide layout is established, these visual lines become invaluable for positioning your chosen words with intention and accuracy.
For instance, if the desired phrase is "Dream," implementing it within these guides ensures it occupies a visually balanced and impactful position within the image.
Font Selection and Modification
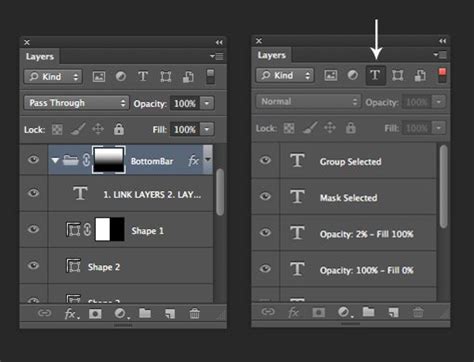
After introducing text using the Horizontal Type Tool, you will invariably need to refine its appearance. To alter the font of your text, ensure the text layer is selected and the text itself is highlighted. Then, simply select your desired font from the drop-down menu available within the Horizontal Type Tool options.
Should the font you wish to use not be readily available, it may necessitate importing it into Photoshop. The process of changing font size or applying effects is remarkably similar. With the text highlighted, you can directly adjust these parameters. To highlight text, confirm that the correct font layer is selected and that the Horizontal Type Tool is active.
How to use Text Tool in Photoshop (2023)
Fine-Tuning Text Position and Alignment
Once your text is styled, the Move Tool (accessible by pressing 'V' or selecting its icon) becomes instrumental for making minor adjustments to its position. For exacting alignment with your guides, Photoshop's "Snap to" feature is an indispensable asset. To activate this, navigate to View >> Snap or View >> Snap To. This ensures that your text aligns perfectly with the established guides, contributing to a polished and professional final image.
The process of achieving a desired aesthetic often involves a degree of experimentation. For example, aiming for a bold yet refined look might involve selecting a very bold font but employing a tighter, smaller font size. Strategic placement, such as aligning text with a third of the image or centering it within a specific visual element, can significantly contribute to a clean and accomplished outcome.
Enhancing Text with Blend Modes
A particularly effective technique for integrating text seamlessly into an image is the utilization of blend modes. These can be accessed via the drop-down menu situated above the layer panel. By applying a blend mode, you can achieve various effects, such as making text appear as if it's printed on an item like a shirt or cup, or infusing the text with the texture of the image, thereby increasing its visual harmony.
Removing Text from Images
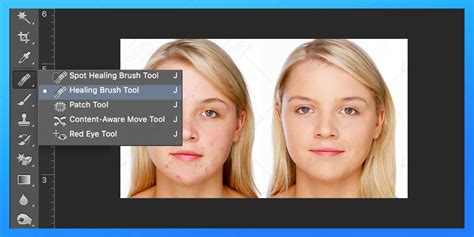
Often, the need arises to remove unwanted text from an image, whether it's a distracting logo, a brand name, or a piece of text you wish to replace entirely. Photoshop offers several robust methods for text removal, mirroring the techniques used for removing any unwanted element. The primary tools for this task are the Spot Healing Brush Tool, the Clone Stamp Tool, and Content-Aware Fill.
The Spot Healing Brush Tool is exceptionally user-friendly, allowing you to simply paint over an area to remove imperfections. It is particularly effective for smaller text elements. Select this tool by pressing 'J' or locating its icon in the toolbar.
For medium-sized areas of text that the Spot Healing Brush might struggle with, the Clone Stamp Tool provides greater control. To use it, press 'S' or select its icon. You then sample a source area of the background by holding the 'Alt' key and left-clicking, effectively copying that texture to overwrite the text.
The Content-Aware Fill tool represents a more advanced and powerful solution for larger or more complex removals. It leverages Photoshop's intelligent algorithms to analyze the surrounding area and intelligently fill the selected space. To utilize this, first select the text you wish to remove using a selection tool like the Lasso, Marquee, or Quick Selection tools (keyboard shortcuts: L, M, W respectively). Once the selection is made, navigate to Edit >> Content-Aware Fill. A new window will appear, allowing you to refine the areas Photoshop uses to generate the fill.
It is crucial to remember to save your layered document as a PSD file throughout this process to avoid losing any work.
Replacing Text: Combining Removal and Addition
Replacing existing text with new content is a straightforward process that combines the text removal techniques with the text addition methods previously discussed. This two-step approach-removing the old and adding the new-is highly efficient for achieving a polished final product. This allows for complete control over new formatting, spacing, fonts, boldness, and textures.
Advanced Text Manipulation Techniques
Beyond basic addition and removal, Photoshop offers a suite of tools for more creative text manipulation.
Point Text vs. Paragraph Text
Understanding the distinction between Point Text and Paragraph Text is fundamental. Point text is created by simply clicking on the image with the Text Tool and typing; it remains on a single line unless an Enter key is pressed. Paragraph text, on the other hand, is created by dragging a text box, constraining the text within that defined area, making it ideal for larger blocks of text and easier centering.
Transforming Text
Photoshop provides extensive options for transforming text to add dynamic visual interest. This includes adjusting the spacing of individual letters, the height and width of characters, and even converting text between uppercase and lowercase.
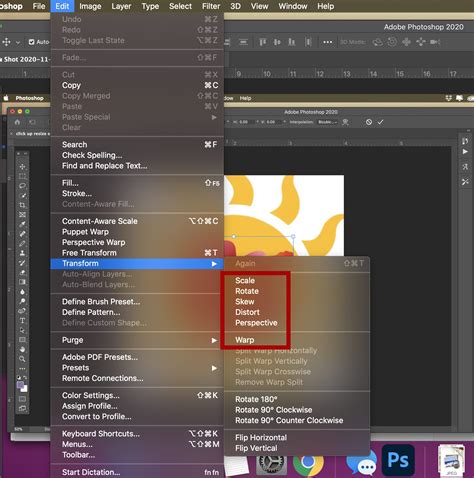
To angle or slant text, select the text layer or the text itself, then go to Edit > Transform > Skew. Dragging the corner handles allows for precise angling. Similarly, Edit > Transform > Scale and Edit > Transform > Rotate offer further control over the text's dimensions and orientation.
The Warp Text Tool opens up possibilities for creating curved or distorted text effects, allowing text to flow along custom paths or shapes.
Enhancing Readability and Impact
Ensuring text is legible against complex backgrounds is a common challenge. Anti-aliasing settings, found in the top context menu (option #4), should not be set to "None," especially for online images, as this can affect text edge clarity.
Color choice is also critical. While white text often offers a clean aesthetic, it can easily be lost in busy images. An effective technique to make light-colored text stand out is to add a subtle drop shadow. For instance, a near-invisible black drop shadow can provide a tremendous visual punch without appearing overtly artificial. Adjusting the shadow size based on image resolution (e.g., from 1 to 10 for print) can further refine this effect.
When the background behind text is distracting, a simple yet effective method involves creating a new layer between the photo and the text. Using a soft-edged brush and the Eyedropper Tool to sample a mid-tone color from the background (e.g., the sky just above the text), you can then paint over the area behind the text on this new layer. This subtly darkens the background, making the text pop more effectively.
Decorative Fonts and Embellishments
For adding visual flair and unique stylistic elements, decorative fonts are invaluable. These often function as graphic elements rather than traditional letters, offering a wide array of swooshes, swirls, and other embellishments. Hundreds of free decorative fonts are available online, providing endless possibilities for artistic expression.
Editing Text Messages in Photoshop
A specific and popular application of text editing in Photoshop involves manipulating screenshots of text message conversations. This allows for the creation of humorous scenarios, visual storytelling, or the correction of perceived errors.
The process begins with taking a screenshot of the desired text message exchange. This image is then imported into Photoshop. Within Photoshop, the Eyedropper Tool is used to sample a color directly from the message bubble containing the text to be altered. Subsequently, the Rectangular Marquee Tool is employed to select the area of the original message. The Paint Bucket Tool then fills this selection with the sampled color, effectively covering the original text.
Following the removal, the Horizontal Type Tool is used to insert the new message. Adjusting the font size to match the surrounding messages is crucial for authenticity. The Move Tool then facilitates precise positioning of the new text within the message bubble.
Exploring Advanced Text Tutorials and Resources
The journey of mastering text editing in Photoshop is ongoing. Numerous tutorials exist, catering to various skill levels and stylistic preferences. These resources can guide users through creating 3D word art, replicating typewriter or chalk effects, designing neon styles, and even crafting nature-inspired or embroidery-like text.
For those seeking inspiration or quick solutions, pre-designed text effects and actions are available. These can simulate vintage letterpress, foil balloons, or even specific pop culture aesthetics like the Stranger Things font. Many of these effects are highly customizable, allowing users to adapt them to their specific needs.
How to use Text Tool in Photoshop (2023)
For beginners, tutorials focusing on fundamental typography principles can be highly beneficial. As skills develop, more advanced tutorials delve into complex word art and 3D special effects. The digital landscape is rich with these learning opportunities, from detailed step-by-step guides to comprehensive video playlists.
Conclusion
Photoshop's text and layer tools offer a powerful and versatile toolkit for creative expression. Whether you aim to embed simple messages, craft intricate advertisements, or engage in the nuanced art of text message editing, Photoshop provides the means to achieve professional and impactful results. By understanding the fundamental tools, design principles, and advanced techniques, users can unlock the full potential of typography within their photographic and design projects. Continuous practice and exploration of available tutorials will undoubtedly lead to enhanced skills and innovative creations.