Adobe Photoshop stands as the undisputed industry standard for image editing and manipulation, empowering artists, photographers, and designers to transform their visions into reality. Whether you're a novice looking to understand the fundamental tools or an experienced professional seeking to unlock advanced creative techniques, a comprehensive user guide is essential. This manual is designed to be that definitive resource, offering a wealth of tutorials and step-by-step projects that will elevate your image-making capabilities. If you can imagine it, you can create it with Photoshop, and this guide will show you how.
Unlocking the Power of Photoshop: A Journey from Basics to Advanced
The Adobe Photoshop Manual is meticulously crafted to introduce you to the key tools and techniques that grant you the freedom to maximize your images and propel them to the next level. Many aspiring creatives have marveled at the stunning works of art produced by professional artists and photographers, often wondering about the secrets behind their mastery. This guide demystifies those processes, breaking down complex concepts into easily digestible steps. Don’t worry; the world of Photoshop is not as daunting as it might appear. By following our comprehensive guides, you will be fine-tuning your creative skills and achieving professional-level results in no time.
Beyond the foundational elements, this manual delves into an extensive set of more advanced and creative projects, specifically designed to help you find your stride and push the boundaries of your imagination. If your ambition is to unlock the secrets of professional photo editing and embark on exciting creative image projects, look no further. This comprehensive resource is your one-stop destination, providing instant access to a wealth of tutorials and innovative projects.
The Papercut's Photoshop User Guides: Independent Manuals for Every Skill Level
Papercut's Photoshop User Guides offer independent manuals for the key Adobe Photoshop packages. These guides cover everything from the most basic principles, essential for beginners to grasp the fundamental concepts, to advanced techniques that allow seasoned users to get the absolute most from their images. This approach ensures that whether you are just starting your Photoshop journey or are looking to refine sophisticated workflows, you will find the information you need to succeed.
From one of the leading publishers of independent Adobe Photoshop bookazines, you can now carry Papercut’s Photoshop User with you at all times, thanks to the innovative Pocketmags app. This digital accessibility means that your indispensable Photoshop resource is always at your fingertips, ready to assist you whenever inspiration strikes or a creative challenge arises.
Technical Compatibility and Accessibility
The Pocketmags app, which hosts Papercut’s Photoshop User Guides, is designed for broad compatibility across various devices. It runs seamlessly on all iPad and iPhone devices running iOS 13.0 or above. For Android users, the app is compatible with devices running Android 8.0 or above. Additionally, Fire Tablet users can access the content on devices running Fire Tablet (Gen 3) or above. For the optimal experience on iOS devices, it is recommended to use any device capable of running the latest iOS version, as this ensures better performance and enhanced stability, allowing for a smoother and more efficient user experience.
Layers for Beginners | Photoshop CC Tutorial
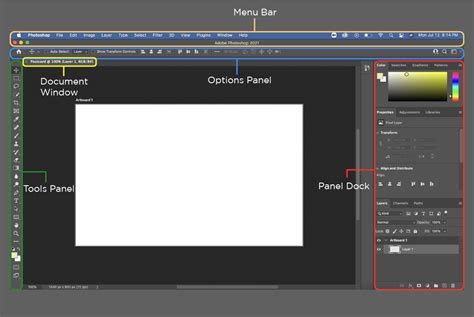
Understanding the Photoshop Workspace: Your Digital Canvas
The Photoshop workspace is your digital environment where all image editing and manipulation take place. It is comprised of several key components, each serving a specific purpose in the creative process. Familiarizing yourself with these elements is the first crucial step towards mastering the software.
The Menu Bar: Accessing Core Functions
At the very top of the Photoshop window, you'll find the Menu Bar. This bar contains a series of menus - File, Edit, Image, Layer, Type, Select, Filter, 3D, View, Window, and Help. Each menu provides access to a wide array of commands, options, and settings. For instance, the File menu is where you'll find options for opening, saving, and exporting your work. The Edit menu houses essential functions like Undo, Redo, Cut, Copy, Paste, and Transform. The Image menu allows you to adjust image-related settings such as brightness, contrast, and color balance, as well as image size and canvas size. The Layer menu is paramount for working with Photoshop's non-destructive editing capabilities, enabling you to create, manage, and manipulate layers. The Filter menu is a gateway to a vast collection of artistic and corrective effects that can dramatically alter the appearance of your images.
The Options Bar: Context-Sensitive Controls
Directly below the Menu Bar is the Options Bar. This dynamic bar is context-sensitive, meaning its contents change depending on the tool currently selected from the Tools panel. For example, if you have the Brush Tool selected, the Options Bar will display settings related to brush size, hardness, opacity, and flow. If you select the Text Tool, it will show font, size, color, and alignment options. Understanding how to utilize the Options Bar is key to fine-tuning the behavior of each tool and achieving precise results.

The Tools Panel: Your Creative Arsenal
The Tools Panel, typically located on the left side of the workspace, is your primary arsenal of creative instruments. It contains a wide variety of tools for selection, drawing, painting, retouching, and much more. Tools are often grouped together, indicated by small triangles in the corner of their icons. Clicking and holding an icon will reveal the other related tools within that group. Key tools include the Move Tool (for repositioning elements), Marquee and Lasso Tools (for making selections), the Brush Tool (for painting), the Eraser Tool (for removing pixels), the Type Tool (for adding text), and the Crop Tool (for resizing and recomposing an image). Each tool has its own unique functionality, and mastering their use will unlock a vast range of editing possibilities.
Panels: Organizing Your Workflow
Panels, such as the Layers panel, Adjustments panel, Properties panel, and Navigator panel, are usually docked on the right side of the workspace. These panels provide access to detailed controls and information about your project. The Layers panel is arguably the most critical, allowing you to manage, organize, and composite different elements of your image. The Adjustments panel offers quick access to various image adjustments like Levels, Curves, Hue/Saturation, and more, often applying them non-destructively as adjustment layers. The Properties panel displays context-sensitive information and controls for the currently selected item, whether it's a layer, a shape, or a text object. The Navigator panel provides a thumbnail view of your image and allows for easy zooming and panning. You can customize your workspace by opening, closing, and rearranging these panels via the Window menu.
Core Concepts in Photoshop: Building a Solid Foundation
To truly master Photoshop, it's essential to understand some core concepts that underpin its powerful functionality. These concepts are the building blocks upon which all advanced techniques are based.
Pixels and Resolution: The Building Blocks of Images
Digital images are composed of tiny squares called pixels. Each pixel has a specific color and brightness value. The resolution of an image refers to the number of pixels it contains, typically measured in pixels per inch (PPI) for digital displays or dots per inch (DPI) for printing. A higher resolution means more pixels, resulting in a more detailed image that can be printed larger without losing quality. Understanding resolution is crucial for determining the best output for your images, whether for web display or professional printing.

Layers: The Heart of Non-Destructive Editing
Layers are fundamental to Photoshop's power. Think of them as transparent sheets stacked on top of each other. You can place different elements of your image on separate layers, allowing you to edit them independently without affecting the other layers. This non-destructive workflow is invaluable because it allows for easy revisions and experimentation. You can adjust the opacity of a layer, change its blending mode to interact with layers below it in various creative ways, apply masks to selectively reveal or hide parts of a layer, and transform layers without degrading the original image data. Mastering layer management is paramount for efficient and professional image editing.
Selections: Isolating Areas for Editing
Selections are used to isolate specific areas of an image so that you can apply edits or adjustments only to that selected region. Photoshop offers a variety of selection tools, each suited for different tasks. The Marquee Tools (Rectangular and Elliptical) are good for basic geometric selections. The Lasso Tools (Lasso, Polygonal Lasso, Magnetic Lasso) provide more freeform or edge-detecting selection capabilities. The Magic Wand Tool selects areas of similar color with a single click, while the Quick Selection Tool allows you to "paint" a selection. For more complex selections, tools like the Pen Tool offer precise path-based selections, and the Select and Mask workspace provides advanced controls for refining edges, especially around intricate areas like hair.
Masks: Precise Control Over Visibility
Layer masks and vector masks are powerful tools that allow you to control the visibility of a layer without permanently erasing pixels. A layer mask is a grayscale image attached to a layer. Painting with black on the mask conceals parts of the layer, painting with white reveals them, and shades of gray create semi-transparency. This is incredibly useful for blending images, making targeted adjustments, or creating complex compositions. Vector masks, created with the Pen Tool, are resolution-independent and are ideal for sharp, defined edges.
Adjustment Layers: Non-Destructive Color and Tone Control
Adjustment layers are special layers that apply color and tonal adjustments to the layers below them without permanently altering the original image data. This means you can go back at any time and modify the adjustment. Common adjustment layers include Brightness/Contrast, Levels, Curves, Exposure, Hue/Saturation, Color Balance, and Black & White. Using adjustment layers is a cornerstone of professional, non-destructive editing, offering immense flexibility and control over the look and feel of your images.
Essential Photoshop Tools and Techniques
With the fundamental concepts in mind, let's explore some of the most frequently used tools and techniques that will empower your creative journey.
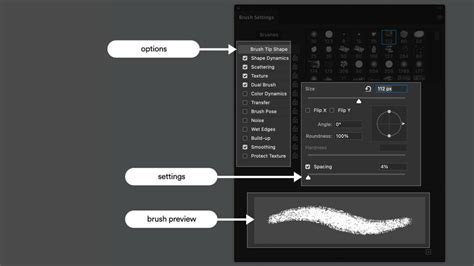
The Brush Tool and Its Variants: Painting and Retouching
The Brush Tool is one of the most versatile tools in Photoshop. It allows you to paint strokes of color onto your image. You can customize the brush tip shape, size, hardness, spacing, and jitter to achieve a wide range of effects. Beyond basic painting, the Brush Tool is essential for applying masks, retouching blemishes, and creating artistic effects. Related tools like the Pencil Tool (for hard-edged lines), the Color Replacement Tool (for changing colors while preserving texture), and the Mixer Brush Tool (for blending colors realistically) offer even more specialized painting capabilities.
The Clone Stamp Tool: Duplicating and Repairing
The Clone Stamp Tool allows you to duplicate pixels from one area of an image to another. This is incredibly useful for removing unwanted objects, repairing damaged areas, or extending textures. To use it, you first Alt-click (Windows) or Option-click (Mac) on the source area you want to copy from, and then click and paint on the destination area. Careful use of the Clone Stamp Tool, paying attention to light, shadow, and texture, is key to seamless repairs.
The Healing Brush and Spot Healing Brush Tools: Seamless Retouching
The Healing Brush and Spot Healing Brush Tools are designed for retouching and are more sophisticated than the Clone Stamp Tool. The Healing Brush samples pixels from a source area (like the Clone Stamp) but then blends the texture, lighting, and shading of the sampled pixels with the destination area. The Spot Healing Brush is even simpler: you just paint over the blemish or imperfection, and Photoshop automatically samples surrounding pixels to create a seamless blend. These tools are indispensable for portrait retouching and removing distracting elements.
The Pen Tool: Precision Selections and Vector Paths
The Pen Tool is renowned for its precision. It allows you to create paths, which are vector-based outlines that can be converted into selections, stroked with paint, or used to create shapes. Paths are resolution-independent, meaning they remain sharp regardless of how much you zoom in. The Pen Tool is ideal for creating clean, complex selections around objects with defined edges, such as products or people, and for creating custom vector shapes.
Adjustment Layers: A Deeper Dive
As mentioned earlier, Adjustment Layers are non-destructive. Let's explore some of the most powerful ones:
- Levels: This adjustment allows you to control the tonal range of an image by adjusting the black points, white points, and midtones. You can use the histogram to visualize the distribution of tones and make precise adjustments.
- Curves: Curves offer even more granular control than Levels. They allow you to adjust individual tonal ranges (shadows, midtones, highlights) by manipulating a curve on a graph. You can create dramatic contrast changes or subtle enhancements with Curves.
- Hue/Saturation: This is your go-to for controlling the colors in your image. You can adjust the overall hue (the color itself), saturation (the intensity of the color), and lightness of specific color ranges or the entire image.
- Color Balance: This adjustment allows you to shift the overall color cast of an image towards specific colors (e.g., adding more red, yellow, or blue) in the shadows, midtones, or highlights. It's excellent for correcting color casts or creating specific moods.
- Black & White: This powerful adjustment goes beyond simply desaturating an image. It allows you to control how different colors are converted to shades of gray, giving you precise control over the contrast and tonal range of your black and white conversions.
Blending Modes: Creative Compositing and Effects
Blending modes determine how a layer's pixels blend with the pixels of the layers beneath it. There are numerous blending modes, each offering a unique interaction. Some common and powerful modes include:
- Multiply: Darkens the image by multiplying the color values. Great for darkening and adding depth.
- Screen: Lightens the image by screening the color values. Excellent for creating light effects or brightening images.
- Overlay: Multiplies or screens colors depending on the base layer's color. It preserves highlights and shadows of the base layer while adding the contrast of the blend layer.
- Soft Light / Hard Light: Similar to Overlay, but with softer or harsher effects respectively.
- Color: Applies the hue and saturation of the blend layer to the luminosity of the base layer. Useful for colorizing black and white images or changing colors.
- Luminosity: Applies the luminosity of the blend layer to the hue and saturation of the base layer. Useful for applying tonal adjustments without affecting color.
Understanding and experimenting with blending modes is key to creating sophisticated composite images and achieving unique visual styles.
Advanced Techniques for Professional Results
Once you have a solid grasp of the fundamentals, you can begin to explore more advanced techniques that will truly elevate your Photoshop skills.
Non-Destructive Workflow: The Professional Standard
A non-destructive workflow is paramount in professional image editing. This means making changes in a way that allows you to revert or modify them at any point without degrading the original image data. Key elements of a non-destructive workflow include:
- Using Smart Objects: Converting layers into Smart Objects allows you to apply non-destructive transformations (scaling, rotating, skewing) and filters. These filters are applied as "Smart Filters" and can be re-edited or removed at any time.
- Leveraging Adjustment Layers: As discussed, these provide flexible and editable color and tonal corrections.
- Utilizing Layer Masks: These allow for selective application of effects and adjustments without permanent pixel alteration.
- Working with Smart Filters: Applying filters to Smart Objects ensures that they are editable.
Adopting a non-destructive approach saves time, reduces errors, and provides unparalleled flexibility throughout the editing process.
Compositing and Photomanipulation: Creating the Impossible
Photoshop's true power shines in its ability to composite multiple images together to create entirely new scenes or to manipulate existing images in ways that defy reality. This involves:
- Precise Selections: Using tools like the Pen Tool or Select and Mask to isolate elements from different sources.
- Layer Masks: Seamlessly blending the selected elements into a new background.
- Color Matching: Using tools like Curves, Color Balance, and Match Color to ensure that the lighting and color tones of the composited elements are consistent.
- Shadows and Highlights: Adding realistic shadows and highlights to integrate elements believably into the new environment.
- Perspective and Scale: Adjusting the size and angle of elements to match the perspective of the new scene.

Retouching and Beauty Work: Polishing Portraits
Professional portrait retouching involves enhancing features while maintaining a natural look. This includes:
- Skin Retouching: Using tools like the Spot Healing Brush, Healing Brush, and Clone Stamp to remove blemishes, reduce wrinkles, and smooth skin texture. Frequency separation is an advanced technique that separates texture from color and tone, allowing for precise skin smoothing without losing detail.
- Eyes and Teeth Enhancement: Subtly brightening eyes, enhancing iris detail, and whitening teeth.
- Dodge and Burn: Using these tools (often on separate layers with soft brushes and low opacity) to selectively lighten and darken areas, adding dimension and contour to the face.
- Color Correction: Ensuring accurate and flattering skin tones.
The key to successful retouching is subtlety; the goal is to enhance, not to create an artificial appearance.
Creative Filters and Effects: Adding Artistic Flair
Photoshop offers a vast array of filters that can transform images in countless ways. Beyond corrective filters, many artistic filters can be used to create unique styles:
- Artistic Filters: Such as Watercolor, Dry Brush, and Poster Edges, can give images a painted or drawn appearance.
- Distort Filters: Like Liquify, Wave, and Twirl, can be used for creative warping and manipulation.
- Stylize Filters: Such as Find Edges and Glowing Edges, can create interesting line-based effects.
- Camera Raw Filter: This powerful filter provides a comprehensive suite of tools for raw image processing and creative adjustments, mimicking the functionality of Adobe Lightroom.
When using filters, consider applying them as Smart Filters to maintain editability and experiment with different blending modes and opacities for unique results.
Workflow Optimization and Best Practices
To maximize efficiency and produce high-quality work consistently, adopting a structured workflow and adhering to best practices is essential.
Organizing Your Files and Projects
- Consistent Naming Conventions: Use clear and descriptive file names (e.g.,
ProjectName_Subject_Version.psd). - Folder Structure: Create logical folder structures for your projects, separating raw images, edited files, and final exports.
- Layer Organization: Name your layers descriptively (e.g.,
Background,Subject 1,Text Overlay,Adjustment Layer - Curves). Use layer groups to organize complex compositions. - Color Coding Layers: Assign colors to layers or groups for quick visual identification.
Saving Your Work Effectively
- PSD Format: Always save your primary working file in Photoshop's native .PSD format. This preserves all layers, masks, and other editable information.
- Version Control: Regularly save incremental versions of your work (e.g.,
MyImage_v1.psd,MyImage_v2.psd) to have backups and the ability to revert to earlier stages if needed. - File Size Management: Be mindful of file sizes, especially when working with high-resolution images. Optimize images for their intended use.
Utilizing Presets and Actions
- Custom Brushes and Gradients: Save frequently used brushes, gradients, and patterns as presets for quick access.
- Actions: Record a series of Photoshop commands into an Action, which can then be played back on other images to automate repetitive tasks. This is incredibly powerful for batch processing and applying consistent edits.
By integrating these principles into your Photoshop practice, you will not only enhance the quality of your work but also streamline your creative process, allowing you more time to focus on the artistic aspects of your projects. This manual serves as your gateway to unlocking the full potential of Adobe Photoshop, transforming your creative ideas into stunning visual realities.