Photoshop offers a versatile toolkit for image manipulation, and achieving a smooth fade from an image to transparency is a common yet powerful technique. This capability allows you to seamlessly blend images into backgrounds, create captivating graphic designs, or integrate photographic elements into broader compositions. Whether you’re looking to add subtle effects to your photos, blend exposures, or design professional brochures, understanding how to implement transparent gradients is an essential skill. This guide will walk you through various methods to achieve this effect, from simple gradient masks to more advanced layer styling.
The Gradient Tool: Your Primary Instrument for Fading
The most direct approach to creating a transparent fade in Photoshop involves utilizing the Gradient Tool. This tool, found in the toolbar on the left side of your workspace, is specifically designed for creating smooth transitions between colors or, in this case, opacity levels.
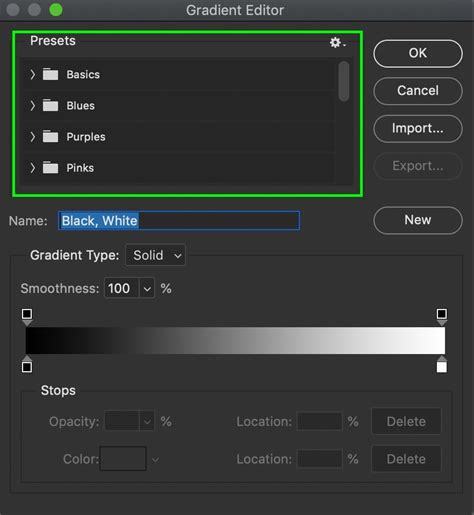
To begin, ensure you have the Gradient Tool selected. You might notice that several tools are nested under this icon, so confirm you have the correct one. Once selected, your attention should shift to the control panel, typically located at the top of your Photoshop window. Here, you'll find a gradient thumbnail. Clicking this thumbnail will open a fly-out panel, revealing a range of predefined gradient presets.
Within this panel, you'll find a "Basics" set containing several auto-generated gradients. For the purpose of creating a transparent fade, you'll want to focus on gradients that incorporate transparency. You can also create your own custom gradients.
Understanding Gradient Stops
When you double-click the gradient thumbnail to open the Gradient Editor, you'll encounter a visual representation of your gradient. This bar consists of "Color Stops" and "Opacity Stops."
- Color Stops: These determine the colors within your gradient. You can add new Color Stops by clicking directly below the gradient bar.
- Opacity Stops: These control the transparency of the gradient at specific points. You can add Opacity Stops by clicking directly above the gradient bar. Crucially, the Opacity Stop dictates the opacity of the corresponding Color Stop. By selecting an Opacity Stop, you can then use the dedicated Opacity slider to precisely adjust the transparency of its associated Color Stop.
This granular control allows for intricate fade effects. Remember, you can always add more Color Stops or Opacity Stops to fine-tune your gradient to perfection. Once you've configured your gradient to your liking, click "OK" to exit the Gradient Editor and apply your settings.
Fading with Layer Masks: Precision and Control
A highly effective and non-destructive method for fading an image into transparency is by using layer masks. This technique offers excellent control and allows for easy adjustments later on.
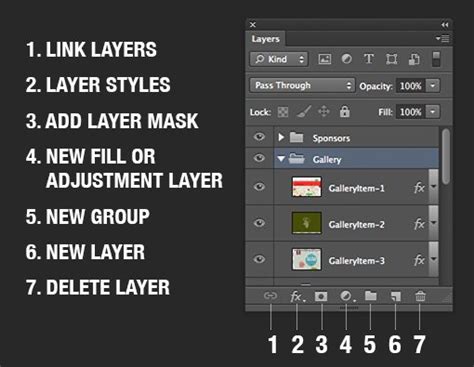
Begin by selecting the image you wish to fade. This image should be on its own layer. In the Layers panel, click on the layer containing your photo to ensure it's active. Now, at the bottom of the Layers panel, you'll find an "Add layer mask" icon (a white rectangle with a circle inside). Clicking this icon will add a white layer mask to your active layer.
A white layer mask signifies that the entire layer is visible. Conversely, a black layer mask hides parts of the image. The magic of the layer mask lies in using shades of gray: black conceals, white reveals, and shades of gray create varying degrees of transparency.
Applying the Gradient Mask
With the layer mask selected (you'll see a white border around its thumbnail in the Layers panel), select the Gradient Tool from your toolbar once more. Ensure you are working on the layer mask, not the image itself.
Now, click on the side of the photo that you want to initiate the fade from and drag your cursor towards the middle of the photo. The length and direction of this drag are crucial. Dragging a short line will result in a more abrupt transition, while dragging a longer line will create a smoother, more gradual fade. Release your cursor when you feel the gradient is appropriately placed. Upon release, a portion of your image will begin to fade into transparency, dictated by the gradient you've drawn on the mask.
It's common to need a few attempts to achieve the desired effect. Don't hesitate to use the undo function (Cmd-Z on Mac, Ctrl-Z on Windows) and reapply the gradient until you are satisfied. This iterative process is key to mastering the technique.
Layer Styles: Applying Gradients Directly
Another method to incorporate transparency involves using Photoshop's Layer Styles. This approach is particularly useful when you want to apply a gradient overlay that fades to transparency, rather than masking out parts of an existing image.
To use this method, first, ensure you have a background layer. This could be a solid color or another image. Then, add a new layer on top of your background. You can then apply a transparent gradient to this new layer.
Focus on the Layers panel and double-click the layer on which you wish to apply the transparent gradient. This action will open the Layer Style panel. Within this panel, you'll find an option for "Gradient Overlay." Select this option.
You'll see a gradient thumbnail associated with the Gradient Overlay. Double-click this thumbnail to open the Gradient Editor. Here, you can adjust the gradient as you wish, similar to how you would when using the Gradient Tool directly. Remember the principles of Color Stops and Opacity Stops discussed earlier; they apply here as well. You can add new Color Stops or Opacity Stops by clicking below or above the gradient bar, respectively. Adjust the Opacity Stops to control the transparency of your gradient.
Once you've customized your gradient, click "OK" to leave the Gradient Editor and apply it. Then, click "OK" again to close the Layer Style panel. This will apply the gradient overlay to your selected layer, with the transparency fading out as defined by your gradient settings.
Solid Color Fades
If your goal is to fade into a solid color rather than complete transparency, you can achieve this by first creating a solid color background. Select your background layer and then choose the Paint Bucket tool. This tool might be nested with the Gradient Tool, so look for it in the toolbar. Choose your desired color and then click somewhere within the image area to fill it with that color.
If this solid color background isn't sized perfectly, you can easily adjust it. Make sure your background image layer is selected, then press Command-T (Mac) or Control-T (Windows) to activate the Free Transform tool. With this tool, you can resize, rotate, and reposition the background image to fit your needs.
How to Fade an Image to Transparent in Photoshop
Extending Canvas and Blending
Sometimes, the desired effect requires more canvas space for the fade to occur naturally. In such cases, you can extend the canvas size of your image. Go to Image > Canvas Size. Here, you can specify the new dimensions. For example, you might extend the height to 4400 pixels. When changing the canvas size, it's important to set the anchor point to control where the existing image is positioned within the new canvas. As you'll see, this results in a larger canvas, but the image might have an abrupt ending.
This is where the gradient fade becomes essential. After extending the canvas, you can then apply a gradient mask or gradient overlay to smooth the transition from your image to the newly created empty space, which can then be filled with a solid color or left as transparent.
Adjusting Fade Prominence
Making adjustments to how elements fade into each other is straightforward. For instance, if you find that certain elements of a background image are too prominent during a fade, you can refine the gradient mask or layer style. In some instances, you might have used the Free Transform tool to make an image larger and move it, which can also influence how it interacts with a fade. The key is to continually evaluate the visual outcome and make iterative adjustments to your masks, gradients, or layer styles until the desired level of blending is achieved.
Creative Applications of Transparent Gradients
The ability to fade images to transparency opens up a world of creative possibilities.
- Photo Composites: Blend multiple images together seamlessly, creating surreal or realistic composite shots. A gradual fade can make it appear as though one image is naturally emerging from another.
- Graphic Design: Create visually appealing backgrounds for posters, flyers, websites, and social media graphics. An image fading into a solid color or transparent background can provide a clean and professional look.
- Web Design Elements: Use transparent gradients for buttons, banners, or image sliders to create smooth transitions and modern aesthetics.
- Brochure and Presentation Design: Integrate photographic elements into layouts without harsh edges. A fade can guide the viewer's eye and create a more cohesive design.
- Blending Exposures: When combining multiple exposures for High Dynamic Range (HDR) photography, transparent gradients can be used to blend different tonal ranges smoothly.

The process of fading an image gradually into a transparent background, or into a background layer, is a fundamental skill in Photoshop. It allows for sophisticated visual effects that can elevate the quality and impact of your designs and photographs. By mastering the Gradient Tool, layer masks, and layer styles, you gain the power to control precisely how your images transition and blend, transforming ordinary visuals into extraordinary ones.
Have you experimented with transparent gradients in Photoshop? Perhaps you've used them to add unique effects to your photos, or in the creation of brochures or other design projects? The versatility of this technique ensures it remains a valuable asset in any digital artist's toolkit.
tags: #photoshop #fade #to #transparent