The art of photo restoration breathes new life into old photographs, preserving cherished memories and historical moments that may otherwise fade away. Through the digital wizardry of Photoshop, we have the capability to reverse the effects of age, wear, and environmental damage. This process involves meticulous attention to detail, an understanding of historical colorization, and an intricate application of a variety of photo editing tools. Approaching photo restoration requires both a creative eye and a technical skill set within Photoshop's robust environment. The magic lies in identifying the areas in need of repair and knowing which tools to use to fix issues such as tears, scratches, discoloration, and fading. In photo restoration, we focus on reviving old photographs that have suffered from damage over time.
The Crucial First Step: High-Quality Scanning
We can't overstate the importance of high-quality scanning when it comes to photo restoration. The initial scan is our foundation; it must capture as much detail as possible from the original old photo. A high-resolution scan, typically at 300 DPI (dots per inch) or higher, ensures that we have the best quality to work on. Before we commence our workflow in Photoshop, it's critical to ensure that our foundation is set correctly. To ensure the quality of our restoration work, we start by importing old photos into Adobe Photoshop at a high resolution. TIFF (Tagged Image File Format) is optimal for this task due to its lossless nature-meaning no quality is sacrificed each time the file is saved.
Establishing a Non-Destructive Workflow
Our commitment to a non-destructive workflow in Adobe Photoshop means we must be meticulous with our layers. Every adjustment or correction should happen on its own layer, leaving the original untouched. We begin by locking the original photo layer and labeling it as the 'Background'. This foundational practice ensures that we can always revert to the original image if any adjustments do not yield the desired results. Working with layers provides a safety net and allows for greater flexibility throughout the complex restoration process.
Essential Tools for Repair and Enhancement
In the realm of photo restoration with Photoshop, we focus on precise tools and advanced techniques to breathe new life into damaged photographs.
Spot Healing Brush Tool
The Spot Healing Brush Tool is indispensable for quick fixes. We select it to swiftly remove dust spots, small scratches, or other minor imperfections. Its ability to automatically sample surrounding pixels makes it incredibly efficient for cleaning up small blemishes without requiring manual selection of source areas.
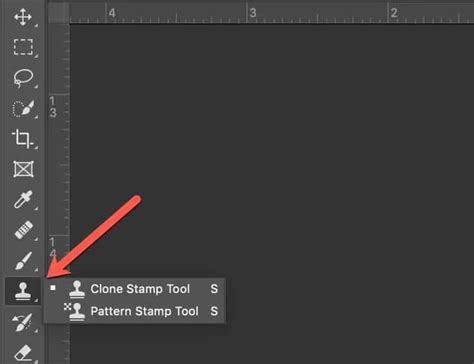
Clone Stamp Tool
For more control, especially in areas of intricate detail or where the Spot Healing Brush might not blend seamlessly, we use the Clone Stamp Tool. This tool allows us to manually sample pixels from one area of an image and paint them onto another, offering precise control over the cloning process. This is particularly useful for reconstructing larger damaged areas or replicating patterns.
Neural Filters: The Power of AI
Neural Filters are a suite of AI-powered tools within Photoshop that enable us to make complex adjustments that previously would have been exceedingly time-consuming or merely impossible. While these filters offer significant advantages, we combine them with our expertise to ensure that the final output maintains the photo's authenticity. The 'Photo Restoration' neural filter, for instance, can automatically detect and correct common issues like scratches, noise, and fading, providing a remarkable starting point.
Automatic Photo Restoration - New AI Neural Filters in Photoshop
The Art and Science of Color Correction and Colorization
When restoring photographs in Photoshop, meticulous color work can bring an image back to its former glory. We’ll explore how to achieve accurate color correction as well as the methods to infuse life into black-and-white photos through colorizing techniques.
Accurate Color Correction
Color correction is vital to counteract color shifts and deterioration in old photos. These shifts can occur due to the aging of photographic materials, exposure to light, or improper storage conditions.
Manual Color Adjustment
We begin by manually adjusting hues and saturation to correct shifts in color balance, often due to age or improper storage. Tools like the Hue/Saturation adjustment layer allow for precise control over the color spectrum.
Curves and Levels
Precise manipulation of Curves and Levels helps in correcting the tonal range and color balance. By adjusting the curve or histogram, we can enhance contrast, correct exposure issues, and bring back faded colors, ensuring a more natural and lifelike appearance.
Auto Color
In some cases, Photoshop’s Auto Color function provides a quick method for improving color balance, especially for images with less severe coloration issues. While it can be a good starting point, manual adjustments are often necessary for optimal results.
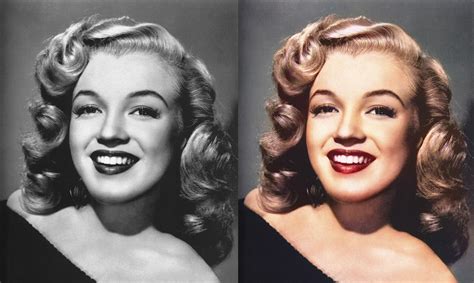
Colorizing Black-and-White Photographs
Colorizing black-and-white or sepia photos is part art, part science. The process of colorizing can revitalize an old photograph, bridging the gap between past and present.
Layer-by-Layer Color Application
Converting a black-and-white photo to color in Photoshop requires adding color information layer by layer. We would start by selecting portions of the image and apply a color tint using the Brush Tool on a new layer set to Color blending mode. This method allows for nuanced and realistic color application, where we can control the opacity and blend mode of each color layer to achieve depth and subtlety.
AI-Powered Colorization
With advancements in artificial intelligence, Photoshop's Neural Filters now include a 'Colorize' option. This AI-powered tool can automatically add color to black-and-white images, often with surprisingly accurate results. While it provides an excellent starting point, manual refinement is usually recommended to ensure historical accuracy and artistic intent.
Repairing Physical Damage
In the intricate process of photo restoration, we meticulously repair physical damage and enhance crucial details to breathe new life into old photographs.
Addressing Tears, Cracks, and Creases
When we encounter cracks, creases, and tears in photographs, our approach is thorough and careful. We utilize tools such as the 'Healing Brush' and 'Patch Tool' in Photoshop that allow us to sample undamaged areas of the image to seamlessly repair the broken parts. The Healing Brush is excellent for localized damage, while the Patch Tool can be used to select a damaged area and then drag it to an undamaged area to sample from, blending the repaired section effectively.
Reconstructing Water-Damaged Photos
Yes, we can digitally repair water-damaged old pictures using Photoshop. This usually involves carefully using the Clone Stamp Tool to replicate undamaged areas over the water-stained sections. The process requires patience and a keen eye to seamlessly blend the repaired areas with the surrounding image, effectively masking the water damage.
Enhancing Faces and Fine Details
When it comes to enhancing faces and fine details, we focus on improving the photo's clarity and bringing forward the personality captured in the image. In every step, our goal is to preserve the photo's authenticity while highlighting the elements that make the image come alive. This might involve subtly sharpening features, restoring lost textures, or enhancing the expressiveness of eyes.
Final Refinements and Quality Assurance
As we approach the final stages of photo restoration in Photoshop, it is crucial to focus on refining the image to bring out its full potential and ensure the highest quality. We often use adjustment layers to tweak the final look of a restored photograph without altering the original image information. For instance, we may use a Curves adjustment layer to manage the contrast and a Hue/Saturation layer for color control. This review process allows us to maintain the integrity of the photo while bringing it back to life.
Saving and Sharing Your Restored Masterpiece
Once we have breathed new life into old photographs through restoration, it's essential to save and share these memories with the utmost care.
Optimal Saving Formats
When saving our restored photos, we aim to reduce JPEG artifacts to maintain quality, especially after significant retouching. For this, TIFF is our preferred choice, providing lossless compression to preserve the detailed work we've done. For web sharing, a high-quality JPEG can be used, but it's crucial to manage the compression settings to avoid introducing noticeable artifacts.
Cropping for Presentation
When it comes to sharing restored images, we must do so with attention to the quality and respect for the original piece. Our first step is to ensure the image is suitably cropped using the crop tool, adjusting to the desired aspect ratio without losing essential details. This ensures the final image is presented in its best possible light, focusing on the subject matter. By following these steps, we make sure that the digital restorations we’ve worked so hard to create can be enjoyed and appreciated in the best possible quality across various mediums.
The Evolving Landscape of Photo Restoration
With advancements in artificial intelligence and the proliferation of apps, we find ourselves empowered in the realm of photo restoration. The crux of modern photo restoration lies within AI-enhanced restoration tools. Adobe Photoshop's neural filter stands out as a prime example, transforming old, damaged photos into revitalized images with stunning detail and clarity. This technology employs deep learning to recognize and correct common issues such as cracks, spots, and tears-a task that previously took hours of meticulous labor.
The field of photo restoration has transcended the realm of desktops; apps optimized for tablets and smart devices open a new chapter. These apps leverage the tactile advantages of a digital pen, providing us with the precision needed to handle intricate restorations on-the-go. The use of a tablet in conjunction with a digital pen enables us to execute fine-tuned edits, from addressing minuscule imperfections to reconstructing faded aspects of a photograph.
While Photoshop does not have a single, dedicated photo restoration filter, it offers a wide array of means like the Filter Gallery and third-party plugins that can aid in restoring photos. The combination of its powerful built-in tools and the integration of AI technologies makes it an unparalleled platform for breathing life back into treasured photographic history.
Quick Restoration Workflow with AI
For those seeking rapid improvements, Photoshop offers a streamlined approach:
- Import Your Scanned Image: Your scanned image will serve as your background layer in Photoshop.
- Create an Empty Layer: This new, empty layer is where you will make all your adjustments, ensuring a non-destructive workflow.
- Utilize the Photo Restoration Neural Filter: Navigate to Filter › Neural Filters › Photo Restoration. Download and apply the filter to witness instant improvements in your photo’s clarity and detail.
- Address Remaining Damage: For any damage that persists, go to the options in the top toolbar. Click 'Sample All Layers' and select 'Content-Aware' from the available types. Then, use the Spot Healing Brush to dab over areas you wish to heal. If unwanted marks still remain, cover them with the Clone Stamp tool for more precise control.
- Colorize Black and White Photos: If your old photo is black and white or sepia-toned, you can add color quickly and easily. Create a new layer that contains all your previous layers by clicking Ctrl+Alt+Shift+E on Windows, or Command+Option+Shift+E on Mac. Then click Filter › Neural Filters › Colorize.
Learning to restore an old photo is a rewarding skill. Through seminars and practice, you’ll learn how to remove marks and scratches, adjust contrast and color, use layers to work non-destructively, and much more. Mastering these techniques in Photoshop allows you to retouch and color correct photos, combine images, and create compelling visuals, beginning your journey as a professional graphic designer by learning the essential skills and tools used by industry experts. Perfect your photos and develop comprehensive skills in photo retouching using Adobe Photoshop and Lightroom.
tags: #restoring #old #photographs #in #photoshop