Discovering the perfect image to enhance your Microsoft Word document is an exciting moment, only to be met with the frustration of an unwanted background. Fortunately, Microsoft Word offers built-in tools to tackle this common challenge, allowing you to isolate your subject and integrate visuals seamlessly. While the software is adept at handling solid backgrounds and straightforward shapes, its capabilities extend to more intricate images, though professional-grade results for complex visuals might benefit from specialized external tools. This guide will walk you through the process of removing backgrounds directly within Word, exploring its nuances and offering insights for achieving optimal outcomes.
Understanding the Background Removal Feature in Word
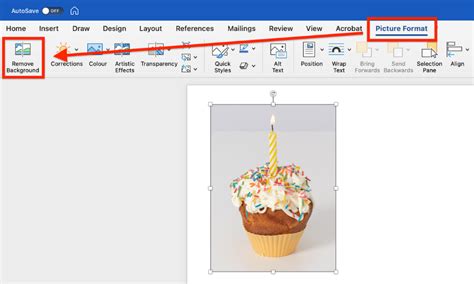
Microsoft Word's background removal tool is designed to automatically detect and separate the foreground subject from its background. Once you insert an image into your document, the process begins by accessing the relevant formatting options.
For newer versions of Microsoft Word:
Navigate to the toolbar and select the "Picture Format" tab. Within this tab, you will find the "Remove Background" option. Upon clicking this, Word will attempt to identify the background and highlight it in a distinct magenta color. This visual cue allows you to see which areas Word has identified as the background.
For earlier versions of Microsoft Word:
The process is remarkably similar, with minor differences in menu placement. Access the "Format" tab on the toolbar. Here, you will also find the "Remove Background" command. Similar to newer versions, the background will be highlighted in magenta, indicating the area Word intends to remove.
Refining the Background Removal
Once the default background area is highlighted in magenta, Word provides tools to fine-tune the selection, ensuring accuracy and precision. This is particularly important when the automatic detection isn't perfect or when dealing with images that have subtle color transitions between the subject and the background.
Adjusting the Selection:
After the initial magenta highlighting, you can refine the selection using a pencil-like tool. This tool offers two key functionalities:
- Mark Areas to Keep: Use this option to paint over parts of your image that were incorrectly marked for removal but should be retained as part of your subject.
- Mark Areas to Remove: Conversely, this option allows you to paint over areas that were mistakenly kept and should be removed from the background.
By carefully using these marking tools, you can meticulously define the boundaries of your subject, ensuring that only the unwanted background is ultimately removed.
Finalizing the Changes:
Once you are satisfied with the adjusted selection, you will find an option to "Keep Changes." Clicking this will apply the background removal, leaving you with an image that features your subject isolated against a transparent background, ready to be placed anywhere in your document without the distraction of its original backdrop.
Addressing Potential Issues and Limitations
While Word's background removal is a powerful and convenient feature, it's important to be aware of its limitations. The effectiveness of the tool can vary significantly depending on the complexity of the image.
Solid Backgrounds and Simple Objects:
Microsoft Word excels at removing solid-colored backgrounds or isolating clearly defined, simple objects within an image. If your image has a distinct contrast between the subject and a uniform background, the built-in tool will likely yield excellent results with minimal effort.
Complex Images and Edge Detection:
However, Word can struggle with more complex images. When the edges of the subject are not sharply defined, or when there are intricate details like fine hair, translucent elements, or subtle color gradients that blend with the background, the automatic detection may falter. In such scenarios, the "Mark Areas to Keep" and "Mark Areas to Remove" tools become indispensable, though they might require significant patience and meticulous effort to achieve a satisfactory outcome. The software's ability to identify the precise edges of objects in these complex situations is where it can sometimes fall short of professional expectations.

When Word's Background Removal Falls Short: Exploring Alternatives
For scenarios where Word's built-in tools do not provide the desired level of precision, particularly with complex images, external background removal tools offer a more robust solution. These specialized applications and web-based services are often equipped with more advanced algorithms designed for superior edge detection and object segmentation.
Web-Based Background Remover Tools:
Services like Icons8 Background Remover are frequently cited for their accuracy and speed. These platforms are specifically engineered to identify the edges of objects in images with a higher degree of precision than general-purpose software like Word.
How Web-Based Tools Work:
Typically, the process involves uploading your image to the service. The tool then automatically processes the image, identifying and removing the background. Many of these tools also offer options to further refine the selection or to immediately apply a new background color or even a different photo to the cutout. The speed at which these tools operate is often remarkable, with many completing the task within seconds.
Benefits of External Tools:
- Enhanced Accuracy: Superior algorithms for edge detection, especially for complex images.
- Speed: Often process images much faster than manual refinement in Word.
- Specialized Features: May offer advanced editing options not found in Word.
Step by step tutorial Apply design on subject Photoshop Tutorial
A Note on Document Styles and Shading
It's worth noting that sometimes, what appears to be an image background might in fact be related to document formatting, especially if you're encountering persistent shading issues that don't seem directly tied to an image. In such instances, the shading might be incorporated into the document's style, potentially the "Normal" style.
Modifying Styles for Shading:
If you suspect a style issue, you can try modifying the style itself. Within the "Modify Style" dialog box, navigate to "Format" and then select "Border." Within the "Border" options, you should find a "Shading" tab. This is where you can control the background color applied to text or paragraphs.
Applying Shading to Text vs. Cells:
When working with shading in the "Borders and Shading" dialog, it's crucial to ensure the "Apply to" setting is correctly configured. If the shading appears to affect only the text and not a larger area (like a table cell), ensure that "Apply to" is set to "Text" if that's your intention, or to "Paragraph" or "Cell" as appropriate for your desired outcome.
Downloading Documents and Editing Permissions
When collaborating or sharing documents, especially those originating from platforms like SharePoint, understanding download and editing capabilities is important. If you are viewing a file through a web interface, such as SharePoint, the editing tools might be rudimentary. This means that while you can view the document, the options for in-depth editing, like advanced image manipulation, might be limited.
Saving Copies for Desktop Editing:
To fully utilize the desktop version's editing features, you may need to explicitly save a copy of the document. You can often do this by going to the "File" tab and selecting "Save As." From there, choose an appropriate location and file type. This will allow you to download a version of the document that can be opened and edited with the full functionality of your desktop Microsoft Word application.
Conclusion: Leveraging Word's Tools and Beyond
Microsoft Word provides a readily accessible and effective solution for removing backgrounds from images, especially for solid-colored or simple subjects. The "Remove Background" tool, coupled with the "Mark Areas to Keep" and "Mark Areas to Remove" options, allows for significant control and customization. However, for intricate images with complex edges, external, specialized background removal tools often deliver superior results with greater efficiency. By understanding the capabilities and limitations of Word's built-in features, and knowing when to turn to external solutions, you can ensure that your images integrate seamlessly and professionally into your documents, enhancing their overall visual appeal and impact. The key is to select the right tool for the specific image and desired outcome, maximizing both efficiency and quality.
About the author: Mia Donovan is a Marketing Designer who weaponizes visuals to make people actually care about products.
tags: #how #to #remove #background #word