Photoshop, a powerhouse in digital imaging, offers robust tools for seamlessly combining multiple photographs into a single, cohesive image. This process, commonly known as photo stitching, is essential for creating panoramic vistas, detailed product shots, immersive virtual tours, and even artistic collages. While the underlying principle is straightforward - blending overlapping images - achieving professional-quality results requires understanding Photoshop's features and best practices. This guide will delve into the intricacies of photo stitching in Photoshop, from initial capture to final export, ensuring a smooth and impressive outcome.
The Foundation: Capturing Your Images for Stitching
The success of any stitched image hinges on the quality and consistency of the source photographs. When aiming to create a panorama or any composite image, meticulous capture is paramount.
Capturing a Series of Overlapping Images
The core of photo stitching lies in capturing multiple images of the same scene that have significant overlap. This overlap provides Photoshop with the necessary reference points to align and blend the images accurately.
- Tripod Essential: For panorama shots, especially, the stabilization you get from mounting a camera on a tripod will help keep your images level. Using a tripod is essential for capturing consistent images, preventing the subtle shifts in perspective that can occur when hand-holding.
- Consistent Exposure Settings: Ensure all images are shot using the same exposure settings. This includes aperture, shutter speed, and ISO. Modern digital cameras do a lot of automatic white-balancing, aperture adjustment, focus adjustment, and shutter speed changes when you take a photo. To avoid inconsistencies, "Set your camera to manual focus and use aperture priority," as professional architectural photographer Barry Grossman advises. This consistency in exposure is crucial for a seamless blend.
- Overlap Strategy: A general rule of thumb is to ensure that each image overlaps with the next by at least 30%. This overlap provides enough common detail for Photoshop's algorithms to work with. If you wish to use a Motion Control Head or a Pan Tilt Bracket, they will provide you with more precision and options for creating not only panoramas but time-lapse videos.
- Direction of Capture: Take panorama photos from left to right (or right to left, consistently). Overlap about a third of each image between the shots, just to play it safe.
Understanding Lens Choice and Distortion
The type of lens used can significantly impact the stitching process.
- Wide-Angle Lenses: Wide-angle lenses, in their extreme form, the fisheye lens, offer a wider and more spherical field of view, often at the cost of distortion around the edges. Many photographers and cinematographers use this distortion to great effect (think Lawrence of Arabia’s sweeping vistas). While Photoshop can correct for some distortion, starting with less extreme distortion can make the stitching process smoother.
- Tilt-Shift Lenses: Tilt-shift photography is when you use camera movements that change the orientation or position of the lens with respect to the film or image sensor on the camera. Tilt-shift lenses allow you to change the orientation, perspective, and position of the lens without moving the camera back itself. In many outdoor and panoramic settings (when you shoot trees or buildings, for example), normal lens positioning might cause the lines of an object to have a distorted perspective. Tilt-shift lenses can be tricky, but they allow for minimal distortion and easier image stitching than you get with wide-angle lenses.
Importing and Preparing Your Images in Photoshop
Once your images are captured, the next step is to bring them into Photoshop and prepare them for the stitching process.
Opening Images and Organizing Your Workspace
There are several ways to import your images:
- Direct Import: Open Photoshop, go to "File" > "Open," and select the images you want to combine. This will load both images into separate layers.
- Adobe Bridge: Open Adobe Bridge and begin browsing to identify which images would be ideal for superimposing to create your panorama. After labelling and rating your files, select them by holding down the Ctrl (Windows) or Command (Mac) key and clicking on each photo. Then import your images into Photoshop by right-clicking on the selection and choosing "open with Camera Raw."
- Drag and Drop: You can also drag and drop your selected image files directly into the Photoshop workspace.
Keeping in mind that the alignment, movement, and exposure of each frame can influence how realistic and seamless the end result. Organizing your files is crucial. Create a dedicated folder for your project. Name your photos in sequence. This helps in easy identification. Proper organization saves time and avoids confusion. A well-organized workspace helps you focus. Keep tools and panels in easy reach.
Editing Images within Camera Raw or Lightroom
Before stitching, it's beneficial to make any necessary global adjustments to your images.
- Consistency is Key: Open and edit all images identically within Adobe’s Camera Raw or Lightroom. Save all images with the same resolution, color profile, working space, and file format to ensure consistency. This step is vital for a harmonious final composite.
- Global Adjustments: Make any necessary adjustments to white balance, exposure, contrast, and saturation here. These adjustments should be applied consistently across all images that will be part of the stitch.
Stitching Photos with Photoshop's Photomerge
Photoshop's Photomerge feature is specifically designed for automatically stitching images together, making it an efficient tool for creating panoramas and other composite images.
Accessing and Using the Photomerge Dialog
Photomerge is accessed through the main File Menu and offers more than simple stitching for oversize images.
- Open Photomerge: In Photoshop, go to the main navigational menu and select… File > Automate > Photomerge…
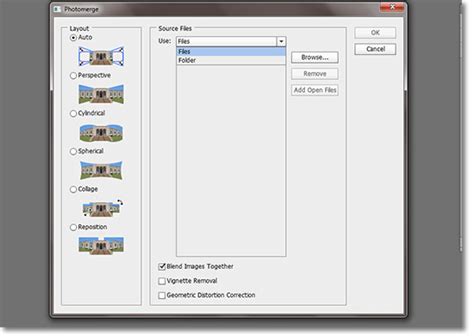
- Select Images: Once the Photomerge dialog window appears, you’ll be asked to select and open all the images that go together to make up your panorama. Browse for the files you want to stitch together.
- Choose Layout Option: In the layout settings, select the type of panorama you’re creating. In most cases, you can get away with using the "Auto" option, unless of course you know exactly what type of lens distortions are within your photographs. Photoshop offers several different styles of panorama, but relying on the Automatic method often yields good results.
- Enable Key Options: Finally, make sure you have “Blend Images Together” checked. Then choose whether or not you would like “Vignette Removal” and/or “Geometric Distortion Correction” applied. Vignette removal can help to remove the darkening effect that can occur at the edges of an image, especially when using wide-angle lenses. Geometric distortion correction helps to straighten out any warping or bending caused by the lens.
- Begin Merging: Click “OK” to begin the merging process. Photoshop will then automatically align and blend them into one image.
Manual Stitching and Refining the Blend
While Photomerge is powerful, sometimes manual intervention is needed for perfect results, or for combining just two images.
Manual Alignment and Canvas Adjustment
For combining just two images, or when Photomerge needs a guiding hand, manual techniques are employed.
- Open Both Images: Open both images in Photoshop. They will load as separate layers.
- Increase Canvas Size: Go to "Image" > "Canvas Size" and adjust the width or height to make room for both photos. This ensures enough space to position them side by side. Dragging as you adjust the canvas size will display a preview of the new canvas space.
- Position and Align: Use the "Move Tool (V)" to drag each photo into position. Resize the images with the "Transform Tool (Ctrl + T)" if needed, and align them for a seamless connection. Hover your cursor over the blue frame to transform the image’s size. Now click on the image and drag it into position.
Blending Layers and Masking
After aligning the images, the next crucial step is to blend them seamlessly.
- Layer Masks: Use layer masks to blend them more naturally. A layer mask allows you to selectively reveal or hide parts of a layer without permanently altering the pixel data.
- Brush Tool for Blending: Use the Brush tool to paint on the mask. By painting with black on the mask, you hide parts of the layer above, revealing the layer below. White will reveal the layer above, and shades of gray will create semi-transparency. This gives you full control over how the photos are stitched together.
- Adjust Opacity: You can also adjust the opacity of each layer to make sure the images blend seamlessly.
Fine-Tuning and Correcting Imperfections
Even with automated tools, some level of refinement is usually required to achieve a professional look.
Checking for Imperfections
Double-check the quality of the merge and look for any imperfections that may have occurred in the stitching process that require your attention to fix.
- Zoom In: In most cases, you will need to view your image at 50-100 percent in order to visually find any problem areas. If you focus your attention predominantly around where the images have been stitched together, you can’t really go wrong. By turning off individual layers, you’ll be able to see where the layer masks connect.
Addressing Seams and Distortions
Common problems include visible seams, misalignments, and distortions.
- Auto-Align Feature: The auto-align feature in Photoshop helps to automatically adjust and align your images, ensuring they fit together without visible seams. This tool saves time and ensures that your images are perfectly aligned when stitching photos together in Photoshop.
- Manual Alignment: If auto-align isn't perfect, use the Move Tool to manually adjust each layer.
- Content-Aware Fill: If your image is missing sections either top, bottom, or on either side after stitching, you have two options. Either crop your image tightly and work with what you’ve got or utilize Photoshop’s content-aware fill to fill in these areas. Content-aware fill isn’t perfect, but it does give you a great starting point from which you can work from.
- Lens Correction: For distortions, go to "Filter" > "Lens Correction." This filter can automatically correct for common lens distortions like barrel and pincushion distortion.
- Warp Tool: The Warp Tool (Edit > Transform > Warp) can also be used to manually correct distortions by allowing you to bend and shape specific areas of the image.
Double Exposure Effect - Photoshop Tutorial #photoshoptutorial #photoshop
Color and Exposure Matching
A truly seamless stitch requires that the color and exposure of the individual images are consistent.
Fine-Tuning Color and Exposure
Sometimes, the images you are stitching have slight differences in color or exposure. Fine-tuning these elements ensures that the stitched photo looks cohesive.
- Adjustment Layers: Use adjustment layers (e.g., Brightness/Contrast, Levels, Curves, Hue/Saturation) for non-destructive changes. This allows you to easily modify or remove the adjustments later if needed.
- Matching Tones: You can often see obvious tonal differences between stitched photos. Adjusting brightness, contrast, and saturation will help match the images when stitching pictures. For instance, if one image is slightly darker than another, you can use a Brightness/Contrast adjustment layer to lighten it.
Advanced Applications of Photo Stitching
Beyond simple panoramas, Photoshop's stitching capabilities have numerous practical applications.
Product Photography
In product photography, stitching pictures in Photoshop helps combine multiple images of a product from different angles. This technique creates a more complete and detailed view of the product, showing its features from all sides.
Virtual Tours
Photographers often need to combine several images of a space into one cohesive image. Photoshop enables this by stitching images of different rooms or areas, ensuring a smooth and realistic transition between them. This is crucial for creating an immersive experience in virtual tour applications.
Cinemagraphs
Cinemagraphs are still images with small, moving parts, like a flowing waterfall or a flickering candle. Photoshop helps create these by merging stills into a seamless loop, enabling the motion to blend naturally with the stillness of the image.
Art and Collage Creation
Artists and designers often use Adobe Photoshop to stitch photos together into one creative piece. It helps make unique collages or artwork that blend different textures, colors, and scenes. This technique gives artists the freedom to experiment and produce one-of-a-kind compositions.
Exporting Your Stitched Image
The final step is to save your creation in a format suitable for its intended use.
Saving and Exporting in High-Quality
Once your image is perfectly stitched, export it in high resolution to retain its quality.
- PSD Format: Saving in the PSD format keeps all your layers and edits intact, allowing for further modifications later.
- High-Resolution Export: When you are happy with your stitched photograph, export it as a final image. For web use, JPEG is a good choice because it balances quality and file size. For printing, a TIFF or a high-quality JPEG is recommended. A high-resolution export ensures your final result will look sharp, clear, and professional. Choose the format that best suits your needs.
The process of capturing and creating a panorama is fairly straightforward, and with Photoshop's powerful tools, you can transform multiple individual shots into a stunning, unified image that captures the full scope of your vision.
Disclaimer: This article is for informational purposes only. The author is not affiliated with Adobe and does not receive any compensation for mentioning their products.