Adobe Photoshop is a powerful tool for digital image manipulation, offering a vast array of techniques to refine and transform photographs. Among its many capabilities, the ability to precisely remove or alter specific colors is a fundamental skill for many designers and photographers. Whether you're aiming to eliminate a distracting white background from hundreds of tiny areas, neutralize an unwanted color cast, or simply replace a specific hue, Photoshop provides a robust set of tools to achieve these goals. This guide delves into various methods for removing color, from straightforward selection techniques to more nuanced adjustments, catering to users of all skill levels.
Understanding the Nuances of Color Removal
Before diving into specific tools and techniques, it's essential to understand what "removing color" can entail in Photoshop. It can mean making an area transparent, replacing one color with another, or desaturating an image to black and white. The approach you choose will depend heavily on your desired outcome and the nature of the image itself. For instance, removing a solid white background differs significantly from correcting a subtle color cast that affects the entire image.
Method 1: Precision Selection with Color Range and Magic Wand
For situations where you need to remove specific colors, especially when they appear in numerous small areas, precise selection is key. The Color Range command is an excellent starting point.
- Initiate Color Range: Navigate to
Select > Color Range. This opens a dialog box that allows you to sample colors directly from your image. - Sample the Target Color: Use the eyedropper tool (the default cursor in the Color Range dialog) to click on the color you wish to select. As you click, the preview screen will update, showing you which areas of the image are being selected.
- Refine the Selection: To select all instances of a color, even if they aren't contiguous, you can uncheck the Contiguous option. This is particularly useful when dealing with white backgrounds that might have small breaks or intricate edges.
- Adjust Tolerance: The Fuzziness slider (similar to Tolerance in other selection tools) controls how wide a range of similar colors is included in your selection. Adjust this value to precisely capture the desired color while excluding others. You can use the preview screen to gauge the effectiveness of your selection.
- Applying the Selection: Once satisfied with the selection, you can then proceed to remove the color. This might involve pressing the Delete key if you're working on a layer with transparency, or using the selection to create a mask.
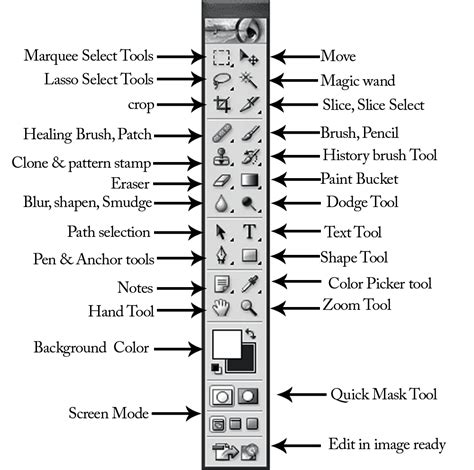
The Magic Wand tool also plays a role here. When selecting a color with the Magic Wand, unchecking the Contiguous option in the Options bar will select all similar pixels throughout the image, not just those touching the initial click point. This is a quicker approach for uniformly colored areas. Adjusting the Tolerance setting for the Magic Wand is crucial for fine-tuning the selection.
How to use the Magic Wand tool to make selections based on color in photoshop
Method 2: The Magic Eraser and Background Eraser Tools
Photoshop offers specialized eraser tools designed for color removal, streamlining the process for certain types of edits.
Magic Eraser Tool: This tool, found by long-pressing the standard Eraser tool in the toolbar, functions much like the Magic Wand selection tool. When you click on a color with the Magic Eraser, it erases pixels of that color. You can choose to erase a contiguous area or the entire image based on the Contiguous option in the Options bar. Similar to the Magic Wand, you can set the Tolerance and choose whether the tool operates on the active layer or all layers. A key difference is that the Magic Eraser can be set to an opacity percentage, allowing for partial erasure.
Background Eraser Tool: This tool is specifically designed to remove backgrounds. You can click and drag over any color in the image, and it will attempt to erase areas of that color. It offers options to protect the foreground color while erasing the background, or to erase only the current background color. While it's called a "background" eraser, it can be used to remove any color from an image by targeting it.
Method 3: Leveraging Layer Blending Modes for Background Removal
For a quick and effective way to remove a white background, especially when you intend to place the image on a new background, blending modes offer an elegant solution.
- Prepare Layers: Ensure your image is on its own layer. Create a new layer beneath it and fill it with your desired background color or image.
- Apply Blending Mode: Select the layer containing the image you want to remove the white from. In the Layers panel, locate the dropdown menu next to "Opacity" (it typically says "Normal" by default).
- Choose "Multiply": Select the Multiply blending mode from the dropdown. This mode darkens the image, and importantly, it makes white areas transparent. This effectively "removes" the white background, allowing the layer beneath to show through.
- "Screen" for Black: Conversely, the Screen blending mode works in reverse, making black areas transparent and allowing for the removal of black backgrounds.
This method is particularly efficient if your primary goal is to isolate the subject from a white background without complex masking.
Method 4: The Power of Hue/Saturation Adjustments
The Hue/Saturation adjustment is a versatile tool that allows for both color replacement and targeted color removal.
Sub-Method 4a: Color Range Followed by Hue/Saturation
This technique combines precise selection with color manipulation.
- Open Image: Open your image in Adobe Photoshop.
- Select Color Range: Go to
Select > Color Range. Use the eyedropper tool to click on the color you want to change or remove. Use the eyedropper with the plus icon to add more shades if needed. - Preview Selection: Use the "white matte" option in the selection preview to visualize which parts are selected. If other unwanted areas are selected, use a selection tool to deselect them.
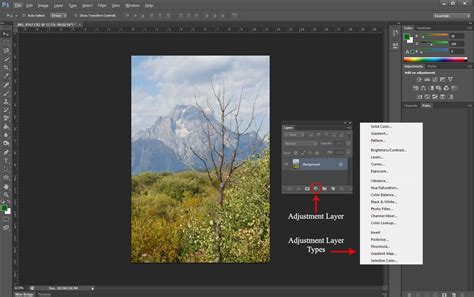
- Apply Hue/Saturation Adjustment: In the Layers panel, click the circle-shaped masking icon at the bottom and choose Hue/Saturation. This will create a Hue/Saturation adjustment layer, clipped to the layer below.
- Adjust Color: In the Hue/Saturation panel, you can now choose a new color to replace the selected area by adjusting the Hue slider. You can also modify Saturation and Lightness to fine-tune the effect. If your goal is removal, you could desaturate the selected color completely by dragging the Saturation slider to the far left.
Sub-Method 4b: Direct Hue/Saturation with Hand Tool
This method offers a more intuitive way to target and adjust specific colors.
- Open Image: Open your image in Adobe Photoshop.
- Create Hue/Saturation Layer: In the Layers panel, click the circle icon and select Hue/Saturation.
- Activate Hand Tool: Within the Hue/Saturation panel, click on the Hand Tool icon (usually located under the "Edit" dropdown or near the Hue slider).
- Sample and Adjust: Your cursor will change to a hand with a dropper. Click and drag directly on the color you want to change within your image. As you drag left or right, you'll be adjusting the Hue of that specific color range.
- Refine Range: The sliders at the bottom of the panel (often labeled with color ranges) allow you to expand or contract the range of colors affected by your adjustment. This is crucial for achieving smooth transitions and ensuring only the desired colors are modified.
- Fine-tune: Adjust the Hue, Saturation, and Lightness sliders to achieve your desired result. You can also use the Colorize option to apply a uniform hue to a desaturated area.
Method 5: Black & White Adjustments and Layer Styles for Targeted Desaturation
A more advanced technique involves using the Black & White adjustment in conjunction with Layer Styles to effectively "cut out" areas based on their color. While this process results in a black and white image, it can be a precursor to isolating specific colors for removal or replacement.
- Duplicate Layer: Copy the image layer you want to work with.
- Apply Black & White Adjustment: On one of the layers, go to
Image > Adjustments > Black & White. This opens a dialog box where you can use sliders to control how different colors are converted to grayscale. For example, you can make a specific color appear as pure white or pure black in the resulting monochrome image. - Layer Style Blending Options: With the black and white layer selected, go to
Layer > Layer Style > Blending Options. Here, you can manipulate the Blend If sliders. By adjusting these sliders, you can make the white or black areas of this layer transparent. For instance, if you've made your target color appear as white in the Black & White adjustment, you can use the "This Layer" sliders to make the white areas transparent. - Merge and Mask: Merge this adjusted layer with a blank layer. Then, use
CTRL + click(orCmd + clickon Mac) on the merged layer's thumbnail to load its transparency as a selection. - Apply as Layer Mask: Apply this selection as a layer mask to the original, color version of your image. This will effectively remove the color that was targeted in the Black & White adjustment.
This method is powerful for isolating colors but requires careful manipulation of sliders and understanding of layer masks.
Method 6: Correcting Color Casts with Levels and Curves
A color cast is an unwanted shift in the overall color balance of an image, often caused by lighting conditions or incorrect white balance settings. Photoshop offers several ways to neutralize these casts.
Sub-Method 6a: Using the Levels Adjustment Layer
The Levels adjustment layer is a fundamental tool for correcting exposure and color balance.
- Add Levels Adjustment Layer: Go to the Layers panel and click the icon for creating new adjustment layers. Select Levels.
- Utilize the Eyedroppers: In the Levels dialog box, you'll find three eyedropper tools: black, gray, and white. The goal is to use these to neutralize the color cast.
- Gray Eyedropper: This is often the most effective for color casts. Sample a neutral gray area in your image. Photoshop will analyze the color information at that point and adjust the overall color balance to neutralize the cast.
- White Eyedropper: Click on an area that should be pure white.
- Black Eyedropper: Click on an area that should be pure black.
- Refine with Channel Adjustments: If the automatic correction isn't perfect, you can manually adjust the sliders for each color channel (Red, Green, Blue). You can also use the gray eyedropper within each channel to target specific color imbalances.
- "Neutralize" Command: In some versions of Photoshop, the Levels dialog box has a "Neutralize" button, which attempts an automatic color cast correction. While convenient, it may require further manual adjustments.
Sub-Method 6b: Adjusting Color Curves
The Curves adjustment offers more precise control over tonal and color adjustments than Levels.
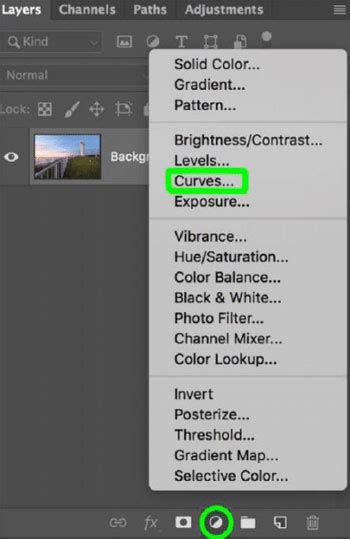
- Add Curves Adjustment Layer: Similar to Levels, add a Curves adjustment layer.
- Target Color Casts: In the Curves dialog, you can select individual color channels (Red, Green, Blue) from the dropdown menu. By adjusting the curve for each channel, you can add or remove specific colors. For instance, if your image has a blue cast, you would lower the blue curve.
- Use the Gray Eyedropper: The Curves dialog also includes eyedropper tools. The gray eyedropper can be used to click on a neutral point in the image, and Photoshop will adjust the curves to neutralize any color imbalance at that point.
- Presets and Experimentation: The Curves dialog offers various presets that can help with color correction. This method often requires a bit of trial and error to achieve the desired result, but it provides granular control.
Method 7: Utilizing Third-Party Plugins
For photographers who frequently deal with color correction, specialized plugins can offer streamlined workflows and advanced capabilities. Nik Color Efex Pro 4 by DxO is a well-regarded plugin that includes tools specifically designed for removing color casts. While it's a paid plugin, its efficiency and effectiveness make it a valuable addition for many professionals. Within Nik Color Efex Pro, filters like "Pro Contrast" often include a "Correct Color Cast" slider, allowing for quick and intuitive adjustments.
Method 8: Targeted Adjustments with Layer Masks
While the methods above often involve global adjustments, there are times when you might want to remove or alter color only in specific areas of an image. This is where Layer Masks and Luminosity Masks become indispensable.
- Layer Masks: After applying a color adjustment (like Hue/Saturation or Levels) to a layer, you can add a layer mask to that adjustment layer. By painting with black on the mask, you hide the effect of the adjustment in those areas. Painting with white reveals the effect, and shades of gray create partial transparency. This allows you to precisely control where the color correction is applied.
- Luminosity Masks: These are advanced masks that are generated based on the luminosity (brightness) values of an image. They allow you to target adjustments to specific tonal ranges, such as highlights, midtones, or shadows, which can be crucial for nuanced color cast removal or selective color manipulation.
Painting Tools for Color Manipulation
While often associated with creating images from scratch, Photoshop's painting tools can also be used for color manipulation and removal.
- Brush Tool: The Brush tool, with its various settings for opacity, flow, and blending modes, can be used to paint over areas with a new color or to blend colors. When used with a layer mask, it becomes a powerful tool for selectively applying or removing color effects.
- Pencil Tool: Similar to the Brush, but with a harder edge. It can be used for more defined areas.
- Eraser Tool: As discussed earlier, the Eraser tool can be used to make pixels transparent. Its various modes and options allow for different types of erasure.
Conclusion: A Spectrum of Solutions
Removing color in Photoshop is not a one-size-fits-all process. The best method depends on the specific image, the type of color you're trying to remove or alter, and your desired outcome. From simple selections and erasers to sophisticated adjustments and plugins, Photoshop offers a comprehensive toolkit. Experimentation is key; understanding how each tool and adjustment layer interacts with your image will empower you to achieve professional-quality results. With practice, you can master these techniques to refine your photographs and bring your creative visions to life.