The dreaded red-eye effect can transform a cherished photograph into a less-than-ideal memory, casting an unnatural, demonic glow that detracts from the subject's natural appearance. This phenomenon, a common byproduct of flash photography in low-light conditions, occurs due to light reflecting off the retina. Fortunately, with the right tools and techniques, this eerie glow can be effectively banished, restoring the natural charm to your precious pictures. This guide delves into the causes, prevention, and, most importantly, the methods for removing red eyes from photos, offering a comprehensive approach for both novice and experienced editors.
Understanding the Red-Eye Phenomenon
The red-eye effect is fundamentally a flashlight reflection effect. It commonly occurs when a photograph is taken in a dark or low-light environment, and the camera's flash is directed straight at the subject. When the flash fires, the light enters the pupil and reflects off the blood-rich retina at the back of the eye. This reflected light then travels back through the pupil and is captured by the camera lens, resulting in the characteristic red or sometimes orange glow. While often associated with dark settings, it's important to note that the red-eye is not solely caused by the ambient light conditions; versatile causes can contribute to its appearance. The closer the flash is to the camera lens, the more pronounced this effect tends to be, as the angle of reflection is more direct.

Preventive Measures: Avoiding the Red-Eye Before It Happens
While post-processing tools are highly effective, the best approach to dealing with red eyes in photos is to prevent them from occurring in the first place. Implementing a few simple strategies can significantly reduce the incidence of this common photographic flaw.
- Utilize Natural Light: Whenever possible, opt for natural light sources. Shooting outdoors during the day or near a window indoors can eliminate the need for a flash altogether.
- Avoid Direct Flash: If you must use a flash, try to diffuse it or bounce it off a surface like a ceiling or wall. This softens the light and reduces the direct reflection into the subject's eyes. Many cameras have built-in flash diffusers, or you can improvise with a piece of tissue paper.
- Increase Ambient Light: Ensure the environment is well-lit before taking a picture. Brighter surroundings reduce the pupil's dilation, making it less susceptible to the flash reflection.
- Change the Angle: If your camera or flash has a movable head, try angling it away from a direct shot into the subject's eyes.
- Encourage Subjects to Look Away: While not always practical, asking your subjects to look slightly away from the camera lens can sometimes help minimize the red-eye effect.
- Use the Red-Eye Reduction Feature: Many digital cameras and smartphone camera apps have a "red-eye reduction" mode. This feature typically involves a pre-flash or a series of rapid flashes that cause the subject's pupils to constrict before the main picture-taking flash fires, thereby reducing the pupil's exposure to the direct flash.
Digital Solutions: Red-Eye Removal Tools and Software
When prevention isn't entirely successful, or for those "in the moment" shots where flash is unavoidable, digital editing offers a robust solution. Numerous software applications and online tools are designed specifically to tackle the red-eye problem, ranging from simple, automated fixes to more advanced manual adjustments.
Dedicated Red-Eye Remover Apps
Several applications are purpose-built for photo editing, with many including sophisticated AI-powered tools for red-eye removal. These apps are often praised for their user-friendliness and the accuracy of their results, making them accessible to users of all skill levels.
Airbrush: This AI-empowered photo and video editing app is a prolific editing hub, piled up with an extended array of awe-inspiring editing tools, features, and technically empowered functionality. It allows users to make the best edits ever and create pictures of superlative quality with access to every minor detailing. Whether it's about doing makeup, enhancing facial features, or removing red spots in the eye due to the flashlight effect, Airbrush has you covered. Its AI-empowered red-eye remover serves as an attractive and highly accurate feature, making it a go-to pick for editors worldwide. The accuracy of the end results is a cherishing slot that makes the app a worth-trying option for those starving for the best red-eye removal. It is quite easy to remove the red spot pupil in your pictures on any of your devices with this app by following a few simple steps.
To use the red-eye remover in Airbrush, you typically:
- Upload your photo into the app.
- Navigate to the "Retouch" or "Tools" section.
- Select the "Red Eye" tool.
- The app's AI will usually automatically detect and correct the red-eye. You might have options to fine-tune the intensity or color of the correction.
- Save your edited image.
Picsart: As a full ecosystem of free-to-use content, powerful tools, and creator inspiration, Picsart offers a dedicated "Red Eye Remover" tool. With over a billion downloads and more than 150 million monthly active creators, Picsart is a leading creative platform. To use this feature:
- Upload your image to Picsart.
- Locate and select the 'Red Eye' tool within the editing options.
- The AI in the program will automatically identify the red eye and make the necessary adjustments.
- Save the corrected photo.
Picsart's broader editing suite also includes numerous other retouching tools that can enhance facial features, such as adjusting eye size and position, whitening teeth, and even applying virtual makeup, all of which contribute to a more polished final image.
Fotor: This online red-eye remover is another top-notch pick, known for its ease of use and effective results. Fotor offers a straightforward interface where you can upload your photo and let the tool automatically correct the red-eye. It's a good option for quick fixes without needing to download any software.
Pixlr: Pixlr is another excellent online photo editor that features a clean UI and a wide array of editing tools. It allows users to enhance photos, apply artistic effects, and adjust colors. Pixlr's red-eye removal tool is integrated into its suite of editing features, making it easy to access and use on both Android and iOS devices. The program is user-friendly and effective for correcting red eyes.
Professional Photo Editing Software
For users seeking more control or working with professional-grade software, programs like Adobe Photoshop and alternatives offer advanced red-eye correction capabilities.
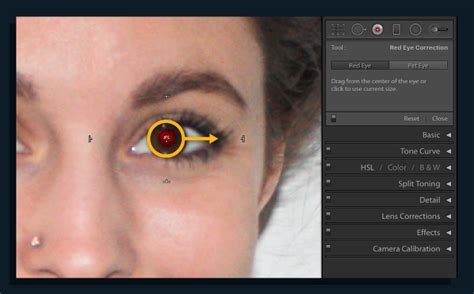
Adobe Photoshop: A leading software in the industry, Photoshop provides precise control over image editing. To remove red-eye:
- Load the photo into Photoshop.
- Select the "Red Eye Tool," which is often found within the "Spot Healing Brush Tool" group in the toolbar.
- Adjust the "Pupil Diameter" and "Darken Amount" sliders to achieve the desired result. The tool automatically detects the red pupil.
- Click on the red area in the eye. Photoshop will attempt to correct it by matching the surrounding iris color and darkening the pupil.
- You can also choose to darken the eyes if the red-eye correction makes them appear too light.
- Save the picture, often in JPEG format for sharing.
Photoshop also offers manual methods for red-eye correction, such as using the "Clone Stamp Tool" or "Healing Brush Tool" to sample healthy eye color from another part of the eye or another photo and paint over the red area. This offers maximum control but requires more skill.
Learn How to Remove Red Eye or Pet Eye in Camera Raw in Adobe Photoshop: A Training Tutorial
IrfanView: This free image viewer also comes with a number of image editing features. The "Retouch" tab in IrfanView offers similar functionalities to more professional software, including red-eye removal, often for free. It provides a wide range of other editing tools, making it a capable option without requiring a financial investment in professional software.
Wondershare Filmora: While known for video editing, Wondershare Filmora also possesses photo editing capabilities, including red-eye removal. A notable feature of Filmora is its ability to process multiple photos simultaneously, which can be highly efficient for batch editing. After initial processing, users can further refine the results with its other editing tools.
Advanced Techniques and Considerations
When standard red-eye removal tools don't yield satisfactory results, or for very specific cases, advanced techniques can be employed.
- Manual Color Matching: In some instances, the automated tools might overcorrect or create an unnatural look. In such cases, using tools like the "Color Replacement Tool" or manually selecting and desaturating the red area with the "Hue/Saturation" adjustment layer in Photoshop can provide a more natural outcome.
- Freehand Pupil Outline Method: If a photo doesn't have a flash and you suspect the red is from another light source, or if the automatic detection fails, this method involves manually outlining the red-eye area. You can then choose the color match and size of the red-eye area to be corrected, offering a more precise manual adjustment.
- Eye Color Change Tools: Some advanced editors, like Airbrush, include features for changing eye color. These tools can sometimes be adapted or used in conjunction with red-eye removal to ensure the final eye color looks natural after correction.
Choosing the Right Tool
When selecting an app or software for red-eye removal, consider the following features:
- Ease of Use: For beginners, intuitive interfaces and automated tools are paramount.
- Accuracy: The tool should effectively detect and correct red-eye without distorting the natural eye color or pupil shape.
- Control: For more advanced users, options for manual adjustments and fine-tuning are essential.
- Additional Features: Consider if you need other retouching tools, such as blemish removal, teeth whitening, or makeup effects, within the same application.
- Platform Compatibility: Ensure the tool is available for your device (desktop, smartphone, or web browser).
The Overall Editing Workflow
Removing red-eye is often just one step in a broader photo retouching process. Many editing apps, including Picsart and Airbrush, offer a comprehensive suite of tools designed to perfect your images. After addressing the red-eye, you might explore:
- Auto Retouching: Many apps offer an "Auto" tool that enhances lighting, saturation, and other components of your photo with a single tap.
- Facial Feature Adjustment: Tools to subtly adjust the size and shape of the head, jaw, chin, forehead, nose, mouth, and lips can help refine facial proportions.
- Eye Enhancements: Beyond red-eye removal, you can adjust eye size, vertical size, and position to make them appear more open or striking.
- Eyebrow Editing: Tools to adjust the vertical position, thickness, symmetry, and shape of eyebrows can significantly impact facial expression.
- Blemish Removal: Tools like Picsart's Blemish tool allow you to easily blur out pimples or other imperfections.
- Teeth Whitening: Correcting yellow teeth can make a smile appear brighter and healthier.
- Makeup Application: Virtual makeup tools allow you to experiment with lipstick, blush, eyeliner, and eyeshadow without applying any real makeup.
- Filters and Effects: Applying filters can unify the edited image and give it a distinct aesthetic.
In conclusion, the red-eye effect, while a common photographic nuisance, is easily manageable with modern digital tools. By understanding its cause, employing preventive measures, and utilizing the array of available red-eye removal software and techniques, you can ensure your photos capture moments with clarity and preserve the natural beauty of your subjects' eyes. Whether you opt for a quick fix on your smartphone or a more in-depth edit on your computer, the goal is to achieve a flawless, frame-worthy picture free from distracting red pupils.