Polycarbonate, a versatile synthetic thermoplastic, is renowned for its exceptional strength, robustness, and adaptability. Its chemical structure, characterized by carbonate groups, endows it with properties that make it a material of choice across numerous industries. From the intricate data storage of CDs and Blu-rays to the critical safety of riot shields and bulletproof glass, polycarbonate's applications are as diverse as they are essential. Its high molecular weight and thermoforming capabilities allow it to be molded into a vast array of forms, catering to specialized needs.
The electronic, construction, and aviation sectors particularly value polycarbonate for its impressive thermal capacity. It is both flame retardant and heat resistant, making it a safe and reliable choice in environments where temperature fluctuations are a concern. Furthermore, its excellent electrical insulating properties are crucial for a multitude of electronic components and applications.
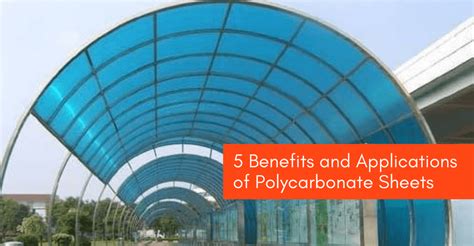
Translucent grades of polycarbonate, when combined with its inherent lightness and remarkable impact resistance, make it an ideal material for protective eyewear, swimming goggles, and safety screens. In the construction industry, polycarbonate serves as a popular, lightweight, and durable alternative to traditional glazing. It is frequently specified for roof lights, curved or irregularly shaped glass installations, wall and roof panelling, and acoustic barriers. The ability to be transparent, translucent, or opaque, depending on the grade and intended use, allows for flexible design solutions. For instance, opaque polycarbonate can be used as cladding to introduce natural light into spaces without compromising privacy or visual access, creating bright and airy environments.
Polycarbonate sheeting is a common sight in cost-effective industrial projects, agricultural structures, and domestic outbuildings such as greenhouses and garden sheds. Its durability and ease of use make it a practical material for a wide range of construction and DIY applications. The concept of a seamless surface texture, particularly one mimicking polycarbonate, is invaluable for architectural drawings and 3D models, allowing for repeated tiling across surfaces without visible breaks. This makes such textures highly useful for creating realistic digital environments and visualizations.
Creating a Polycarbonate-like Plastic Wrap Texture in Photoshop
This tutorial will guide you through the process of generating a realistic plastic wrap texture within Adobe Photoshop, mimicking the appearance of polycarbonate sheeting. While ready-made textures can save time, understanding the creation process offers greater creative control and customization.
Step 1: Initial Setup and Base Layer Creation
Begin by creating a new file in Photoshop. The dimensions can be adjusted based on your project's requirements. Following this, you will establish a base layer for your texture. Navigate to Layer > New > Layer and name this layer "Temp_1."
21 PHOTOSHOP TIPS – Easy Through Advanced!
Next, apply a noise filter to this layer to introduce foundational grain. Go to Filter > Noise > Add Noise. Set the "Amount" to 25%, choose "Gaussian" for the Distribution, and ensure the "Monochromatic" option is checked. This will create a subtle, uniform grain that forms the basis of our texture.
Step 2: Developing the Plastic Overlay Effect
Now, create a second new layer by pressing Control-Shift-N (or Cmd-Shift-N on Mac) and name it "Temp2." To prepare for generating a cloudy pattern, press the 'D' key to reset your foreground and background colors to their default black and white. Then, proceed to Filter > Render > Clouds. This will fill the "Temp2" layer with a cloud-like pattern.
Apply noise to this cloud layer as well, to further refine its texture. Go to Filter > Noise > Add Noise, again setting the "Amount" to 25%, "Distribution" to Gaussian, and checking "Monochromatic."
To combine these layers effectively for further manipulation, press Control-Alt-Shift-E (or Cmd-Option-Shift-E on Mac). This command creates a merged screenshot of all visible layers, effectively capturing the current state of your texture.
Now, select the "Temp1" layer. Hold down the Shift key and click on the "Temp2" layer (or any layers in between if you had more). This will select all layers from "Temp_1" to the topmost layer. Press Control-E (or Cmd-E on Mac) to merge these selected layers into a single layer. This consolidated layer now holds the combined effect of the noise and cloud renders.
Step 3: Adjusting Levels for Depth and Contrast
To control the overall tonal range and contrast of your texture, access the Levels adjustment. Go to Image > Adjustments > Levels. You will then input specific settings here to fine-tune the appearance. For a typical plastic wrap effect, you'll want to adjust the black, white, and mid-tone sliders to create a good range of highlights and shadows, giving the texture a sense of depth and form. The precise values will depend on the desired look, but generally, you're aiming to enhance the underlying cloud pattern's definition.
Step 4: Introducing Surface Details with Filter Gallery
Create another new layer by pressing Control-Shift-N (or Cmd-Shift-N on Mac) and name it "Texture_2." This layer will be used to add more intricate surface details.
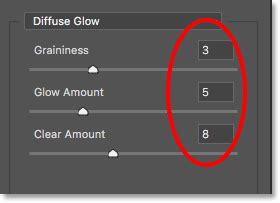
Begin by applying a "Diffuse Glow" effect from the Filter Gallery. Navigate to Filter > Filter Gallery > Distort > Diffuse Glow. Within the Diffuse Glow settings, adjust the "Graininess" to 6, "Glow Amount" to 10, and "Clear Amount" to 15. This filter will add a subtle, luminous quality to the texture, simulating the way light might interact with a plastic surface.
Next, apply a "Chrome" effect from the Filter Gallery to further enhance the metallic or reflective qualities often associated with polycarbonate. Go to Filter > Filter Gallery > Sketch > Chrome. Set the "Detail" to 10 and "Smoothness" to 7. This will introduce subtle highlights and imperfections that contribute to a more realistic and less uniform plastic appearance.
Step 5: Masking and Refinement
To manage the intensity of the applied filters and refine the texture, add a layer mask. Go to Layer > Layer Mask > Reveal All. This adds a white mask to your "Texture_2" layer, making the entire layer visible.
Now, select the Brush Tool (B). Set your foreground color to black (#000000). Choose a soft-edged brush. You will then "brush over" the areas of the texture that appear too highlighted or where you want to reduce the intensity of the applied filters. This process allows you to selectively reveal or conceal parts of the "Texture_2" layer, giving you precise control over the final look and preventing the texture from appearing overly artificial.
Step 6: Final Adjustments and Layer Duplication
For further refinement and to create a more complex layered effect, you can duplicate the "Texture1" layer. Hold down the Alt key (or Option on Mac) while clicking and dragging the "Texture1" layer in the Layers panel. Position this new duplicate layer at the top of your layer stack.
Apply another Levels adjustment to this duplicated layer. Go to Image > Adjustments > Levels. Adjust the sliders to further fine-tune the contrast and tonal range of this layer, creating a more nuanced and varied texture. Experimenting with different Levels settings here can significantly impact the final outcome, adding depth and realism.
Congratulations! You have now successfully learned how to create a plastic wrap texture in Photoshop that can effectively simulate the look of polycarbonate.
Integrating Your Texture
Once your texture is complete, you can place this plastic wrap overlay onto your designs. A highly effective method for blending the texture seamlessly is to change its Blending Mode in the Layers panel to "Screen." This mode will make the dark areas of the texture transparent and the light areas visible, creating a realistic overlay effect. Feel free to position and transform the texture as needed to fit your design perfectly. You can also utilize a layer mask on the texture layer itself to reveal only specific parts of the overlay, allowing for targeted application.
For those seeking to expedite their workflow, pre-made texture packs are available. These often include a variety of plastic wrap overlay textures, sometimes in editable PSD files, allowing for customization of different sizes and shapes. Such packs can offer numerous high-resolution plastic film overlay textures, providing a wide selection to choose from for your projects. This can be particularly useful for quickly adding a realistic plastic sheen to product mockups, graphic designs, or digital artwork, enhancing the overall visual appeal and perceived quality.
tags: #polycarbonate #texture #photoshop