Creating a compelling portfolio is a crucial step for any creative professional, serving as a visual testament to your skills, experience, and unique design sensibilities. Adobe InDesign, with its robust layout and design capabilities, offers a powerful platform for crafting these essential documents. This guide delves into the intricacies of designing an InDesign portfolio template, from initial setup to final output, and explores a diverse array of pre-designed templates that can streamline your workflow and elevate your presentation.
The Foundation: Setting Up Your InDesign Document
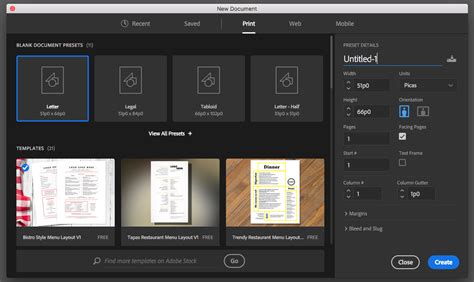
The journey of creating an architectural portfolio, or any professional portfolio for that matter, begins with establishing a well-defined document in Adobe InDesign. The first step involves initiating a New Document. Portfolios are particularly fun to design because you often have a lot of freedom to decide on the best way to feature your work. You might choose to go with something traditional, or maybe you'll go with a square shape or even a long format. For this tutorial, I'll set my Margins to 0.5" on the Top, Bottom, and Outside. Understanding "Full Bleed" is also important; if an image is "Full Bleed," it generally means that the imagery/content goes to the edge of the page, without any border or "white space." This is essential for ensuring your designs extend to the very edge of the printed page, creating a seamless visual impact.
Structuring Your Narrative: Leveraging Parent Pages and Layout Elements
Parent Pages, located within the top portion of the Pages panel in InDesign, are fundamental to maintaining consistency and efficiency throughout your portfolio. By going "inside" of A-Parent, our first Parent Page, through a double-click, you can establish master elements that will appear on all pages based on this parent. Portfolio pages essentially need to show off our work-there needs to be an emphasis on the portfolio piece itself. Before I started placing imagery, I decided to "block out" my composition with gray rectangles, using the Rectangle Tool. The Fill is set to 25% gray. Once I had some rectangles placed, I created Guides, based on my layout elements. These guides act as invisible frameworks, ensuring alignment and proper spacing for your content.
Next, I started placing text based on the Guides I had created. Keep in mind the text that you'd want featured in your portfolio. It's generally a good idea to have the title of the piece, the date it was created, and a description. Let's start with our title. I decided to add supplemental text, under the title, using the Text Tool. Again, think about hierarchy - how important is each piece of information? Now, let's add two spaces for some more supplemental type-this could be a great place for additional comments, insights, or statements on the work. Again, use the Text Tool. To push the aesthetic further, I decided to add some lines using the Line Tool. The footer area could include any supplemental information you like. You'll notice that they read "A"-this is OK! This indicates that these elements are inherited from the A-Parent page.
Parent Pages in Adobe InDesign | How to Use Parent Pages
Bringing Your Work to Life: Placing Imagery and Text
With the foundational layout established, the next critical step is to integrate your visual and textual content. Finally, let's insert some imagery. Select the Rectangle Frame that you want to place your imagery into. Double-click the Rectangle Frame to toggle between selecting the frame itself and the contents inside it. This allows for precise positioning and scaling of your images within the designated frames. Repeat this process for your other rectangle frames, ensuring each piece of work is showcased effectively.
Page Management and Local Edits
Moving on to the next step in how to make an architecture portfolio, we need to create New Pages. Let's make sure we have three pages in our Pages panel. Notice that your pages have an "A" Icon on them, signifying they are based on the A-Parent page. To further illustrate this idea, select the first page in your document. Then, select [None] in your list of Parent Pages and drag it to your active page. This detaches the page from any parent, allowing for complete independence in its design.
Let's go to Page 2 and 3 of our document. However, when you try to click on parts of your architecture portfolio layout, nothing will happen. This is because these pages are still linked to the A-Parent. To make edits locally, within individual pages, hold down Shift-Command (on Mac) or Shift-Control (on PC) while clicking on an element of your layout. This action "breaks" the link to the parent for that specific element, allowing you to make independent modifications. Now, let's insert our imagery. Select the rectangular frame. Repeat this process in the other image areas in your architecture portfolio layout. You could use the same image, close-up shots, or a different, applicable supplement here, depending on what best highlights the specific project.
Pre-Press Considerations and Cover Design
Before we begin the final output stages, it's vital to consider your printer's requirements. Make sure to ask your printer about any questions or file requirements that might apply to your project. For example, your cover will vary from your interior pages, as it has a spine and often requires different bleed and trim settings.
Let's start by creating a New Parent Page for the cover. Delete one of the pages in B-Parent, so you're left with a one-page spread. I wanted the front cover to feature some compelling imagery. Place the imagery by going to File > Place. To add transparency or overlay effects, select the rectangle frame and Right Click (on PC) or Control Click (on Mac) and explore the various transparency options. You could place any type here that you find most appropriate-but feel free to follow my example on this! Remember, there's no wrong answer-you know what's best for your architecture portfolio design! Create another New Parent Page for the back cover, following a similar process to ensure design consistency.
Exploring Pre-Designed InDesign Portfolio Templates
For those seeking inspiration or a faster route to a professional-looking portfolio, a wealth of InDesign portfolio templates are available. These templates offer pre-designed layouts, saving significant time and effort. Envato Elements, for instance, provides a wide selection of templates ready to go, making them a great addition to anyone's collection.

Here are some examples that highlight the diversity and quality of available InDesign portfolio templates:
- Architectural Focus: With 20 different pages, this InDesign template is one of the best architectural portfolio examples. Its clean design could also work for a multitude of varied projects, from illustration to graphic design.
- Magazine Style Adaptation: This beautiful, stylish magazine layout could be easily adapted for your portfolio or other print project.
- Horizontal Showcase: I love the long, horizontal orientation featured in this portfolio booklet. There's so much space here to showcase your work in a clean and well-organized way.
- Warm and Translucent: Warm colors, transparencies, and clean design-this template is one of the best architectural portfolio examples.
- Minimalist Elegance: I love all the negative space in this portfolio design! It's a classy, timeless look that would suit almost any kind of work-architectural or not!
These templates are often created with graphic designers, design students, and creative professionals in mind, allowing you to present your design projects in a polished and professional way. Each portfolio template typically includes a substantial number of unique page layouts, often featuring front and back covers, a contents page, a bio page, and numerous project pages.
Customizing Your Template: A Step-by-Step Approach
The beauty of InDesign portfolio templates lies in their editability. They are designed to be simple to edit using Adobe InDesign, allowing you to incorporate your own choice of images. While images featured in demo previews are often not included, a full image list is usually provided with the download. Similarly, fonts and photos shown in preview images may not be included, but links to free fonts used are typically provided.
We’ve put together a collection of helpful tips to make editing our InDesign Templates super easy.
Step 1: Unzipping the TemplateOur InDesign templates are packaged and saved as ZIP files.
Step 2: Opening the Correct FileIf you’re running InDesign CS6 or a later version, open the INDD version of the file.
Step 3: Navigating LayersOur InDesign templates are organized into layers, which group similar elements together. Pro tip: Try locking the "YOUR IMAGES HERE" layer to save time when editing text.
Step 4: Editing Text ContentThe text across this design can easily be replaced with your own copy. Simply use the Type Tool (T) to select the text box you wish to edit. You can then add your own fonts and formatting.
Step 5: Replacing ImagesYou’ll notice when you first open the template that all the image frames have a placeholder image. You can insert your own images by selecting the image frame and using File > Place to select a replacement image. Pro tip: Do your images look blurry? Make sure your display is set to high-quality (View > Display Performance > High-Quality Display).
Step 6: Adjusting Page DimensionsIt’s simple to change the width of the spine in your template by using the Page Tool (Shift+P). Select the tool and then click onto the spine to select it. You can drag the sides of the page to preview your desired new size. Hold down Alt or Option while you drag to resize the page.
Step 7: Formatting Text StylesYou can format individual items of text using the Type Tool (T) and Controls panel, which you’ll find running along the top of the InDesign workspace. The fonts in most templates are not set as InDesign styles. However, it’s easy to create a Character or Paragraph Style using existing text formatting, and then edit this from the Styles panels (Window > Styles). This ensures consistency across your entire document.
The Essence of Portfolio Design in InDesign
An InDesign Portfolio Template can be understood as designing the layout of the portfolio with all important details which provide all the information of the particular professional for whom that portfolio is designed. In this software, we use a number of elements for the design portfolio template, and these elements include images of different types of work done by that professional for whom that portfolio is, and text content that provides details of the work for proper understanding about that work. For designing a Portfolio Template, we must have knowledge about the professionals for whom the portfolio will work and, according to that, we should include design elements as well as text content.
For example, when creating a portfolio layout design for a Graphic Designer, the first page will be the cover page of the portfolio. This can be divided into two sections by dragging a guideline from the vertical ruler of the user screen of this software. After that, take the Type tool and draw a text frame, then type the heading of the Portfolio. Make some formatting so that it will create an effective look. You can also add some other design elements to the cover page, such as creating some shapes at the left side of this page for making it attractive.
Once you are satisfied with your cover page design, jump into other pages. Take the Frame tool and create frames for placing work images that were created by the designer. For placing an image into the first frame, go to the File menu and click on it. Now, the image will come into the selected frame, and it can be fitted into this frame. Add the Project Name here that will be related to this image. This provides an idea about how you can use elements and features of this software for creating a portfolio template and attaching your work to it.
A Curated Selection of InDesign Portfolio Templates
Beyond the specific examples, a vast array of InDesign portfolio templates cater to diverse needs and aesthetic preferences. These can be broadly categorized:
Portfolio Templates for Designers/Creatives:These often feature bold typography, ample image space, and flexible layouts suitable for graphic design, illustration, web design, and more. Examples include minimalist brochures, layouts with vibrant color accents, and elegant, classic designs.
Photography Portfolio Templates:Designed to give images the spotlight, these templates often utilize larger image frames, minimalist text areas, and a focus on visual storytelling. They range from black and white photobooks to colorful magazine-style layouts.
Portfolio Templates for Agencies:These templates are typically structured for presenting multiple projects or a range of services, often with a more corporate or polished feel. They might include sections for case studies, team introductions, and client testimonials.
Other Portfolio Templates:This broad category encompasses templates for architects, artists, writers, and any professional looking to showcase their work in a visually appealing manner. This includes specialized templates for architectural portfolios, art portfolios, and even general business portfolios.
Final Output: Preparing for Print
When you’ve completed your work on your template and you’re ready to print, head to File > Export. To create a print-ready file, choose Adobe PDF (Print) from the Format drop-down menu in the Export window. Make sure to include the bleed in your export options by checking "Use Document Bleed Settings" in the Export Adobe PDF window. This ensures that any artwork extending to the edge of the page will be correctly trimmed, preventing unwanted white borders.
By understanding the fundamental tools within Adobe InDesign and leveraging the wealth of available templates, you can create a professional, impactful portfolio that effectively communicates your unique value and expertise.