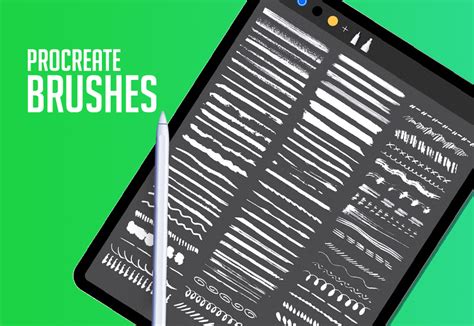
Procreate, a raster graphics editor app for digital painting, has become an indispensable tool for artists and designers alike, offering a powerful yet accessible platform for creating expressive sketches, rich paintings, gorgeous illustrations, and beautiful animations. At the heart of Procreate's versatility lie its brushes, which can be customized and expanded to suit an infinite range of artistic styles and needs. For beginners, navigating the world of Procreate brushes can seem daunting, but this guide aims to demystify the process, from importing new brushes to understanding and manipulating their core properties.
Importing and Organizing Your Brush Library
The journey into Procreate's brush ecosystem begins with acquiring new brushes. These can come as individual .brush files or as collections in .brushset files. Often, downloaded files are compressed into .zip archives. Since Procreate cannot directly import .zip files, they must first be extracted. If you're working solely on an iPad, you'll need an unzip application like Winzip or Zip Browser. For those using a PC or Mac, unzipping can be done before transferring the files to your iPad. It's important to note that if, after unzipping, you find numerous folders and small files, the original archive may not have been intended for unzipping in this manner.
There are several methods to import brushes into Procreate, and if one doesn't yield results, another is likely to succeed. The import process typically takes only a few seconds. Once a full brush set is imported, it will appear at the top of your Brush Library.
A straightforward method involves opening your local Files app, locating the .brushset file, and simply tapping it. This action should automatically import the brush or set into Procreate. The same principle applies when using cloud storage services like Dropbox. Navigate to the .brushset file within Dropbox, tap the three-dot menu, select "Export," and then choose "Copy to Procreate." Similarly, if you're importing from a Google Drive link, you can often import directly into Procreate.
How to install brushes in Procreate - It’s easier than you think!
Procreate's brush libraries are now integrated with the iPad's Files app, residing either in "On My iPad" → "Procreate" → "Brushes" or within your iCloud Drive folder designated for Procreate brushes. This integration means that changes made to brushes within Procreate are reflected in the Files app, and vice versa. You can also import individual .brush files by placing them into a brush set folder within the Files app. When importing, a new set named "Imported" is automatically created for single brush imports.
Brush Management and Organization
Within Procreate, brush libraries can be managed through the Files app. You can import entire brush libraries, rename them, and even delete them. If you opt to store your brushes in iCloud, an internet connection is necessary for synchronization. Search results within the Files app can be tapped to activate a brush, set, or library.
Your "Recent" brushes are conveniently located at the top of the brush library sets. Access them by navigating to Paint, Smudge, or Erase, and then tapping "Recent." To locate the original set from which a brush in your "Recent" list originated, swipe left on the brush and tap "Find."
For frequently used brushes, you can "Pin" them. Swipe left on a brush in your "Recent" set and tap "Pin." This keeps the brush persistently at the top of your "Recent" list, identifiable by a pin symbol. To unpin or delete a brush from "Recent," swipe left and tap "Clear."
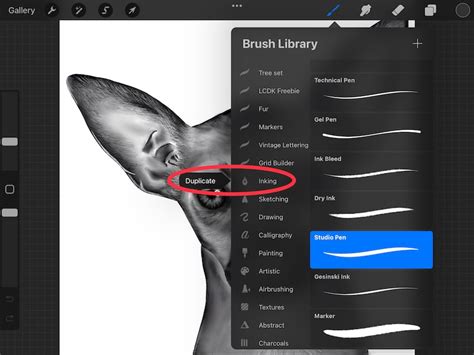
Duplicating brushes and brush sets is also a simple process. To duplicate a brush, open the brush panel, swipe left on the brush thumbnail, and select "Duplicate." For brush sets, tap twice on any set and then select "Duplicate." An exact replica will appear directly below the original. In versions prior to 5.4, renaming a brush could be done via "About this Brush" in the Brush Studio. Renaming a brush set can be achieved by tapping it twice (or long-pressing) and selecting "Rename." Brushes and sets can also be renamed directly within the Files app.
An interesting feature for brush sets is the ability to use an emoji as their icon. This works by ensuring no specific icon is already set for the brush set; Procreate will then use the first emoji found in the brush set's name as its icon.
Sharing individual brushes is done by swiping left on the brush thumbnail and tapping "Share." Custom brush sets can be shared by tapping them twice and selecting "Share." For backing up your brushes or entire brush sets, consider saving them to an external hard drive compatible with your iPad or a dedicated cloud storage location.
Moving brushes and brush sets is an intuitive drag-and-drop operation. Tap and hold a brush or set until it "lifts up" slightly. To move multiple items, pick up the first one, and then with another finger, tap the other items you wish to include in the stack. A green icon will appear on the initial item, and a number next to it will indicate how many items are in your selected stack. Dropping the stack onto the title of another brush set will copy the brushes into that set. This is the only instance where brushes are copied rather than moved. Moving brushes and sets between different brush libraries is also possible by dragging them. In Procreate 5.4 and later, these moves are complete transfers, not copies.
Deleting a brush, brush set, or even an entire brush library is a permanent action that removes it from both Procreate and the Files app. Therefore, it is crucial to back up any important brushes before deletion. If a deletion occurs accidentally, you can often recover the item from the "Recently Deleted" folder within the Files app's Locations.
To reset a brush to its default state, you must enter the Brush Studio. From the brush library, tap the button to open the context menu.
Default Brush Sets in Procreate
Procreate comes equipped with a robust library of 18 handcrafted brush sets, designed to provide a wide array of tools for various artistic needs. These brushes range from realistic to fantastical, catering to diverse styles.
- Defaults: A collection of clean, primarily rounded brushes for general use.
- Inking: Tailored for comic and manga styles, featuring inks and halftones.
- Artistic: Designed for a more technical approach, suitable for precise projects.
- Drawing: Ideal for practical drawing, planning, sketching, and quick studies.
- Painting: Offers a range of rendering brushes for artistic painting.
- Dry Media: Mimics the feel of traditional dry art mediums.
- Wet Media: Encompasses realistic and digital painting effects, including acrylics, stucco, and oils.
- Texture: Focuses on creating varied textures, with effects ranging from watery to clumpy.
- Specialty: Brushes with Streamline enabled, perfect for creating smooth, even calligraphic forms.
- Calligraphy: A staple of digital art, these brushes quickly lay down large areas of texture.
- Artistic Textures: Demonstrates the unique capabilities of Procreate's Brush Studio, including brushes that change color, create smoky effects, and generate chaotic shapes.
- Materials: Features Material brushes with metallic and roughness properties, designed for 3D painting.
- Grungy: A set that takes full advantage of digital art's power to add realistic grunge textures.
- Organic: Focuses on natural elements, with scatter brushes for grass, leaves, and bark, as well as brushes mimicking handmade strokes.
- Watercolour: Offers a selection of realistic watercolor brushes.
Understanding and Customizing Brush Properties
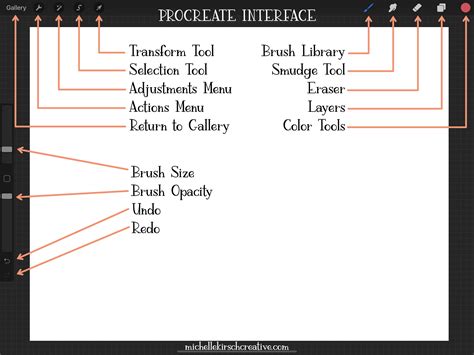
Beyond importing, Procreate empowers users to delve deep into brush customization, allowing for unparalleled control over stroke behavior. The Brush Studio is the central hub for all these settings, offering hundreds of options to create limitless brush combinations.
Essential Brush Settings
Properties (Brush Size): This section allows you to adjust the brush's size limits. You can increase or decrease the Maximum and Minimum size ranges. This is crucial for adapting a brush to different tasks, such as painting a background texture where grain behavior might change at scale, or refining a liner brush for finer details. It's always a good practice to duplicate a brush before making significant changes.
Stabilization (StreamLine): The StreamLine settings are designed to correct curves and reduce wobble in your strokes, which is particularly beneficial for precision drawing. Increasing StreamLine results in smoother strokes. Depending on your preference, you can adjust or even remove this smoothing effect.
Shape and Grain: The Shape acts as a container for the Grain, which is essentially the texture that defines how the brush mark is stamped. Think of the Shape as the brush tip itself - some are blunt, others are soft and round. The Grain source can be visualized as a paint roller. You can access and edit both Shape and Grain images within their respective tabs in the Brush Studio. In these images, 100% black will render as transparent, while 100% white will be solid. If you're unhappy with a new shape or grain, you can always reset the brush to its original settings.
- Shape Source: This defines the basic form of the brush tip.
- Grain Source: This defines the texture that is applied by the Shape.
Apple Pencil (Pressure Curve): The Pressure Curve allows you to control how your Apple Pencil's pressure affects the brush. You can edit these settings for individual brushes or globally in your Apple Pencil preferences. A brush like the RSCO Standard Pencil #4 or Procreate's default 'Technical Pencil' demonstrates noticeable opacity changes with pressure. To adjust the curve, go to the Actions Panel (wrench icon) → Preferences → Pressure & Smoothing. By observing light to dark strokes, you can fine-tune the curve: if you need to press very hard for visible strokes, increase the starting angle of the curve.
Apple Pencil (Tilt and Dynamics): Within the Apple Pencil tab in the Brush Studio, you'll find settings for Tilt. The "Angle" slider determines when the pencil's tilt begins to influence the stroke. You can also adjust opacity for tilted strokes. Setting Tilt to "None" means tilt won't affect opacity. "Gradation" creates a gradient from the point of contact to the base of the stroke, while "Bleed" affects stroke detail. "Size" controls the brush size when tilted, and "Size Compression" can also be toggled.
Taper: Brush Taper refers to the reduction in brush size at the beginning or end of a stroke. These settings are found under the Taper tab. There are controls for Pressure Taper (Apple Pencil) and Touch Taper (finger). For Pressure Taper, two sliders adjust the taper at the stroke's start and end. A percentage must be assigned to the "Size" slider to see these changes. The "Opacity" slider controls opacity changes during the taper, and the "Tip" slider influences the shape of the tapered ends - a "Sharp" setting results in a pointed tip. "Tip Animation" applies the taper when the pencil is lifted. While not suitable for all brushes, taper can add realism to strokes.
Wet Mix: A Blend brush differs from a standard brush by mixing and dragging existing colors on the canvas, offering more control and variety than the Smudge Tool. In the Brush Studio, tap the Wet Mix tab. "Dilution" is the primary setting affecting paint amount; for blending brushes, it's often set to Max. "Charge" influences the amount of paint applied, while "Attack" is designed for the Apple Pencil. The "Pull" slider works in conjunction with Dilution. Experimenting with these settings is key to achieving desired blending effects.
Procreate's Unique Features
Procreate offers several unique features that enhance the drawing and painting experience:
- QuickShape: Draw a shape (circle, line, square) and hold your pencil steady at the end to automatically create a perfect geometric shape.
- QuickLine: Similar to QuickShape, draw a line and hold your pen steady to straighten it. This is invaluable for creating clean lines and architectural elements.
- Gesture Controls: Procreate features intuitive gesture controls. A two-finger tap acts as an undo, and a three-finger tap redoes.
- Time-lapse Replay: Procreate records your entire creative process, allowing you to watch a time-lapse of your artwork's evolution. This can be accessed via Actions → Video → Time-lapse Replay.
- Color Drop: Quickly fill closed shapes with color by dragging a color from the Color Picker onto the desired area.
- Layers: Procreate utilizes a layer system, allowing you to stack transparent sheets of artwork on top of each other for non-destructive editing and complex compositions. Multiple layers can be selected and moved or resized together.
- Alpha Lock: This feature locks the transparency of a layer, ensuring that you only paint within existing artwork on that layer. This is useful for adding texture or color without affecting transparent areas.
- Layer Masks and Clipping Masks: These advanced features provide further control over how layers interact and are displayed, essential for professional workflows.
Tips for Beginners
Embarking on your Procreate journey should be approached with a spirit of exploration and experimentation.
- Start Simple: Begin by practicing with basic shapes and brushes to familiarize yourself with the app's feel and functionality.
- Experiment with Brushes: Don't hesitate to try out different brushes and their effects to discover what resonates with your style.
- Embrace Layers: Liberally use layers as you create. They are fundamental to building complex artwork and making edits.
- Learn Shortcuts: Mastering shortcuts, especially the two-finger tap for undo and three-finger tap for redo, significantly speeds up your workflow. Understanding features like Color Drop is also highly beneficial.
- Consider a Paper-like Screen Protector: Some artists find the default glossy iPad screen slippery. A paper-like screen protector can provide a more tactile drawing experience, mimicking the feel of paper.
- Backup Your Work: Regularly back up your brushes and artwork to prevent data loss.
The Procreate app is available on iPads with Apple Pencil compatibility for a one-time fee from the App Store. Once you have the app and your Apple Pencil, creating your first canvas is as simple as tapping the "+" button in the Gallery.
Procreate seamlessly integrates with other creative software, such as Adobe® Photoshop®, making it a valuable tool for designers who may already be familiar with similar features. The ability to quickly export layered images into Photoshop for further manipulation or reformatting adds to its professional appeal.
Ultimately, the most important aspect of using Procreate is to harness its capabilities in a way that best suits your personal style and preferences. Whether you aim for clean, polished designs or organic, traditional-medium looks, Procreate offers the flexibility to achieve your artistic vision. The sheer volume of settings and possibilities within the Brush Studio can seem overwhelming at first, but with practice, these features will become second nature, opening up an endless realm of creative potential.