Procreate's Reference Window is a powerful, yet often underutilized, feature that can significantly enhance your digital art workflow. While not a recent addition, understanding its capabilities and implementing it strategically can revolutionize how you approach your creative process, from detailed calligraphy to complex illustrations. This guide delves into the multifaceted applications of the Reference Window, offering insights for both novice and experienced Procreate users.
The Core Functionality of the Reference Window
At its heart, the Reference Window in Procreate allows you to display an image in a separate, floating window directly on your canvas. This means you can have a reference image readily available without the need to switch between applications, print out materials, or use a secondary device. The window is entirely mobile; you can position it anywhere on your screen to best suit your workspace and drawing style. Furthermore, you have granular control over the reference image itself. You can scale and pan within the window, zooming in on specific details or adjusting the overall view to match your needs. This flexibility is key to leveraging its full potential.
Strategic Applications for Calligraphy and Lettering
For those practicing calligraphy or lettering, the Reference Window offers a particularly elegant solution to common challenges. It can be notoriously difficult to discern the precise start and end points of strokes, especially in elaborate scripts where flourishes can obscure the foundational lines. Some strokes may begin mid-flourish and conclude only after other elements of the letter have been drawn.
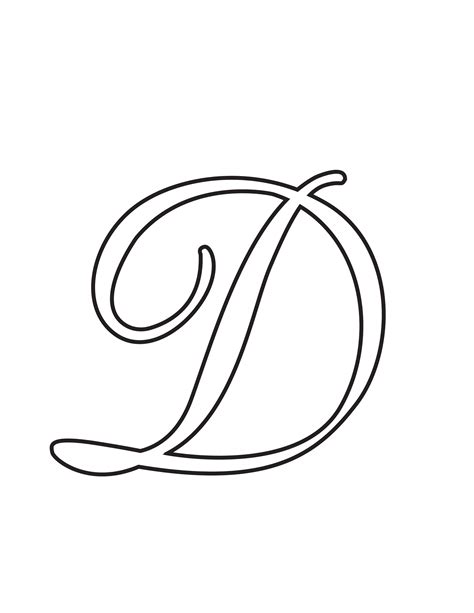
Consider a flourished uppercase 'D'. At first glance, it might appear to be a single, continuous stroke. However, a closer examination reveals a more intricate construction involving multiple overlapping strokes. The process might begin with stroke number one, following its path down to the loop's completion. Then, a new stroke, number two, commences, weaving around and ultimately meeting the endpoint of the first stroke. Stroke number three might then emerge unexpectedly from the middle of a pre-existing flourish.
This is precisely where the Reference Window proves invaluable. Instead of constantly toggling layers on and off, or resorting to external aids, artists can load a reference worksheet directly into the Reference Window. This eliminates the frustration of losing your place or misinterpreting stroke order, providing a clear, persistent visual guide. This method has been particularly effective for calligraphy students, offering a more intuitive and less disruptive learning experience.
Accessing and Managing the Reference Window
To begin utilizing the Reference Window, the process is straightforward. First, ensure the image you wish to use as a reference is accessible within your Procreate workflow. While you can't simply save an image directly from cloud storage like iCloud or Dropbox into the Reference Window, you can import it into your Procreate library first.
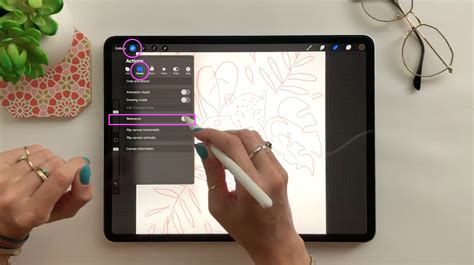
Once your image is ready, navigate to the wrench icon, which is the first icon in the top-left menu, and select the 'Canvas' option. Here, you will find the 'Reference' toggle. Switching this on will open the Reference Window. By default, it may load a copy of your current canvas. To load your desired reference image, tap the 'Image' button located at the bottom of the Reference Window panel. From the subsequent menu, choose 'Import Image.' This action will open your iPad's photo library, allowing you to select the image you wish to use.
The top section of the Reference Window panel provides controls for moving the window across your screen. Importantly, any actions you take on your main canvas will not interfere with the visibility or functionality of the Reference Window. You can also touch and drag the bottom right or left-hand corner of the window to resize it, and use pinch-to-zoom gestures to pan and zoom the reference image within its frame. Tapping the Reference Window itself can hide its user interface, maximizing the viewing area for your reference.
3 WAYS to use REFERENCES for your Portrait Paintings in PROCREATE
Beyond Basic References: Advanced Canvas Manipulation
The 'Canvas' menu, accessible via the wrench icon, offers a suite of tools that extend beyond just image referencing, enabling significant control over your digital workspace.
Crop and Resize
To make sweeping changes to your canvas dimensions or shape, access the 'Crop and Resize' interface. This tool overlays a grid onto your canvas, with the edges of the box defining the new boundaries of your artwork. A readout in the notification bar will indicate how many layers your new canvas size can accommodate, a crucial consideration for complex projects.
The 'Aspect Lock' feature, represented by a chainlink button between the numerical width and height readouts, is vital for maintaining proportional integrity. Tapping this locks the ratio of your image's width to its height, ensuring that resizing one dimension automatically adjusts the other proportionally.
The bottom toolbar displays numerical readouts for the width and height of your canvas, presented in the measurement unit you selected when creating the canvas. Tapping either readout invokes the iPadOS keypad, allowing you to input precise numerical values for that axis.
DPI and Resolution
DPI (dots per inch) is a fundamental measurement for print resolution, indicating the number of pixels contained within each inch of your canvas. For printing, a standard DPI is 300 DPI, while for screen display, 72-144 DPI is generally sufficient. It's important to note that altering the DPI setting will impact the physical dimensions of your canvas in millimeters, centimeters, and inches.
Resample Functionality
When you toggle 'Resample' on within the Crop and Resize interface, the Aspect Lock is automatically engaged. With Resample active, adjusting the crop overlay does not alter the dimension readouts directly. Instead, the numerical dimensions you input dictate the canvas area. This feature is particularly useful for recomposing a piece without altering the overall canvas dimensions. When resampling, Procreate utilizes bicubic interpolation to enlarge or shrink the image, effectively creating new data from existing pixels when scaling up. The grid overlay in this mode has intelligent snapping capabilities, aligning automatically with the edges, horizontal, or vertical center points of your canvas, as well as the edges of any artwork present within it.
Breathing Life into Art: Animation Assist and Drawing Guides
Procreate's capabilities extend to dynamic art forms with features like Animation Assist and Drawing Guides, both accessible through the Actions menu (wrench icon).
Animation Assist
Animation Assist is a comprehensive toolset designed to bring your artwork to life through animation. It provides a visual Timeline of your animation sequence, onion-skinning to help you visualize the relationship between frames, and essential Play/Pause controls.
Drawing Guides
Procreate's array of Drawing Guides empowers artists to focus on the broader creative vision by providing structural assistance. These guides can help with perspective, symmetry, and other compositional elements, freeing the artist to concentrate on the artistic execution.
FacePaint: Augmented Reality for Portraiture
A unique and engaging feature within the Reference Companion is 'FacePaint.' This functionality leverages your iPad's front-facing camera and augmented reality to wrap a custom canvas onto your face. To activate FacePaint, you can either create a new canvas from the Gallery using the 'FacePaint' preset or activate the Reference Companion (Actions > Canvas > Reference toggle) and tap the 'Face' button.
Once activated, FacePaint displays four guides on your canvas corresponding to the position of your eyes, nose, and mouth, facilitating precise painting directly onto your facial features in a virtual space. You can utilize all of Procreate's powerful features within FacePaint, including layers, blend modes, and effects. To capture your creations, you can take photos or record videos directly from the Reference Companion's 'Options' menu. You can also choose to view your FacePaint artwork against a blank background by disabling the camera feed.
Enhancing Workflow with Image Import and Tracing
Procreate offers flexible methods for incorporating reference images, catering to different artistic needs and workflow preferences.
Freehand Sketching from Reference
One common approach involves placing a reference image to the side of your canvas for freehand drawing. This method is akin to traditional analog sketching, where you observe and replicate. You can select a reference image by tapping 'Image' within the Reference Window and choosing a photo from your library. You can then zoom and manipulate the reference image as needed. It's important to remember that the reference box itself counts as a layer, which can be a consideration if you are working under strict layer limitations.
Tracing Directly Over Reference Images
Perhaps one of the most powerful ways to utilize reference images in Procreate is by tracing directly over them. This technique can significantly expedite your workflow, and crucially, Procreate offers a method to do so without the reference image appearing in your final time-lapse video of the creation process.
To achieve this, you'll use the 'Insert a Private Photo' option. This is accessed by tapping the wrench icon, then 'Add,' and swiping left on 'Insert a Photo' to reveal the private option. You can import multiple private photos, each appearing on its own layer, allowing for individual manipulation and the creation of unique compositions from various sources.
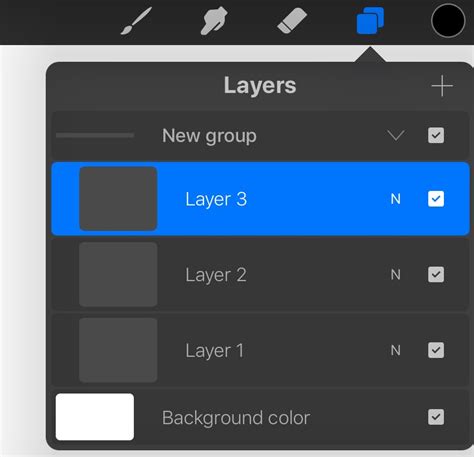
Once your reference images are in place, create a new layer for your sketch on top of them. This ensures that you can easily delete the reference layers later. Many artists prefer to sketch in a bright color, such as red, to easily distinguish their sketch lines from the reference image. Before you begin sketching, it's advisable to reduce the opacity of the reference image layer by tapping the 'N' icon next to the layer thumbnail. This allows for a clearer view of your sketch. The goal during this initial sketching phase is to capture the main forms, not every minute detail. Once your loose sketch is complete, you can delete the reference layers and proceed with inking and refining your illustration.
Understanding Canvas Information and Settings
The 'Canvas Information' screen, accessible through the Actions menu, provides a wealth of data about your artwork and offers options for customization. Here, you can 'sign' your artwork with your name, a handwritten signature, and a profile picture. You can also change the artwork's title without returning to the Gallery by tapping the title to bring up the iOS keyboard.
The 'Image Source' options, accessed via the 'person' icon, allow you to import images from your camera. The width and height of your canvas are displayed in pixels, and also in your chosen measurement unit. When creating a canvas in pixels, the dimensions are calculated in conjunction with the DPI.
Color Profiles and Time-lapse Videos
Procreate allows you to change the color profile of your artwork at any time, offering flexibility in how your colors are rendered and displayed. Furthermore, Procreate automatically generates a time-lapse video recording of your artistic process. You can adjust the quality settings of this time-lapse video, with higher settings providing better visual quality at the expense of larger file sizes. The video resolution directly impacts how good your video looks on larger screens. The size of your time-lapse video is displayed in megabytes, and you can also select the codec, which determines the type of compression your video file uses.
Conclusion
The Procreate Reference Window, in conjunction with other canvas manipulation and asset management tools, offers a robust and versatile environment for digital artists. From simplifying complex lettering to enabling detailed tracing and even incorporating augmented reality for portraiture, its applications are diverse and powerful. By understanding and strategically employing these features, artists can unlock new levels of efficiency, precision, and creative expression within Procreate.