Procreate offers a powerful and intuitive brush system that allows artists to achieve an astonishing range of effects, from photorealistic rendering to fantastical digital creations. At the heart of this system lies the Brush Studio, a sophisticated environment where users can not only utilize a vast library of pre-made brushes but also meticulously craft their own unique tools. This guide will delve into the intricacies of Procreate's brush management, customization, and rendering capabilities, empowering you to unlock the full potential of your digital art.
Navigating the Brush Library: Organization and Access
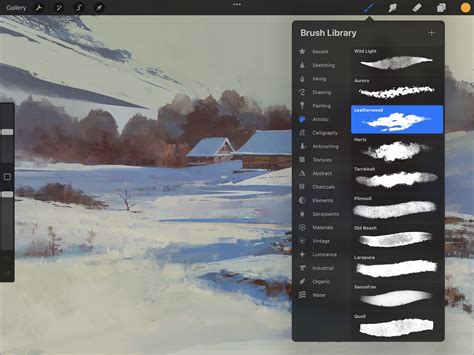
Accessing and organizing your brushes in Procreate is designed for efficiency. The Brush Library presents a clear, hierarchical structure where brush sets are listed on the left, and tapping a set reveals its contained brushes on the right. Each brush is accompanied by its name and a visual preview of the stroke it produces.
Procreate provides two primary methods for managing your brush libraries: within the iPad's Files app or through iCloud Drive. Brush libraries are now integrated with the Files app, residing either in "On My iPad → Procreate → Brushes" or "iCloud Drive → Procreate Brushes." This integration means that changes made to brushes within Procreate are mirrored in the Files app, and vice versa, ensuring a seamless workflow.
Importing and Managing Brush Files
You can import individual brush files (.brush), brush sets (.brushset), or entire brush libraries (.brushlibrary) directly from the Files app. When you import a single brush, Procreate automatically creates a new set named "Imported" to house it. Because brushes, sets, and libraries are treated as files and folders, certain characters are restricted in their naming due to operating system limitations.
To import a brush library, simply navigate to it within the Files app and tap to initiate the import process. You can then rename your brush library, delete it, or sync it with iCloud for cross-device access, which requires an internet connection.
Recent and Pinned Brushes: Streamlining Your Workflow
Procreate thoughtfully includes a "Recent" brushes section at the top of your brush library sets. You can access these by tapping Paint, Smudge, or Erase, and then selecting "Recent." This feature allows you to quickly retrieve brushes you've recently used.
To further enhance accessibility, you can "pin" frequently used brushes to the top of your Recent set. Simply swipe left on a brush in the Recent list and tap the "Pin" button. Pinned brushes are easily identifiable by a pin symbol in the top right corner. If you no longer need a pinned brush or wish to clear brushes from your Recent list, swipe left and tap "Clear." To locate the original set a brush belongs to, swipe left on the brush in Recent and tap "Find."
Exploring Procreate's Core Brush Sets
Procreate offers a robust collection of 18 pre-designed, handcrafted brush sets that form the foundation of its extensive library. These sets are curated to provide a wide array of tools, catering to diverse artistic needs, from realistic rendering to experimental effects.
- General Brushes: This set is characterized by clean, simple, and mostly rounded brushes, ideal for a broad range of artistic applications.
- Comic/Manga: Your go-to for comic or manga-style illustrations, featuring inks, halftones, and specialized effects.
- Technical Pen: Clean and purpose-built for projects requiring a more technical and precise aesthetic.
- Sketching: Designed for practical drawing, planning, sketching, and quick studies, offering a versatile set of tools for preliminary work.
- Rendering: This set provides a range of brushes specifically for artistic drawing and adding depth and form to your artwork.
- Ink: Ideal for cleaning up artwork and drawing in ink-centric styles such as sumi-e, offering a variety of ink-like textures and flows.
- Painting: These brushes encompass a spectrum of realistic and digital painting effects, mimicking traditional media.
- Wet Media: This selection of brushes covers mediums from acrylic to stucco to oil, providing unique textural qualities.
- Texture: Texture is the focus of this fascinating brush set, offering effects from watery to clumpy, perfect for adding surface detail.
- Calligraphy: Brushes in this set feature Streamline enabled, allowing letterers to create smooth and even calligraphic forms with precision.
- Classic Painting: A staple of classic digital art, these brushes excel at laying down large areas of texture quickly and efficiently.
- Artistic: This playful set demonstrates the unique capabilities of Procreate’s versatile Brush Studio, including brushes that change color, create smoky effects, and generate chaotic shapes.
- Materials: A variety of Material brushes featuring metallics and roughness, specifically created for 3D Painting applications.
- Grunge: This mind-blowing brush set takes full advantage of digital art's power, designed to add realistic grunge textures to your artwork.
- Organic: The Organic brush set offers all things natural, including scatter brushes for adding grass, leaves, and bark textures to concept pieces, as well as brushes that mimic handmade mediums.
- Watercolor: This set provides several realistic watercolor brushes, capturing the fluid and translucent qualities of the medium.
Experimenting with these diverse sets is key to understanding their capabilities and discovering what's possible within Procreate.
The Brush Studio: Unleashing Creative Control
The Brush Studio is where the true magic of Procreate's brush engine lies. Accessible by tapping "Create new brush" or by editing an existing brush, it offers unparalleled control over every facet of a brush's behavior.
Shape Dynamics: Defining the Brush Tip
The "Shape" tab allows you to define the fundamental form of your brush tip. You can alter its shape by importing an image into the "Shape Source." This image dictates how the brush stamps onto the canvas. A smooth circular shape, for instance, will produce a smooth, even stroke, while an irregular, patchy shape will result in a rougher texture.
- Shape Source: You can choose from Procreate's extensive "Source Library" of pre-made shapes or import your own from photos or files.
- Stroke Path: This setting controls how frequently the brush shape "stamps" itself along a path. Increasing "Spacing" allows you to see individual stamps, revealing the underlying shape.
- Scatter: Randomizes the position of each stamp, adding variability.
- Jitter Lateral & Jitter Linear: Controls the randomness of the stamp's position perpendicular and along the stroke direction, respectively. These can be influenced by Apple Pencil pressure and tilt, and barrel roll with Apple Pencil Pro.
- Count: Determines how many stamps are applied at each point, with "Count Jitter" adding variability to this number.
- Rotation: You can control the rotation of the shape stamp.
- Azimuth: Detects the Apple Pencil's tilt to determine the shape's orientation, mimicking calligraphy pens.
- Barrel Roll: Adds control over shape rotation based on the Apple Pencil Pro's barrel roll.
- Relative to Stroke: When enabled, the shape's rotation adjusts to follow the direction of your stroke. If disabled, the shape's orientation remains static.
- Scatter: Randomizes the rotation of the shape for each stamp.
Grain Dynamics: Adding Texture and Depth
The "Grain" tab introduces texture to your brush. Grain acts as the pattern or texture that sits within the brush shape.
- Grain Source: Similar to Shape Source, you can import images to create custom tiling textures for your brushes. The "Source Library" offers pre-made textures.
- Movement:
- Moving: The grain texture moves with your stroke, creating a streaky or blurred effect.
- Texturized: The grain remains static behind your stroke, providing a crisp, consistent texture.
- Scale: Controls the size of the grain texture. "Follow Size" scales the grain with the brush size, while "Cropped" keeps the texture size fixed.
- Offset: Randomizes the placement of the grain with each stroke for a more organic feel.
- Contrast: Adjusts the strength and visibility of the grain texture over the base color.
- Blend Mode: Determines how the grain texture blends with the underlying color.
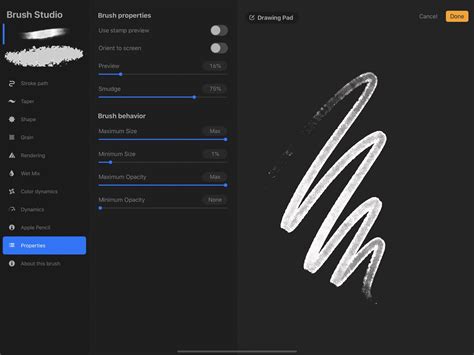
Behavior: Controlling Brush Responsiveness
The "Behavior" tab fine-tunes how your brush interacts with the canvas and the input device.
- Stabilization: Smooths out shaky or wobbly lines.
- Amount: Controls the overall smoothing effect.
- Pressure: Affects how pressure is applied to the brush stroke for smoother transitions.
- Motion Filtering: An advanced algorithm for smoothing strokes, regardless of drawing speed.
- Taper: Adjusts the thickness of your stroke at the beginning and end. This can be controlled by Apple Pencil pressure, mimicking natural drawing tools.
- Taper Length: Controls how long the taper effect lasts at the beginning and end of a stroke.
- Taper Curve: Visualizes and allows editing of the taper's falloff.
- Artificial Taper: Provides a visual representation of how much taper is applied artificially, independent of pressure.
Color Dynamics: Injecting Vibrancy and Variety
"Color Dynamics" allows your brush to dynamically change color, saturation, brightness, and darkness based on various factors.
- Jitter: Introduces random variations in hue, saturation, lightness, and darkness for each stamp or stroke.
- Hue Jitter: Randomly shifts the color.
- Saturation Jitter: Randomly varies the intensity of the color.
- Lightness Jitter: Randomly adjusts the brightness of the color.
- Darkness Jitter: Randomly adjusts the darkness of the color.
- Color Pressure/Tilt/Roll: These settings allow color variations to be controlled by the pressure, tilt, or barrel roll of your Apple Pencil.
- Secondary Color: You can set a secondary color and have the brush transition between your primary and secondary colors.
Apple Pencil Dynamics: Pressure, Tilt, and Barrel Roll
Procreate offers deep integration with the Apple Pencil, allowing for highly nuanced brush control.
- Pressure: Affects settings like Size, Opacity, Flow, and Bleed. You can adjust the pressure curve and response speed for a personalized feel.
- Tilt: Controls how the angle of the Apple Pencil affects brush attributes like size, opacity, or rotation. The "Tilt Graph" allows you to set trigger points where brush behavior changes based on tilt angle. Settings are most effective between 30-90 degrees of tilt.
- Barrel Roll: With Apple Pencil Pro, this allows for rotation of the brush shape as you rotate the pencil, offering intuitive control over stroke direction.
Rendering Modes: Simulating Physical Media
The "Rendering" tab dictates how the brush stroke is applied to the canvas, simulating the behavior of physical paint.
- Rendering Style: Options range from "Light Glaze" (diluted paints) to "Intense Blending" (thick paint). "Classic" combines Photoshop rendering with a caustic approach.
- Blend Mode: Determines how the brush stroke's color interacts with existing colors on the canvas.
- Dilution: Controls how much "water" mixes with the "paint" on your brush, affecting pigment intensity.
- Attack: Governs how much paint sticks to the canvas, with advanced settings for pressure, tilt, and barrel roll.
- Flow: Adjusts the amount of paint that is pulled around the canvas by the brush stroke.
- Wetness: Simulates the amount of water on the brush, affecting how paint behaves.
- Smudge: Controls how much blur your brush applies to existing paint.
How Does Procreate's Brush Studio Work?
Advanced Brush Management and Tips
- Duplicating Brushes and Sets: To experiment safely, duplicate a brush or brush set. A swoop icon indicates a duplicated brush. Duplicated sets become custom sets, allowing for renaming, deletion, and sharing.
- Renaming Brushes and Sets: Brush sets can be renamed by tapping them twice or tapping and holding. Brushes can also be renamed from within the Brush Studio or via the Files app.
- Emojis in Brush Set Names: You can use an emoji as an icon for your brush set by ensuring no icon is set and using the emoji as the first character in the brush set's name.
- Moving and Copying Brushes: You can drag and drop brushes and brush sets to rearrange them. To move multiple items, pick up the first one and then tap others with a second finger to create a stack. Hovering brushes over a brush set title will copy them, while dropping them elsewhere will move them.
- Backing Up Brushes: Regularly back up your custom brushes and sets to an external hard drive or cloud service to prevent data loss.
- Deleting Brushes: Deleting a brush or brush set removes it permanently from both Procreate and Files. Always back up important assets before deletion. If a deletion is accidental, check the "Recently Deleted" folder in the Files app.
- Resetting Brushes: To reset a brush to its default settings, you must enter the Brush Studio.
- Importing from Files App: You can import .brush, .brushset, or .brushlibrary files directly from the Files app.
By understanding and utilizing these features, artists can move beyond the default brushes and create a personalized toolkit that perfectly suits their unique artistic vision and workflow in Procreate. The power to render virtually any effect imaginable lies within the meticulous customization offered by the Brush Studio.