The Clone Stamp tool in Photoshop is a foundational and invaluable Photoshop skill, allowing you to seamlessly remove objects, repair cracks, and clean up images. While its primary function often appears to be retouching image flaws, its capabilities extend far beyond this initial impression, offering powerful techniques for complex image manipulation and creative editing. In an era where generative AI is increasingly prevalent, mastering this classic tool ensures you can handle many simple clean-up tasks efficiently without depleting valuable generative credits or risking your image being flagged as AI-generated. This tutorial delves into the intricacies of the Clone Stamp tool, revealing powerful hidden tips and advanced applications that many users overlook.
The Fundamentals of Cloning: Setting the Sample Point
At its core, the Clone Stamp tool operates by sampling pixels from one area of an image and painting them onto another. To begin, you must first establish a "sample point." This is achieved by holding down the Alt key (Windows) or Option key (Mac) and clicking on the area of the image you wish to clone. This action registers the selected pixels as your source. Once the source is defined, you release the Alt/Option key and click and drag over the unwanted area where you want to paste the sampled texture. You will observe that the content from the source point is copied to your cursor's position, effectively covering the original pixels.
By default, both the Clone Stamp and Healing Brush tools are designed to reset to the original sample point every time the cursor is released. However, if you wish to maintain the spatial relationship between the original sample point and the area you are retouching, you can enable the Align option in the Options bar. This is particularly useful when you need to ensure that the sampled texture is applied with consistent perspective and scale relative to your original source.
Advanced Sampling Techniques: Beyond a Single Source
Photoshop's Clone Stamp tool offers robust features for managing and utilizing multiple source points, significantly enhancing workflow efficiency for complex edits. The Clone Source panel provides dedicated icons across the top, allowing you to set up to five distinct source points within the same document. This capability is invaluable when you need to sample from various areas, especially when working across multiple documents or with video frames. To swiftly navigate between these predefined source points, you can assign custom keyboard shortcuts. Access the Keyboard Shortcut Editor via Edit > Keyboard Shortcuts, and under "Shortcuts For:", select "Panel Menus." You can then assign shortcuts to "Source 1-5" for rapid switching.
Furthermore, the utility of the Clone Stamp tool is not confined to a single document. With multiple documents open, you can clone to a second document by first setting your sample point in the source document (using Option-click (Mac) | Alt-click (Win)) and then navigating to another open document to begin cloning.
Visualizing and Refining Your Cloned Areas
To aid in precise alignment and previewing, the Clone Stamp and Healing Brush tools, by default, display an overlay of the sampled area within the brush preview. This visual guide makes it considerably easier to align areas accurately during the cloning and healing process. However, if you find this overlay distracting, you can easily disable it. Within the Clone Source panel, simply uncheck the “Show Overlay” option. While the overlay is hidden, you can temporarily bring it back into view by pressing Option + Shift (Mac) | Alt + Shift (Win). This shortcut also allows for dynamic scaling of the overlay: Option + Shift + or | Alt + Shift + or will decrease or increase the scale of the overlay in width and height, respectively.
The sampling point itself, represented by a crosshair icon, is also displayed by default while cloning and healing. While this helps in tracking your source, some users may prefer to hide it for a cleaner view of the retouching area.
Optimizing Your Cloning Workflow: Efficiency and Control
The size of the flaws or areas you are retouching can vary significantly, necessitating adjustments to the Clone Stamp tool's size. You can easily modify the tool's dimensions using the size slider in the options bar. For seamless and efficient adjustments of settings like size, opacity, hardness, and flow, tools like the TourBox can be immensely beneficial. With a single press, you can access the Clone Stamp tool, and its knob allows for smooth manipulation of these parameters. This one-handed control over Photoshop operations, including tool switching, layer management, and parameter adjustments, can dramatically streamline your retouching workflow.
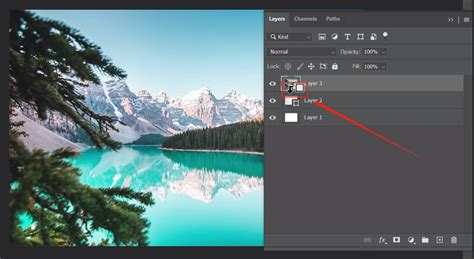
When working with layers, particularly for complex edits, it is highly recommended to clone stamp on separate new layers. This approach allows for individual edits to be isolated, making them easier to manage and correct. If you happen to clone in the wrong location, you can simply select the Move Tool (shortcut key V) and drag the content on that specific layer into its correct position. Once you are satisfied with multiple individual edits performed on separate layers, you can select these layers and press Ctrl + E (Windows) or Command + E (Mac) to Merge Layers into a single, organized "Clone Stamp" layer.
To ensure that you are sampling from the image data beneath your new, empty layer when working non-destructively, change the Sample setting in the options bar from its default "Current Layer" to "Current and Below" or "All Layers." This is a crucial step for effective layer-based retouching.
Healing Brush: Real-Time Adjustments and Diffusion
The Healing Brush tool, while similar in function to the Clone Stamp, offers distinct algorithms for blending sampled pixels with the target area. By default, the Healing Brush algorithm begins making adjustments as you paint. If you prefer to complete your brush stroke before Photoshop initiates the adjustments, you can enable the “Use Legacy” option in the Options bar.
For images containing high-frequency information, such as grain or fine details, artifacts can sometimes appear after using the Healing Brush. To mitigate this, try setting the Diffusion option in the Options bar to a lower value. This can help in smoothing out these unwanted artifacts and achieving a more natural result.
Creative Applications of the Clone Stamp Tool
The Clone Stamp tool's utility extends far beyond simple object removal or flaw correction. It can be employed for sophisticated image manipulation and to overcome common photographic challenges.
1. Blending Mountains and Skies: In a photograph of a snow-capped mountain where the peak meets swirling clouds, the transition can sometimes be abrupt. To achieve a smoother blend, first duplicate the background layer. Then, use the Clone Stamp tool to brush over the area where the mountains and clouds meet. Precision is not paramount at this initial stage. Subsequently, you can employ layer masks to refine the transition between the mountain and the sky. Using a white brush with a hardness set to 0, carefully brush along the boundary of the mountain and the sky. This allows for a more ethereal and integrated look.
2. Recovering Detail in Underexposed Shadows: When shooting scenes with a high dynamic range, such as backlit subjects, underexposed shadows can appear completely black in post-processing, rendering them devoid of detail. Even attempts to brighten these areas may yield no recoverable information. In such cases, the Clone Stamp tool can be a lifesaver. Adjust the opacity of the Clone Stamp tool to around 20% and sample brighter parts of nearby elements, such as tree roots, as your source point. Then, using the Clone Stamp tool, gently brush over the pure black areas within the shadows. The low opacity ensures a subtle blend, gradually revealing detail without creating harsh transitions.
3. Restoring Overexposed Highlights: Conversely, highlight areas in an image can become overexposed and completely blown out, making detail recovery impossible. Similar to shadow recovery, the Clone Stamp tool can be used to sample surrounding areas that still retain detail, such as nearby clouds, and then carefully brush over the blown-out highlight areas. This technique allows for the reintroduction of subtle tonal variations and texture into otherwise featureless highlights.
4. Correcting Edge Artifacts: In some photographs, the edges of objects, like mountains, may exhibit noticeable white or halo-like edges. To address this, select the Clone Stamp tool and set its mode to "Darken." Because you have chosen the "Darken" mode, the tool will only affect the brighter white edges and will not alter the darker tones of the mountain itself, effectively concealing the unwanted halo.
The BEST Way To Fix Halos In Photoshop
Maintaining Natural Results and Avoiding Repetition
A common pitfall when using the Clone Stamp tool is the creation of repetitive patterns, which can make the retouching obvious. The key to achieving a natural result is to continually re-sample different nearby sources. This is done by holding down the Alt/Option key and clicking again to select a new source point frequently as you paint. This constant resampling prevents the cloned texture from becoming monotonous and unnatural.
Undoing and Managing Your Edits
Should you make a mistake or decide to revert a cloning action, the History panel is your best friend. It allows you to undo cloning actions step by step. It's important to note that currently, there is no direct, single command in Photoshop to clear all cloning sources at once.
The Enduring Relevance of the Clone Stamp Tool
In conclusion, the Clone Stamp tool remains a cornerstone of digital image editing. Its versatility allows for everything from minor blemish removal to complex compositing and creative manipulation. Even with the advent of sophisticated AI-powered tools, mastering the Clone Stamp tool provides a fundamental skillset that is both efficient and reliable for a vast array of image editing tasks. It empowers users to maintain creative control and achieve precise results, ensuring that their images are polished and professional.