Adobe Photoshop is an incredibly versatile tool that enables users to explore their creativity through a variety of features and commands, one of which is the Warp tool. The Warp tool in Photoshop allows users to manipulate the shape of images, text, and shapes by dragging control points. Using the Warp tool, graphic designers and photographers can achieve impressive results such as correcting perspective problems and making various adjustments to image elements. This comprehensive guide will delve into the intricacies of Photoshop's Warp functionality, from basic transformations to advanced techniques like Puppet Warp, providing a detailed understanding for users of all levels.
Understanding the Fundamentals of the Warp Tool
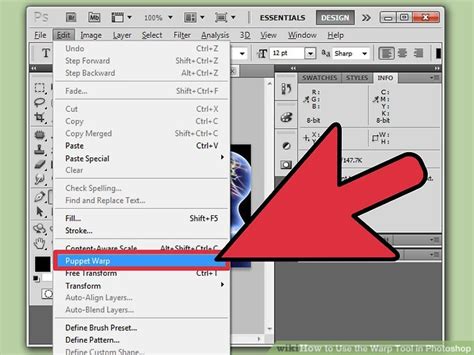
The Warp Tool in Photoshop is a powerful feature that allows us to manipulate the shape of images, text, and shapes by altering the underlying grid. Control Handles are essential components of the Warp Tool that we use to manipulate the image. These can be found at the intersection of the grid lines. The Layers Panel is particularly important for organizing and selecting the elements we want to warp. To access the Warp Command, we need to go to the top menu bar, click on Edit, then select Transform and Warp.
When working with the Transform Warp tool, it's essential to have a good understanding of the Free Transform command. Distortion and rotation are important aspects of Photoshop's Warp tool. To distort an image or object, we utilize the Enhanced Warp Tool by adjusting anchor points around the edges of the object. Rotation, on the other hand, can be done by using the Rotate icon found on the toolbar.
Step-by-Step Guide to Using the Warp Tool
If you have even used Adobe Photoshop, you might have tried using the Warp tool that enables you to transform your photos and drawings by dragging the control points of a grid. Besides images, it allows you to warp shapes and paths.
STEP 1: Find the layer that you want to transform in the Layers panel. If you import JPG or PNG photos, this layer might be locked by default. In this case, click on the Lock icon to unlock it. You can also drag this image onto the New Layer icon. It will allow you to create an editable copy layer. Note: It’s impossible to use the Warp tool to edit the background layer.
STEP 2: You can use one of the available selection tools (for instance, Lasso Tool or Rectangular Tool in the Toolbox) to select any area before performing Photoshop warping. Use them to select a part of the layer that you need to transform. Note: If you don’t use the selection tools, the program will automatically warp the entire layer.
STEP 3: Go to Edit > Transform > Warp. When you select this option, you will see a grid over the layer or the selected area.
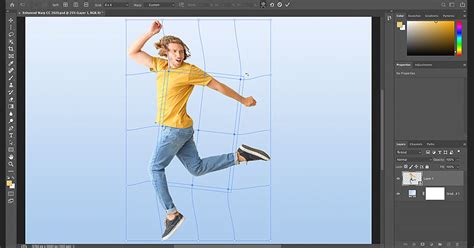
STEP 4: Once you have selected a photo that you want to warp, you will see a gridded mesh over it. You can click on every part of the mesh and drag it to deform your image in any direction you see fit. If you have never done this before, you might need to practice a bit before you get a result that you are satisfied with. Then, you can save it. To control the mesh, click on the highlighted dots on the edge of the grid, intersections of the grid lines, or the area inside the selection.
STEP 5: Use the pop-up menu to manipulate the shape of your image and get the result you need. To enhance your photo even further, go to the Warp menu in the Options bar. In the pop-up menu, you will find several options that will come in handy for performing various edits. Here, you will see the following options:
- Change Warp Orientation: Find a button with a curved grid next to a down arrow and a right arrow. Click on it to switch from vertical to horizontal orientation.
- Change Reference Point: This button has a black square surrounded by white squares on it.
- Define Warp Numerically: Enter numbers in the Bend X and Y boxes to adjust the settings in the way you need.
STEP 6: If you are fully satisfied with your image, apply the edits you’ve made. There are two ways to do it: * Press ↵ Enter (⏎ Return on Mac). * Click on a button with a tick mark in the Options bar. To undo your edits, press Esc or click on the Cancel button located near the button with a tick mark.
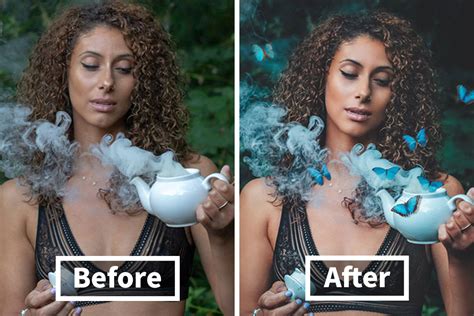
This is how your photo will look like after Photoshop wrapping. After learning how to warp an image in Photoshop, you can enhance your photos even more by using these unique effects.
Advanced Warp Techniques: Puppet Warp and Perspective Warp
Puppet Warp: Animating and Reshaping with Precision
The Puppet Warp tool in Photoshop allows us to manipulate specific areas of an image by adding pins to create a flexible mesh-like structure. By moving these pins, we can smoothly distort and reposition segments of the image according to our needs. This is particularly useful for posing characters, creating natural-looking fabric folds, or even for more abstract artistic manipulations.
To use Puppet Warp, you first need to have your image ready. For instance, you might have a giraffe that you have already cut out and extracted. Rasterizing the layer can make the process quicker, but you can also work with masks.
To access Puppet Warp, go to Edit > Puppet Warp. When you bring this up, the default settings are Mode: Normal, Density: Normal, and Expansion: 2 pixels.
Animating a character using the puppet warp tool
The Expansion setting is crucial as it creates a buffer around your object, giving you more space to manipulate. Changing the Expansion to 20 pixels, for example, provides significant room to work with. The Density setting determines how many lines appear in the mesh; "Normal" is often sufficient, but "More Points" can be beneficial for fine detail adjustments.
When the Puppet Warp tool is active, you'll see a pin icon. Click on different areas of your image to place pins. These pins act as anchors. By locking down certain pins (e.g., the feet of the giraffe), you can then move other pins (e.g., the head) to achieve the desired pose. The tool allows you to move individual pins, and the rest of the object will deform accordingly.
The Mode setting offers further control:
- Rigid: This mode keeps the pinned areas very stiff, with minimal distortion.
- Normal: This is the default and offers a balanced approach to distortion.
- Distort: This mode is excellent for changing perspective. You can move the head of the giraffe, for instance, and it will appear as if it's coming towards the viewer, mimicking a wide-angle lens effect. This is great for adding dynamic perspective shifts to a single area of your object.
After making your adjustments, you can apply them by clicking the tick mark in the Options bar or pressing Enter. To undo, press Esc or click the cancel button.
Perspective Warp: Correcting and Enhancing Depth
The Perspective Warp tool helps us adjust the perspective of an image or a portion of it. This is invaluable for correcting architectural photography where lines might not be straight, or for making composite images appear more realistic.
Initially, you'd select the layer to be warped and go to Edit > Perspective Warp. By clicking and dragging, you create a grid over the area you wish to modify. You can then adjust the grid's anchor points and handles to align with the desired perspective. This allows you to define planes within the image and then manipulate them to achieve a consistent or altered perspective.
Custom Grids and Enhanced Control
The newest version of Photoshop comes with a powerful Warp tool with upgraded functionality. While the Warp option has been available for a long time, users had a limited choice of adjustment options. However, Photoshop CC has a more advanced version of this feature. Adobe has updated the Photoshop warp tool by adding default and customizable grids. You can add grid lines and control points, as well as drag several points to deform an image.
To work with custom grids, start by selecting the Warp command, then choose Grid from the options panel. Adjust the columns and rows as needed, and begin warping the image by dragging the control points.
To add more grid lines to an existing warp: In the Options bar, select a Split icon to add predefined splits: Split Warp Horizontally, Split Warp Vertically, or Split Warp Crosswise. You can also add new control points by holding down the Alt/Option key (on Windows or Mac) and clicking anywhere on the grid. Selecting multiple points can be done by Shift-clicking anchor points or dragging over them while holding Shift.
Applying Warp for Specific Textures and Effects
Cylinder Warp: Wrapping Images Around Cylindrical Objects
Cylinder Warp in Photoshop can be used to wrap images or elements around cylindrical objects. To accomplish this, you first open the image to be warped in Photoshop, and then create a rectangular selection around it. Next, you go to Filter > Distort > Polar Coordinates, choosing the "Rectangular to Polar" option. This process effectively bends a flat image into a cylindrical form, which can then be applied to 3D objects or used for creating textured backgrounds.
Warping Text and Shapes
Not only can we warp images, but also text layers in Photoshop. To apply Warp to text, first, create a text layer. Then, select the Create Warped Text button in the options panel, and choose a style from the Warp drop-down menu. This allows for creative typography where text can follow curves, arcs, or other distorted paths. Similarly, shapes and paths can be manipulated using the same Warp functionality, offering immense creative freedom.
Warp Orientation and Advanced Manipulation
In addition to using Photoshop's built-in Warp options, we can create unique effects by experimenting with Warp orientation. To experiment with Warp orientation, go back to the Warp tool and adjust the orientation settings in the options panel. One advanced technique to consider is using a vanishing point while manipulating the warp orientation. This adds an element of perspective to your images, enhancing the overall realism and depth.
By default, each node’s handles move in Unison mode. When the node is a circle, all of the handles move together when rotating. If you convert to Independent mode and adjust a handle, changing back to Unison mode snaps the handle back to its original orientation and takes the warp with it. This level of control allows for very precise manipulation of the warped elements.
Warp Tool in Various Creative Fields
Photography: Retouching and Compositing
In photography, retouching is a crucial step, and the use of the Warp tool in Photoshop is crucial. We can precisely manipulate the shape of objects to create an aesthetically pleasing image by adjusting perspective. The Warp tool is excellent for portrait and commercial photography, allowing us to adjust photos creatively or correctively. Warp is particularly useful when creating composite images, as it enables us to seamlessly blend different elements from multiple images. For instance, if you've photographed a product from an angle that doesn't quite match other elements in your composite, Warp can help align it perfectly.
Digital Art and Drawing
Not only is the Warp tool beneficial in photography, but it's also valuable in digital art and drawings. Artists can use it to create dynamic poses, exaggerate features, or add a sense of movement and flow to their creations. Warping a sketch can transform it into a more polished illustration, adding depth and character.
Important Considerations and Tips
Understanding the Warp Envelope
Using Warp, just like Liquify, relies heavily on ‘feel’ while you’re working. To get the most out of this tool, it is highly recommended that you get a stock image or two of plain graph paper or other regular pattern to experiment with. This will help you see the results of changes more easily than a photograph or other illustration.
Tip: If you have trouble seeing the Warp envelope over your image, check out the top Options bar and click the Gear while Warp is active. You’ll get choices for Guide line colors, opacity, and density, as well as when to show the lines. Note that the Guide lines are different than the Grid lines - guides are visual references for how the warp is behaving, while grids are the actual lines you can manipulate.
Warp Presets and Refining Adjustments
To make things easier, you can use Warp presets from the Options bar. For example, the "Inflate" preset can provide a reasonable starting point and make things more even than adjusting the shape by hand. After moving several groups around, you can achieve a good approximation of the final shape. To refine from here requires moving individual nodes around, including rotating them by moving the control handles.
Texture Application and Regular Patterns
When applying textures, especially those with regular patterns like graph paper, the Warp tool is invaluable. It allows you to conform the texture to the contours of an object, making it appear naturally integrated rather than flat. For instance, if you are applying a wood grain texture to a curved surface, Warp can bend the grain to follow the curvature, adding a layer of realism.
Limitations and Future Updates
As of now, the Warp tool is not available in Photoshop for iPad. However, Adobe is continually updating the app and adding new features, so the Warp tool may be available in future updates.
Further Enhancements with Photoshop Actions
To enhance your photos even further after applying warp effects, consider using Photoshop actions. There are sets of Photoshop actions available that are suitable for enhancing various photography types, making them a perfect option for beginners and experienced photographers alike. These actions can give your photos an unusual look, apply a variety of eye-catching effects, and tweak colors to make your pictures stand out. These actions are compatible with different versions of Photoshop, like CC or CS 4-6. You can either download one filter to edit the project you are currently working on or save the whole bundle of actions to your device.
Mastering Photoshop's Warp tools opens up a world of creative possibilities, from subtle retouches to dramatic transformations. By understanding the fundamentals, exploring advanced techniques, and practicing with various patterns and textures, users can significantly elevate their digital artistry.