Achieving smooth, controlled lines is a fundamental skill for any artist, and it's a challenge that becomes even more pronounced when working on a digital canvas, especially on smaller mobile screens. The sensitivity of styluses and the limited drawing area can often lead to hesitant or shaky strokes. Fortunately, Procreate, and its mobile counterpart Procreate Pocket, offer powerful built-in features designed to assist artists in creating polished, professional-looking lines. This guide delves into the various tools and techniques available to help you achieve those coveted smooth lines, from understanding Procreate's stabilization features to leveraging quick shape transformations and even employing traditional drawing wisdom.
The Power of Streamline: Smoothing Your Strokes
Every artist understands the significance of maintaining control over their lines. When sketching on mobile devices, achieving that perfectly smooth stroke can be a challenge due to screen size or stylus sensitivity. However, with Procreate Pocket, there's a game-changing feature named Streamline that's here to help.
Streamline is a feature in Procreate Pocket designed to assist in smoothing out your lines as you draw. It acts as an intelligent engine that automatically refines your strokes, transforming potentially wobbly lines into beautiful and smooth curves. This feature is particularly beneficial for inking and calligraphy, where precision and fluidity are paramount.
How to Utilize Streamline: A Step-by-Step Approach
- Open your project in Procreate Pocket.
- Select the brush you intend to use for your artwork.
- Tap on the brush icon located in the top menu to access the brush settings.
- Within the settings menu, navigate to and tap on the "Stroke" tab.
- Here, you will find the "Streamline" slider. To increase the smoothing effect, slide it to the right.
A recommended setting for Streamline is typically around 30-40%. This range offers an ideal blend of control and flexibility. It allows for the effective smoothing of lines without sacrificing the natural dynamics and expressiveness of your sketch. Pushing the percentage too high might render the lines overly "elastic" or "automated," potentially hindering your creative flow and resulting in strokes that feel less organic.
Streamline is a potent tool within Procreate Pocket that every artist should be familiar with. Not only does it aid in refining your lines, but it also enhances the overall quality of your artwork, making it appear more polished and professional.
Stabilization: Procreate's Built-In Smoothing Engine
Crisp contours and confident curves are essential in many forms of illustration, particularly in fashion design, where fluid necklines, curved hems, and clean croquis outlines are crucial. However, achieving these perfect lines, especially on a touchscreen, can be a significant hurdle. Fortunately, you don't need perfect hand control to draw clean lines in Procreate. The application offers built-in smoothing capabilities that can significantly improve the quality of your strokes.
Procreate features a powerful tool called Stabilization, which works to smooth and straighten your strokes as you draw them. This feature is especially helpful for detailed work where precision is key. There are two primary types of stabilization available in Procreate:
Global Stabilization: Affecting Every Brush
Global Stabilization is a setting that overrides the default behavior of all brushes. When activated and turned up, every line you draw will be smoothed out, irrespective of whether the specific brush you are using was initially designed for such smoothing. This is a powerful setting for ensuring consistency across your entire canvas.
How to Adjust Global Stabilization:
- Tap the Actions icon (the wrench symbol).
- Navigate to Prefs (Preferences).
- Select "Pressure & Smoothing".
- Here, you will find the "Stabilization" slider. Adjusting this slider to the right will increase the smoothing effect applied to all your strokes.
While Global Stabilization affects all brushes, it's important to use it judiciously. Over-reliance on high stabilization can sometimes lead to lines that feel too artificial or disconnected from your intended movement.
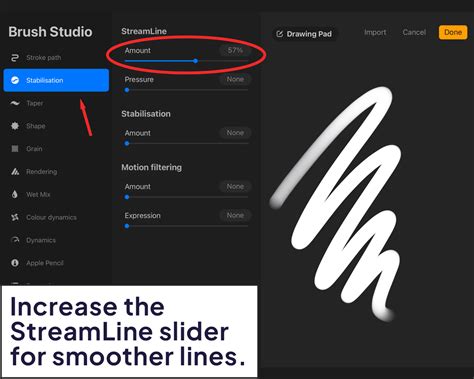
Brush-Specific Stabilization: Fine-Tuning Individual Brushes
Beyond global settings, Procreate also allows for brush-specific stabilization. This means you can fine-tune the smoothing behavior of individual brushes, allowing you to create custom brush presets with varying degrees of line smoothing.
How to Adjust Brush-Specific Stabilization:
- Select the brush you wish to modify.
- Tap the brush icon to open the Brush Studio.
- Navigate to the "Stroke Path" section.
- Within the "Stroke Properties," you will find the "Streamline" slider. This is where you can adjust the smoothing for that particular brush.
By adjusting the Streamline slider within the Brush Studio, you can tailor how a specific brush behaves. Sliding it to the right increases smoothing, while sliding it to the left reduces it, offering a more natural, less processed line. For a smoother and more even result, turn it up, and for less smooth and more natural linework, turn it down or off.
Streamline Examples in Brush Studio:
To illustrate the effect, consider these examples:
- Streamline at 100% (Max): This setting provides the maximum smoothing, resulting in exceptionally clean and fluid lines, ideal for calligraphy or precise inking.
- Streamline at 0% (None): With Streamline off, the line will appear wobbly and uneven, reflecting the raw input from your stylus. This can be useful for achieving a more textured or expressive hand-drawn feel.
Depending on your specific needs and the intended use of a brush, you may also want to explore and adjust other attributes within the Stroke Properties or Brush Studio Settings. This allows for a highly customized brush experience, ensuring your tools perfectly match your artistic vision.
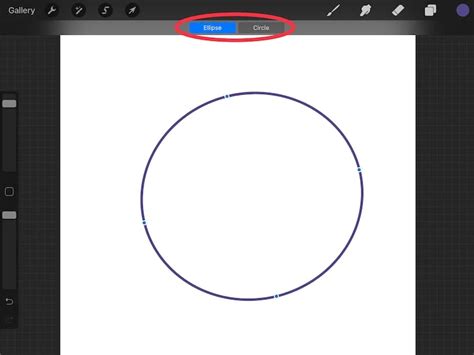
QuickShape: Instant Geometric Precision
Another invaluable feature for achieving smooth and precise lines in Procreate is the QuickShape tool. This intelligent feature transforms your freehand shapes into perfect geometric forms, including lines, curves, and angles, instantly.
How QuickShape Enhances Line Quality
QuickShape is incredibly useful for adding precise details without the need for rulers or other external guides. It's particularly helpful when you need to create perfect circles, ovals, squares, rectangles, or straight lines.
Using QuickShape for Perfect Shapes:
- Draw your shape freehand as you normally would. For instance, draw a rough oval for a character's head.
- Hold down your stylus on the screen after completing the stroke.
- Procreate will automatically recognize the shape and snap it into a perfect geometric form.
- To refine the shape: While still holding down, you can use another finger to tap and hold on the screen. This will allow you to snap the shape to other perfect forms (e.g., turning an oval into a perfect circle). You can also use this gesture to precisely align lines horizontally or vertically.
- Edit Shape Options: Once you release your stylus, an "Edit Shape" button will appear at the top of the screen. Tapping this button provides further options to resize, rotate, and reposition the perfected shape. However, these edit options are only available immediately after the shape is formed; tapping away from the shape will finalize it without these editing capabilities.
QuickShape for Perfect Lines
The QuickShape feature also excels at creating perfectly straight lines. Simply draw a line and hold down your stylus at the end of the stroke. Procreate will convert it into a perfectly straight line. As with shapes, you can use a second finger to tap and hold to constrain the line to perfect horizontal or vertical orientations, or to snap it to precise 45-degree angles.
Limitations of QuickShape
It's important to note that QuickShape works best for standard geometric shapes. Creating highly asymmetrical or complex custom shapes might not be as straightforward. For instance, trying to create a perfect star might result in straight lines but won't necessarily correct the overall shape for symmetry. In such cases, using a reference image and outlining it is a more effective approach.
Combining Quick Shapes for Complex Forms
For more intricate designs, you can combine multiple QuickShapes. For example, to draw a cloud, you can create a series of arcs using QuickShape, holding down after each arc to ensure it becomes a smooth, perfect curve. You can then edit and position each arc individually to form the desired cloud shape. This technique can be applied to various complex forms, allowing for a blend of freehand drawing and precise geometric construction.
Traditional Techniques for Smoother Lines
While Procreate offers powerful digital tools, some of the most effective techniques for achieving smooth lines are rooted in traditional drawing practices. These methods, when applied in Procreate, can significantly enhance your control and the fluidity of your strokes.
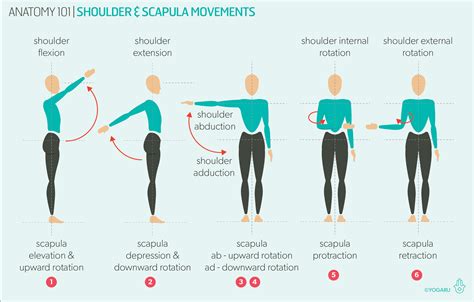
The Arm Movement Principle
A very common and effective trick, based on traditional drawing techniques used by professional artists for ages, is to make your drawing movement with your entire arm, rather than only your wrist. Your whole arm should initiate the movement, starting from your shoulder. By engaging more muscles in the action, you gain significantly more control over the movement of your stylus.
When you restrict your drawing motion to just your wrist, you introduce subtle tremors and a lack of fluidity. By drawing from the shoulder, you create longer, more sweeping lines with greater consistency and less jitter. This method not only improves line quality but also helps in developing a more confident drawing style.
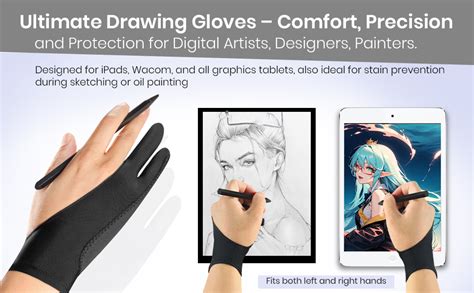
The Role of Gloves
For artists working on touchscreens, gloves are the perfect solution for sliding your hand more smoothly on the screen. Similar to how some traditional artists use gloves when drawing on paper to prevent sweaty hands from sticking or smudging charcoal, digital artists can benefit from specialized drawing gloves. These gloves reduce friction between your hand and the screen, allowing your hand to glide effortlessly.
Drawing lines and shapes becomes much more smooth and fluid when your hand can easily slide across the glass surface without resistance. This simple physical aid can make a surprising difference in the control and comfort of your digital drawing experience, contributing to smoother and more consistent linework.
Beyond the Brush: Other Considerations for Smooth Lines
Achieving consistently smooth lines in Procreate involves more than just adjusting settings. Several other factors can contribute to the quality of your output.
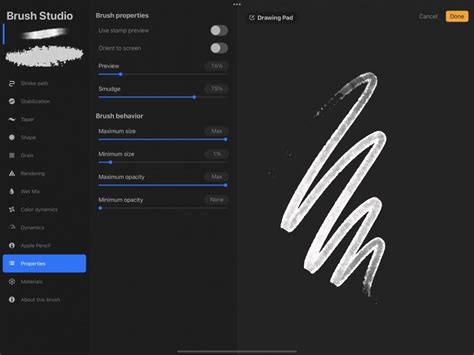
Brush Selection and Customization
The choice of brush itself plays a significant role. Some brushes are inherently designed for smooth lines, while others are more textured. Procreate offers a vast library of brushes, and many artists develop their own custom brushes. Fine-tuning brush settings, such as "Taper" in the "Properties" tab of the Brush Studio, can influence how the line's thickness changes at the beginning and end of a stroke, contributing to a smoother appearance.
For example, the user mentioned creating "ultimate line brushes which I use for everything. Fine-tuned for drawing smooth and sharp shapes like a pro." This highlights the importance of investing time in finding or creating brushes that suit your specific needs for smooth and sharp linework.
Layer Management and Workflow
Sometimes, the appearance of "wiggly" lines isn't solely due to the drawing input but also how those lines are rendered or perceived. Using layers effectively can help. For instance, you might sketch loosely on one layer and then create a new layer on top to ink over your sketch with a smoother, more controlled brush. This approach allows you to separate the expressive stage of sketching from the refinement stage of inking.
Utilizing Reference Images
When aiming for perfect shapes or complex forms that QuickShape might not perfectly handle, using reference images is a highly effective strategy. You can import an image onto a separate layer, reduce its opacity, and then trace over it with your chosen brush. This allows you to achieve precise outlines based on existing artwork or photographs, which can then be used as a foundation for your own creations.
How to use QuickShape in Procreate
By combining the advanced features within Procreate, such as Streamline and QuickShape, with fundamental drawing principles and careful brush selection, artists can significantly elevate the smoothness and professionalism of their digital artwork. Experimentation with these tools and techniques will undoubtedly lead to more confident and refined linework.