Adding a rain effect to your photographs in Photoshop can dramatically alter the mood and narrative of an image. Whether you aim to evoke a sense of melancholy, drama, or simply want to enhance a scene with atmospheric realism, Photoshop offers a versatile toolkit to achieve this. This tutorial will guide you through various techniques to simulate different types of rainfall, from a gentle drizzle to a heavy downpour, ensuring your photographic creations are not only visually striking but also technically sound. By employing Photoshop's powerful filters and adjustment layers, you can imbue your images with a convincing rain effect without ever having to brave inclement weather yourself.
Preparing Your Canvas and Base Rain Texture
The foundation of any effective rain effect lies in creating a convincing rain texture. This process often begins with a new, blank canvas or by preparing an existing image. For a fresh start, it's recommended to create a new document, perhaps with dimensions like 1000px by 1000px, to serve as your rain texture base.
Filling the Layer with Black and Adding Noise
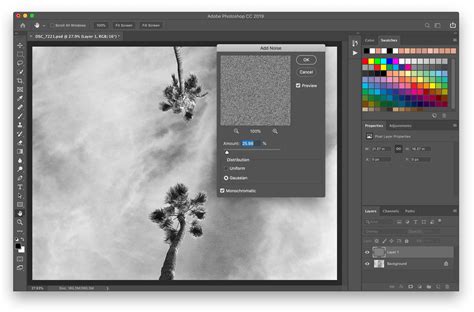
Begin by ensuring your background color is set to white. Then, create a new layer. Select the Brush Tool (B) and set your foreground color to black. Choose a hard brush and adjust its softness slightly. A crucial step in generating the initial rain particles is applying the "Add Noise" filter. Locate this under the Filter tab in the top toolbar, then navigate to Noise > Add Noise. For a good starting point, set the Amount to 25% and select Gaussian for the distribution. To limit the dot colors to black and white, ensuring a monochromatic noise pattern, check the "Monochromatic" option at the bottom. This action will fill the layer with random dots, which will form the basis of your rain.
Scaling the Noise for Larger Raindrops
Once the noise is applied, the dots might appear too small for a convincing rain effect. To address this, you'll need to scale the noise. Follow the path Edit > Transform > Scale. Within the scale options, set the Width (W) to 400%. This significantly enlarges the noise elements, making them more suitable for representing raindrops. While this scaling increases the file size and could potentially slow down Photoshop's performance, it's a necessary step for achieving larger-looking rain. After scaling, it's good practice to deselect any active selection outlines. Go to the Select menu and choose Deselect.
Alternative Method: Using Brush Tool for Rain Texture
Another approach to creating the initial rain texture involves using Photoshop's brush tools. Start by creating a new document (e.g., 1000px by 1000px) with a white background. Create a new layer and switch your foreground color to black. Select a hard brush and increase its softness just a little.
A key setting to enable for this method is "Scattering." Within the brush settings, check the "Both Axes" checkbox and increase the scattering to your liking. This setting adds spacing between the brush strokes, which is essential for creating a more natural, spaced-out rain effect. This method allows for more direct control over the distribution and spacing of the simulated raindrops.
Simulating Falling Rain with Motion Blur
With a basic noise texture in place, the next step is to transform these static dots into streaks of falling rain using the Motion Blur filter. This filter is instrumental in giving the impression of movement.
Applying Motion Blur as a Smart Filter
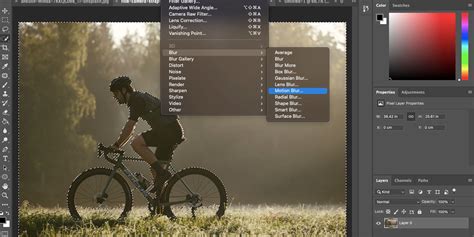
To ensure the Motion Blur settings remain editable, it's best to apply it as a Smart Filter. With your Rain layer selected in the Layers panel, navigate to Filter > Blur > Motion Blur. In the Motion Blur dialog box, you can define the direction and distance of the rain.
The Angle value determines the direction of the rain. You can input a value directly or use the dial to rotate it. For a typical downward rain effect, an angle around 65° or -62° is often effective. The Distance value controls how long the streaks appear, simulating the speed of the falling rain. Adjust the slider to preview the results in your image. A starting point of 75 pixels for the distance is common, but the optimal value will depend heavily on the size and resolution of your image. Don't worry about achieving perfection at this stage, as the smart filter allows for later adjustments.
Adjusting Motion Blur for Different Rain Intensities
The "Distance" setting in the Motion Blur filter is crucial for dictating the intensity and type of rain. For a light drizzle, a smaller distance value is appropriate, resulting in shorter streaks. For a heavy downpour, a larger distance will create longer, more pronounced streaks, giving the impression of intense rainfall. Experimentation is key here; the ideal distance will vary based on the specific image and the desired visual outcome.
Refining the Rain Effect for Realism
Once the basic motion blur is applied, the rain effect might still look artificial. Several techniques can be employed to enhance its realism, including adjusting its intensity, contrast, and distribution.
Using Levels for Intensity and Contrast Control
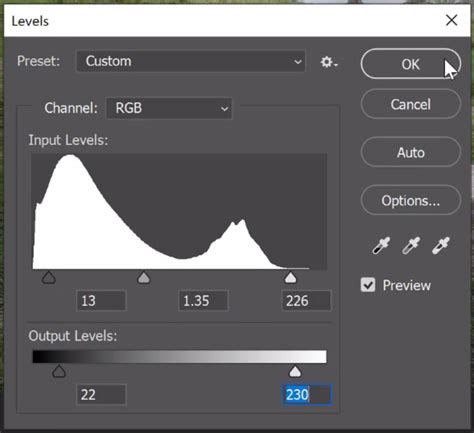
A Levels adjustment layer is an excellent tool for controlling the density and contrast of the rain. Add a Levels adjustment layer to your project. In the Properties panel, you'll see a histogram and three sliders: a black point slider on the left, a white point slider on the right, and a midtones slider in the middle.
To reduce the overall amount of visible rain, drag the black slider on the left towards the right. This will darken the rain streaks, making them less prominent. Conversely, if the rain appears too dark and you need to brighten it, drag the white slider on the right towards the left. The midtones slider can be used to fine-tune the overall brightness and contrast of the rain effect. Dragging the midtones slider to the left, for instance, can increase the perceived imperfection and variation in the rain, contributing to a more natural look.
Enhancing Realism with Layer Masks and Blending Modes
To make the rain effect more integrated with the original image, layer masks and blending modes are invaluable. After applying Motion Blur, it might appear brighter just below the edge of the image due to how the filter processes pixels at the boundaries. To mitigate this, you can add a layer mask to the rain layer.
Select the Brush Tool (B) with a soft edge, set its opacity to around 30%, and use black as your foreground color. With the layer mask active, paint over the brighter areas, particularly near the edges or on highlights within the original image, to reduce the intensity of the rain in those specific spots. This selective masking helps create a more natural distribution, as rain is often less visible against brighter backgrounds.
Changing the blending mode of the rain layer can also significantly impact its appearance. The "Screen" blending mode is often effective for rain, as it naturally lightens the underlying image while allowing the rain streaks to show through. Adjusting the opacity of the rain layer, perhaps to around 95%, can further refine how the rain interacts with the scene.
Adding Splashes for a Dramatic Feel
For a more dramatic and immersive rain effect, consider adding simulated splashes. This can be achieved by creating smaller, more intense noise patterns or by using specialized rain splash brushes. These elements, when strategically placed, particularly around the subject or on surfaces, can significantly enhance the realism and impact of the rain.
Advanced Techniques and Customization
Beyond the core steps, several advanced techniques can elevate your rain effect from basic to professional. These include layering different rain textures, adjusting colors, and simulating wetness on subjects.
Layering Multiple Rain Textures
To create a more complex and realistic rain scene, consider layering multiple rain textures. You can create several rain layers, each with slightly different noise settings, scaling, and motion blur angles. By layering these with varying opacities and blending modes, you can simulate rain falling at different distances and speeds, adding depth and dimension to the effect.
Adjusting Rain Color
While rain is typically depicted as colorless, you can subtly adjust its hue to better match the mood of your image. Using an adjustment layer like Hue/Saturation, you can check the "Colorize" option. This allows you to shift the hue and lightness of the rain streaks, perhaps to a cooler blue tone for a somber mood or a slightly warmer tone if desired. Experiment with these settings to find what best complements your photograph.
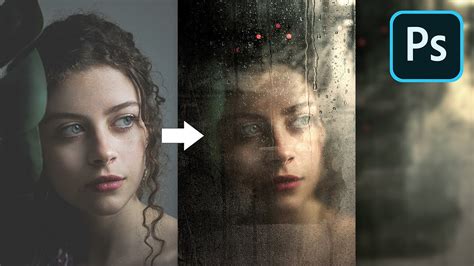
Simulating Wetness on Subjects
To further enhance the realism, you can simulate the effect of rain on your subjects, making their clothes and hair appear wet. This often involves using tools like the Smudge tool to create the appearance of heavier, slicker hair. You can also use clipped adjustment layers, such as Brightness/Contrast and Curves, combined with layer masks, to selectively darken areas and enhance highlights on the subject's clothing and skin, giving the impression of moisture. Creating new layers set to "Soft Light" blending mode can also help build up subtle wet-looking textures.
Exploring Further Possibilities
Once you've mastered the basic rain effect, the possibilities for creative expression are vast. Consider experimenting with other weather phenomena or exploring pre-made resources.
Creating Snow Effects
The same fundamental techniques used for rain can be adapted to create snow effects. By adjusting the noise settings, scaling, and motion blur parameters, you can simulate falling snow. For instance, smaller, more diffused noise particles with a slower motion blur can effectively mimic snowflakes.
Utilizing Photoshop Actions and Brushes
For those seeking to expedite the process or explore diverse rain styles, Photoshop actions and brushes offer a convenient solution. Numerous high-resolution rain brushes are available, each designed to create different types of rain, from light drizzles to heavy downpours. Similarly, Photoshop actions can automate many of the steps involved in creating a rain effect, allowing for quick application and customization with just a few clicks. These tools can be particularly useful for adding a stylistic Hollywood-inspired rain effect or for creating a rain-on-glass effect for added realism.
Rain Effect in Less Than 1 Minute with Photoshop
Further Resources and Inspiration
For continued learning and inspiration, exploring photo effects sections of tutorials or delving into resources dedicated to weather effects can provide new ideas and techniques. The goal is to move beyond simply adding rain to a photo and to integrate it seamlessly, enhancing the overall narrative and emotional impact of your image. Remember that every image is unique, and the best results often come from experimenting with different settings and approaches to suit your specific creative vision.