The Rectangle Tool in Adobe Photoshop is a fundamental yet powerful feature that allows users to create and manipulate rectangular shapes with precision and flexibility. Practising its use not only enhances confidence in transforming and modifying layers but also opens doors to creative possibilities, from constructing geometric designs to building foundational elements for more complex artwork. This tutorial delves into the intricacies of the Rectangle Tool, exploring its functionalities within the option bar and properties panel, and demonstrating how to leverage its capabilities for various design tasks.
Setting Up Your Workspace for Shape Manipulation
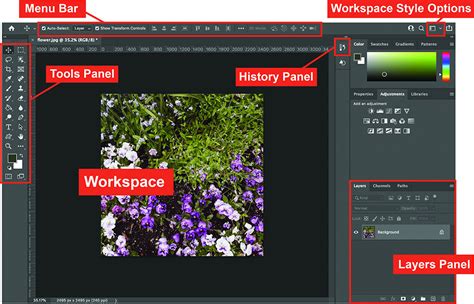
Before diving into the practical application of the Rectangle Tool, it’s essential to establish an organised workspace within Photoshop. If you’ve followed previous lessons, you might already be familiar with opening a new document. For exercises involving print-ready work or detailed progress recording, using an A4 preset canvas size is often beneficial.
For this particular exercise, the focus is on creating and manipulating numerous shapes using the Rectangle Tool, which necessitates a clear understanding of layer organisation. To facilitate this, it's advisable to clear your workspace by closing any unnecessary groups and tabs. Ensuring the Layers panel remains visible on your screen is crucial, as it will be your primary tool for managing the shapes you create.
Selecting and Utilizing the Rectangle Tool
The Photoshop toolbar, typically docked on the left side of your screen, houses the Rectangle Tool at the bottom. If the icon isn't immediately visible, a right-click on the adjacent button will reveal a fly-out menu containing related tools, including the Rectangle Tool.
Once selected, the Rectangle Tool becomes active, ready for use. To draw a basic rectangle, position your cursor over the document canvas. Click and hold the left mouse button, then drag the mouse. This action will create a rectangle, and practising this movement a few times will help you become accustomed to the process.
Modifying Shapes with On-Canvas Controls
Immediately after drawing a rectangle, Photoshop displays on-canvas controls around the shape's path. These controls are visually represented by eight small boxes situated at the corners and midpoints of the rectangle's sides.
Hovering your mouse over these areas will change the cursor's appearance, indicating that transformation is possible. By clicking and holding the left mouse button on these control points, you can resize the height and width of the rectangle. Furthermore, the small circle icons located within the shape allow you to round the corners of the rectangle. Experimenting with drawing and modifying numerous rectangles is highly encouraged to build proficiency.
A valuable tip for maintaining aspect ratio during resizing is to hold down the Shift key while dragging a corner handle. This ensures that the shape maintains its original proportions, preventing distortion.
To reposition a rectangle to a different area of the canvas without altering its dimensions, press the V key on your keyboard to activate the Move Tool. You can then use your mouse to drag and place the rectangle wherever desired.
Leveraging the Properties Panel for Advanced Editing
As you draw shapes, the Properties panel often appears automatically, offering a comprehensive suite of options for modifying your selected layer. Within this panel, you'll find fields for W (Width) and H (Height), which precisely define the dimensions of your rectangle. The X and Y coordinates indicate the shape's position on the canvas.
The Properties panel also allows for detailed control over the shape's appearance, including its fill color and stroke. Photoshop often applies a default stroke, typically a thin black line, around the edge of newly created shapes. It's important to be aware of this and to change it if it doesn't align with your design intentions. To remove the stroke, select the "no color" icon.
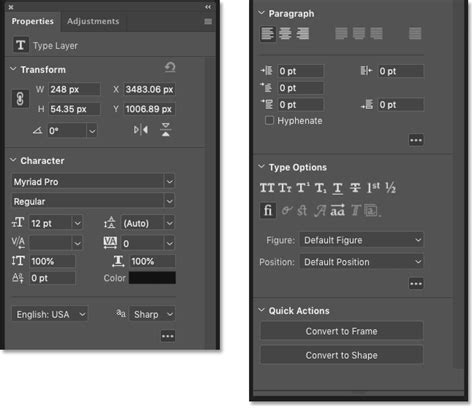
A dedicated section within the Properties panel is dedicated to rounding the corners of the rectangle. You can adjust the radius of each corner individually or, as seen in some examples, modify them collectively by linking the values. This offers granular control over the shape's aesthetic.
Beyond the Properties panel, the Options Bar at the top of the screen also provides quick access to modifying the rectangle's fill color and adding or adjusting its stroke.
Rotating and Transforming Shapes
The Rectangle Tool, like other shape tools in Photoshop, offers intuitive rotation capabilities. Hovering your mouse over one of the rectangle's corners will cause the cursor to transform into a curved arrow icon. Clicking and holding the left mouse button in this state allows you to freely rotate the shape. Practising with different angles will further hone your skills.
For more precise transformations, including rotation, Photoshop's Free Transform feature can be employed. The shortcut for this is Ctrl+T (Windows) or Command+T (macOS). Within the Free Transform options, you can input a specific angle value into the designated field in the Options Bar, ensuring exact rotational accuracy.
Use FREE TRANSFORM To Scale, Rotate & Warp Layers In Photoshop CC 2022
Task One: Crafting National Flags
Utilising the skills developed so far, open a new document in Photoshop and attempt to create the French and Irish flags. For each flag, you will need to create three rectangles. A highly efficient method for ensuring consistent dimensions across these shapes is to duplicate existing layers. This ensures that each rectangle maintains identical size parameters, simplifying the alignment process.
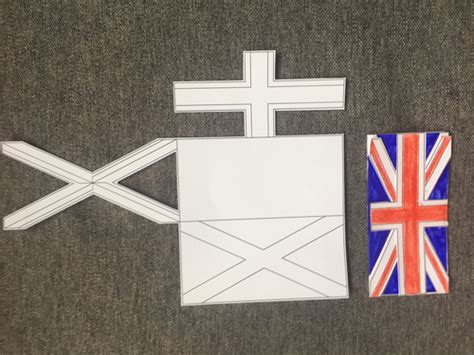
Task Two: Constructing the Union Jack
This task presents a more intricate challenge, requiring the creation of the Union Jack flag. This exercise will push your abilities further by demanding precise rotation of rectangles and meticulous organisation of each shape within the Layers panel. The complexity of the Union Jack necessitates careful attention to detail and a solid understanding of how to layer and position individual elements accurately.
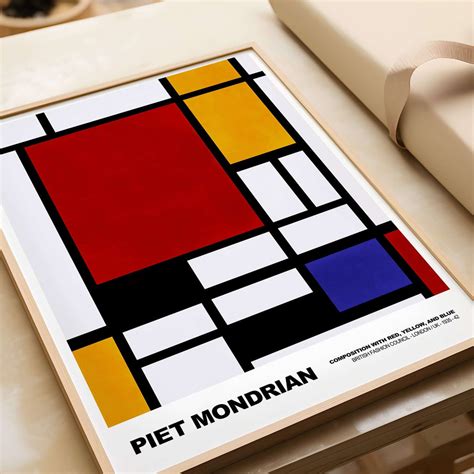
Task Three: Emulating Piet Mondrian's Style
Piet Mondrian is renowned for his distinctive grid-based abstract paintings. With your newfound mastery of the Rectangle Tool, you are well-equipped to replicate the artist's signature style. This involves creating the characteristic black lines, white squares, and the use of primary colours that define his iconic compositions. This task encourages creative application of the tool to achieve a specific artistic aesthetic.
Expanding Your Shape Toolkit: Beyond Rectangles
While the Rectangle Tool is a cornerstone of Photoshop's shape capabilities, it's part of a broader suite of geometric shape tools. Understanding these complementary tools significantly expands your design potential. These include:
- The Ellipse Tool: Used for creating perfect circles and ovals.
- The Triangle Tool: Dedicated to drawing triangular shapes.
- The Polygon Tool: Allows for the creation of shapes with any number of sides, including stars.
- The Line Tool: For drawing straight lines, with options for arrowheads and various stroke styles.
- The Custom Shape Tool: Offers a library of pre-designed shapes that can be incorporated into your work.
Each of these tools shares many common options with the Rectangle Tool, particularly within the Options Bar and Properties panel, ensuring a consistent user experience.
Understanding Shape Modes: Vector, Path, and Pixel
When using Photoshop's shape tools, you have the option to draw shapes in one of three modes: Vector, Path, or Pixels.
- Vector Shapes: These are constructed using mathematical equations, defining points and lines. Vector shapes are infinitely scalable without any loss of quality, making them ideal for logos, illustrations, and any design that might require resizing. They remain fully editable.
- Paths: In this mode, Photoshop creates only the outline of the shape. A path is also scalable and editable, but it lacks any fill or stroke colour by default. Paths are often used as a basis for selections or for creating complex selections.
- Pixel Shapes: These shapes are rasterised, meaning they are composed of pixels, just like regular images. Once created as pixels, they lose their scalability without quality degradation and become part of the image's pixel grid.
For most design applications where scalability and editability are paramount, drawing shapes as Vectors is the preferred method.
Advanced Options in the Options Bar
The Options Bar at the top of the Photoshop interface provides a wealth of settings that modify the behaviour and appearance of the active shape tool.
- Tool Mode: This is where you select whether to draw as a Vector Shape, Path, or Pixels.
- Fill: This option allows you to choose the colour that will fill the shape. You can select a solid colour, a gradient, or a pattern.
- Stroke: This controls the colour, width, and style of the outline around the shape. You can choose from solid colours, gradients, or patterns for the stroke as well. The stroke's alignment (inside, outside, or centered) can also be adjusted.
- Path Operations: This powerful set of icons enables you to combine multiple shapes in various ways. Options include combining shapes into a single new shape, subtracting one shape from another, intersecting areas, or excluding overlapping areas.
- Path Alignment: This feature is useful when you have multiple shapes selected and need to align or distribute them precisely.
- Gear Icon (Path Options): Clicking the gear icon reveals further settings, such as the thickness and colour of the path outline itself (distinct from the stroke), and options for setting a custom size or aspect ratio before drawing. It also includes the crucial Corner Radius option for tools like the Rectangle, Triangle, and Polygon, allowing you to pre-define the roundness of corners.
Working with Live Shapes and the Properties Panel
A key advancement in recent Photoshop versions is the concept of "Live Shapes." When a shape is drawn as a vector, its properties remain "live" and fully editable after creation. This means you can select a shape layer and then use the Properties panel to modify its dimensions, position, rotation, fill, stroke, and corner roundness at any time.
The Properties panel for a selected shape tool is organised into sections:
- Transform: Here you can numerically adjust the Width, Height, X, and Y coordinates, as well as the Angle of rotation. A link icon allows you to constrain or unconstrain the aspect ratio when changing width and height.
- Appearance: This section mirrors many of the options found in the Options Bar, allowing you to change the fill and stroke colours, stroke width, and stroke style (solid, dashed, dotted). It's also where you can precisely control the roundness of individual corners.
- Pathfinder: This section contains the same shape combination options as seen in the Options Bar, providing a convenient location for manipulating multiple shapes.
The Rectangle Tool in Detail
The Rectangle Tool itself is designed for creating four-sided shapes with square corners. Its primary functions include:
- Drawing Rectangles and Squares: As its name suggests, it creates rectangles. Holding the Shift key while drawing constrains the proportions to create a perfect square.
- Vector, Path, or Pixel Output: You can choose the output mode in the Options Bar. Vector shapes are the most versatile for general design work.
- On-Canvas Controls: After drawing, you can use the handles around the shape to resize, scale, and rotate it directly on the canvas.
- Corner Rounding: The on-canvas controls, as well as the Properties panel, allow for precise adjustment of corner roundness.
- Precise Transformation: Using Free Transform (Ctrl+T / Command+T) or the numerical inputs in the Properties panel offers exact control over dimensions and rotation.
The ability to draw rectangles in different modes, modify them extensively through on-canvas controls and the Properties panel, and combine them with other shapes makes the Rectangle Tool an indispensable asset for any Photoshop user, from beginners to seasoned professionals. It is a foundational tool for creating everything from simple geometric elements to complex illustrations and layouts.