In today's visually driven world, the ability to precisely edit images is a crucial skill, especially when preparing content for presentations, websites, or publications. One of the most common editing tasks is removing an image's background to isolate a subject or create a transparent effect. Fortunately, Snagit, a powerful and versatile screen capture and image editing tool, offers a suite of features designed to make this process straightforward and efficient. This tutorial will guide you through the various methods available in Snagit for effectively removing backgrounds, from simple solid color removal to more complex scenarios.
The Challenge of Background Removal
Picture this: you’re working on a presentation, but you need your pictures to have a transparent background. Now that’s a problem. We’ve all been there! Fortunately, learning how to make an image transparent isn’t as tricky as it sounds. The primary challenge in background removal often lies in the nature of the background itself. Solid, uniform backgrounds are relatively easy to tackle. However, images with complex, multi-colored, or irregular backgrounds present a greater hurdle. Fortunately, Snagit provides tools to address both scenarios with varying degrees of sophistication.
Getting Started: Importing Your Image
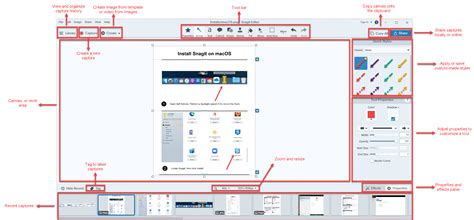
Before you can begin removing backgrounds, you need to have your image loaded into the Snagit Editor. This can be achieved in a couple of ways. You can start by taking a screenshot with Snagit, which is its primary function, or by uploading an image directly from the File menu. Once your image is open in the Snagit Editor, you're ready to explore the background removal tools.
The Magic Wand Tool: For Solid Color Backgrounds
When dealing with images that have a distinct, solid-colored background, the Magic Wand tool is often your first port of call. This tool is designed to make selections based on the color where you click.
- Locate the Tool: Click the Magic Wand tool in the Snagit Editor toolbar. If the tool is not visible in the toolbar, you may need to click the "More" dropdown to reveal it.
- Make Your Selection: Click on the background color you wish to remove. The Magic Wand will select this color and contiguous areas of the same color.
- Delete the Background: Once the background is selected, you can simply press the "Delete" key on your keyboard to remove it. If the background is not a solid color, Snagit might fill too little or too much of an area with transparency.
The Fill Tool: Replacing Colors with Precision
The Fill tool is another powerful instrument for background removal, particularly when you want to replace a specific color with another color or, more importantly for our purpose, with transparency.
- Access the Tool: Click the Fill tool in the Snagit Editor toolbar. Again, if it's not immediately visible, check the "More" dropdown.
- Select the Fill Color: To select the fill color, click the Eyedropper button. This will change your cursor to an eyedropper. Then, click to select a color from anywhere in the image. The Eyedropper cursor will change to the Fill cursor.
- Apply the Fill: Click on the background of your picture. The Fill tool replaces one color with another color or with transparency. If you want to replace the background with transparency, you'll need to set the fill color to transparent. This is often an option within the color selection palette or by using a specific "transparent" setting.
- Adjusting Tolerance: If Snagit fills too little or too much of an area on the Canvas, press Ctrl+Z (Windows) or Command+Z (Mac) to undo the previous fill. Then, drag the Tolerance slider in Tool Properties to adjust the fill amount and try again. Increase the tolerance to fill more area. This slider is crucial for refining the selection when the background isn't perfectly uniform.
The Cut Out Tool: Creative Background Edges
The Cut Out tool offers a more stylized approach to background removal, allowing you to create shaped cutouts with defined edges. This is less about complete background erasure and more about creating specific visual effects.
- Activate the Tool: Click the Cut Out tool in the Snagit Editor toolbar.
- Choose a Style: Select a Quick Style to determine the direction and edge style of the cut. These styles can create various effects, from clean lines to feathered edges.
- Apply the Cutout: A line appears on the Canvas, defining the area to be cut out.
- Note: For Cut Out styles with straight edges, Snagit seamlessly stitches the sections together. For other edge styles, Snagit leaves a gap.
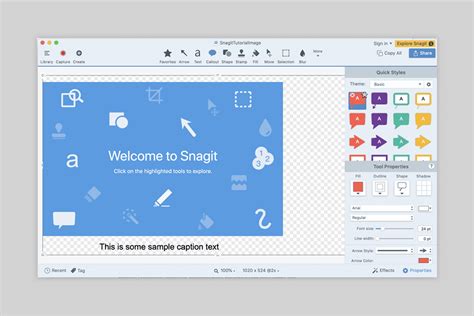
The Selection Tool and Invert Selection: Advanced Control
For more intricate backgrounds or when you need to work with the subject rather than the background, the Selection tool combined with the "Invert Selection" option provides a powerful workflow.
- Use the Selection Tool: Click the Selection tool in the Snagit Editor toolbar. If the tool is not visible in the toolbar, click the "More" dropdown. The Selection tool allows you to draw precise selections around your subject or areas you want to keep.
- Invert Your Selection: To delete or edit everything except the selected area, right-click (Windows) or control-click (Mac) on the canvas and select "Invert Selection." This effectively selects the background if you initially selected your subject.
- Delete or Modify: With the background now selected, you can press "Delete" to remove it, or use other editing tools to modify it. The "Snap to Object" option, often available with selection tools, can help Snagit automatically detect edges of objects, making precise selections easier.
The Transparent Fill Option: A Dedicated Shortcut
Snagit offers a dedicated "Transparent Fill" option that significantly simplifies the process of making backgrounds transparent, especially for images where the background is not a solid color.
- Add Transparent Fill to Quick Styles: To add the Transparent Fill option to your Quick Styles for the first time, it’s pretty simple. This usually involves accessing the tool properties and selecting "Transparent Fill" as a fill type.
- Apply Transparent Fill: Once added, you can select the Transparent Fill option. Then, click on the background of your picture and Snagit will automatically attempt to remove the pesky background for you.
- Adjusting Tolerance and Opacity: Adjusting the tolerance is easy with the slider, as mentioned with the Fill tool. Meanwhile, adjusting the opacity will dictate how transparent you want your fill to be. The more opaque, the less transparent it will be.
The Remove Background Feature (Snagit for Mac)
For users of Snagit for Mac, there's a dedicated "Remove Background" option that streamlines the process even further.
- The Remove Background option on Snagit for Mac automatically removes the background of photos and still images, even when the background is not a solid color. This feature leverages intelligent algorithms to detect the subject and isolate it from the background.
- Note: This option works best on images where there is a high level of contrast between the subject and the background. It may not preserve fine details on the subject, such as individual whiskers or hairs.
Cropping and Canvas Color: Fine-Tuning Your Image
Before or after removing the background, you might need to make some adjustments to the canvas itself.
- Cropping to Square: If the image is not square, you might want to crop it to have an equal width and height for aesthetic consistency or to fit specific templates. Click the Crop tool in the Snagit Editor toolbar. You can then adjust the crop handles to achieve the desired dimensions.
- Changing Canvas Color: Sometimes, to better visualize transparency or to prepare an image for a specific background, you might need to change the canvas color. Select Image menu > Canvas Color (Windows) or Change Canvas Color (Mac). This allows you to set a temporary background color for editing or a final background color if needed.
Refining Your Edits: The Eraser Tool
Even with the most advanced tools, sometimes stray pixels or small imperfections remain after background removal. The Eraser tool is your trusty companion for these situations.
- Remove Additional Details: To remove additional details or clean up edges, select the Eraser tool. You can adjust the brush size and hardness to precisely remove any unwanted remnants of the background.
How to Delete backgrounds in Snag It
Understanding Transparency and File Formats
It's important to remember how transparency works in image files. If you’re editing a screenshot or a PNG image, any background you remove will become transparent by default. PNG is a file format that supports transparency, making it ideal for web graphics and images where you need a see-through background. If you save your image with a transparent background as a JPEG, the transparent areas will typically be filled with a solid color (usually white), as JPEG does not support transparency.
Conclusion: Effortless Background Removal with Snagit
And that’s all there is to it! You now know how to use Snagit's various tools, from the Magic Wand and Fill tools to the more advanced Selection and Remove Background features, to remove image colors from the background of a picture in just a few steps. Don’t let clumsy built-in tools hold you back from creating polished and professional-looking visuals. With Snagit, achieving clean, transparent backgrounds is well within your reach, empowering you to enhance your presentations and digital content with ease.
tags: #remove #background #in #snagit