Lightroom's Adaptive Color profiles represent a significant leap forward in image editing, offering a sophisticated, AI-driven approach to enhancing photographs. Moving beyond the static nature of traditional profiles and the broad strokes of presets, Adaptive Color intelligently analyzes an image's unique characteristics to provide a more refined starting point for your creative vision. This powerful tool, now integrated into both Lightroom Classic and the cloud-based Lightroom, promises to streamline workflows and unlock new levels of detail and balance, especially in challenging high-contrast scenes.
Understanding the Evolution of Lightroom Profiles
Before diving into Adaptive Color, it's crucial to understand how profiles function within Lightroom. Profiles, unlike presets, do not alter the values of your existing edit settings such as White Balance, Exposure, or Clarity. Instead, they fundamentally redefine the color rendering and tonal response of an image. Think of it like switching film stocks; the underlying color science changes, affecting how colors are emphasized and how the image "sees" light. When you switch from Adobe Color to Adobe Landscape, for instance, the color rendition shifts dramatically, but your existing slider values remain untouched. This is particularly true for profiles that utilize Color Look-Up Tables (LUTs), which allow for complex, non-linear color remapping that can go beyond the capabilities of standard Develop settings.
Traditional profiles, such as Camera Standard, Adobe Color, or creative options like Modern, Vintage, and Artistic, offer a consistent starting point across a wide range of images. However, they apply their adjustments uniformly. This is where Adaptive Color distinguishes itself. It's designed to be "almost like 'Auto' on steroids," as one observation puts it, intelligently identifying and adjusting specific areas of an image.
What Makes Adaptive Color "Adaptive"?
The core innovation of Adaptive Color lies in its AI and machine learning capabilities. Instead of a blanket application of color and tonal adjustments, it selectively targets areas within an image. This means it can brighten deep shadows and bring down clipped highlights simultaneously, often with a more nuanced and natural result than traditional methods. The blog post highlights that Adaptive Color "brightens deep shadows and brings down clipped highlights, but it also increases the saturation of greens and yellows, and slightly shifts greens toward blue." This selective adjustment is key to its power, offering a level of detail and control that was previously unattainable with a single click.
Intelligent Tone and Color Adjustments
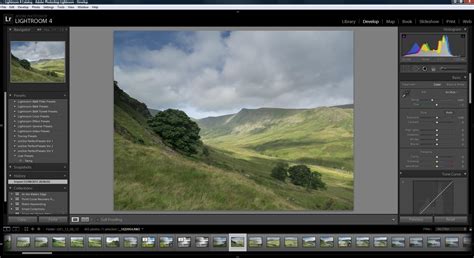
Adaptive Color profiles interact more directly with the tonal structure of an image. This is particularly evident in high-contrast scenes, such as landscapes with bright skies and dark foregrounds. The profile can intelligently reduce the brightness of the sky while simultaneously enhancing detail in the foreground, creating a more balanced and visually appealing image. This is a significant departure from traditional profiles that primarily focus on color shifts.
Furthermore, these profiles are designed to complement, rather than replace, your existing editing tools. When you apply an Adaptive profile, your Develop settings remain at their default (zero) values. This means you retain the full range of editing possibilities and have more "editing leeway" for subsequent adjustments. Unlike presets, which can alter slider positions and potentially limit your range, Adaptive Color provides a refined base from which you can then refine your image with sliders, masks, and other tools.
The Role of Hidden Masks
A point of discussion around Adaptive Color is the perceived loss of control. However, the underlying mechanism suggests that these profiles often employ "hidden auto-generated masks." Just as the Shadows adjustment in Lightroom might automatically generate a mask to avoid affecting brighter tones, Adaptive Color likely uses similar techniques to target specific areas. While users cannot directly manipulate these masks within the profile itself, the ability to refine the results with the "Amount" slider and subsequent masking offers a robust level of control. This is analogous to how you might refine the effect of an Adobe Landscape profile by adjusting its "Amount" and then applying your own custom masks.
Adaptive Profiles in Lightroom Classic, Lightroom, and Camera Raw
Practical Application and Workflow Integration
The Adaptive Color profile is easily accessible at the top of the Profile Browser in the Basic panel of the Develop module. Applying it is as simple as clicking on your photo after selecting the profile. The AI then analyzes the image and transforms it within seconds. This speed and efficiency are particularly valuable for photographers working with large volumes of images or those who prefer a rapid editing workflow.
Best Practices and Potential Pitfalls
It's important to note that Adaptive Color is primarily intended for use with Raw files. While it can be applied to JPEGs and TIFFs, its full potential is realized when working with the greater flexibility of Raw data. The profile is most effective on images with a wide contrast range, where it can truly showcase its ability to recover highlight and shadow detail. For images that are already well-exposed and balanced, you might not see a significant difference, and in such cases, traditional profiles or other editing approaches might be more suitable.
Several key operational factors should be kept in mind:
- One Profile at a Time: You can only apply one profile to an image.
- Adaptive Color OR Auto: You should not use the Adaptive Color profile and then click the "Auto" button to set sliders. Adobe explicitly warns against this, as it often leads to over-processed and aesthetically unpleasing results. The "Auto" button is designed to work on a baseline, and applying it after an Adaptive profile has already made significant adjustments can create conflicts.
- Refresh Icon: A new "refresh" icon may appear at the end of the Develop panel toolbar. If this icon turns amber, it indicates that an adjustment has been made that affects the workings of the Adaptive Color profile, and you may want to refresh it to ensure optimal results.
- Object Removal: If you plan to retouch and remove objects from an image, it's advisable to perform these edits before applying the Adaptive Color profile. Applying Adaptive Color after object removal can sometimes result in a "ghost-like" artifact of the removed object.

Beyond Adaptive Color: Other Enhancements in Recent Updates
The introduction of Adaptive Profiles is part of a broader suite of improvements in recent Lightroom updates, enhancing both editing capabilities and user experience.
Performance and Workflow Improvements
Lightroom Classic's 14.2 update, for example, brought substantial performance enhancements for interactive editing tasks. This translates to a smoother, faster, and more responsive editing experience, particularly when working with complex edits and multiple masks. These updates address previous performance bottlenecks, contributing to a more efficient and productive workflow.
Enhanced Tethering and Catalog Management
For studio photographers, tethering support has been improved for Sony, Canon, and Nikon cameras. Users can now select focus points by clicking directly on the tethered live view window and adjust focus areas within Lightroom. Furthermore, catalog backup management has been streamlined with a new backup panel in Catalog Settings. This panel allows for easy access to backup locations, checking backup sizes, and deleting older backups without needing to navigate through file folders. You can also remove individual backup catalog entries from the list without deleting the actual backup files.
Cloud-Based Lightroom Features
The cloud-based version of Lightroom now offers the same Adaptive Profiles as Lightroom Classic. Additionally, a highly requested dual-monitor mode has been introduced. The Compare View feature has also been enhanced to allow for true side-by-side before-and-after comparisons, providing a more intuitive way to assess your edits.
Understanding the Broader Editing Landscape
While Adaptive Color is a powerful new tool, it's essential to understand its place within the comprehensive editing capabilities of Lightroom. The Basic panel offers fundamental controls for White Balance, Tone, and Presence.
White Balance (WB)
White Balance dictates the color cast of your image, correcting for the color temperature of the light source. You can select presets or use the eyedropper tool to click on a neutral gray area in your image. The Temp (Temperature) and Tint sliders then allow for fine-tuning. Temp adjusts the warmth (yellow) or coolness (blue) of the image, while Tint corrects for green or magenta casts. For Raw files, these adjustments are highly flexible, akin to changing camera settings in real-time. For JPEGs and TIFFs, the scale is typically -100 to 100.
Tone Controls
The Tone area of the Basic panel provides controls for Exposure, Contrast, Highlights, Shadows, Whites, and Blacks. These sliders allow you to manage the overall brightness and tonal range of your image. The histogram, displayed alongside these sliders, provides a visual representation of the tonal distribution, helping you identify clipped highlights (areas of pure white with no detail) or shadows (areas of pure black with no detail). Clipping indicators (triangles at the top of the histogram) turn red when highlights are clipped and blue when shadows are clipped, with white and black indicating clipping in all channels.
Presence Adjustments
Beyond basic tone, the Presence section includes Clarity, Dehaze, Vibrance, and Saturation. Clarity adds depth by increasing local contrast, making textures more pronounced. Dehaze can reduce atmospheric haze or add a dramatic effect. Vibrance and Saturation control the intensity of colors, with Vibrance being more intelligent in protecting skin tones and avoiding over-saturation of already vibrant colors.
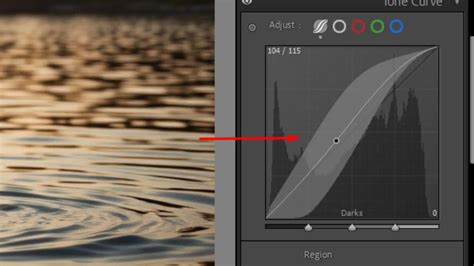
Tone Curve and HSL/Color Panels
For more precise tonal control, the Tone Curve panel allows you to manipulate the image's tonal range in a graph format. You can adjust highlights, lights, darks, and shadows by clicking and dragging on the curve or by using the Targeted Adjustment Tool to click directly on areas of the photo. The HSL/Color panel provides granular control over individual color ranges, allowing you to adjust Hue (the color itself), Saturation (color vividness), and Luminance (brightness) for each color.
Color Grading
The Color Grading panel, formerly known as Split Toning, enables you to add color to grayscale images or create split-tone effects on color images. You can apply specific hues and saturations to the shadows, midtones, and highlights, with sliders for Blending and Balance to control the transitions and overall effect.
The Future of Adaptive Editing
Adaptive Color is not merely a new feature; it represents a paradigm shift in how we approach image editing. By leveraging AI and machine learning, Lightroom continues to provide tools that are both powerful and intuitive, empowering photographers of all levels to achieve exceptional results. As AI continues to evolve, we can expect even more sophisticated and intelligent editing tools to emerge, further blurring the lines between manual control and automated enhancement, ultimately serving the creative vision of the photographer. The ability to intelligently adjust color, tone, and contrast selectively, all within a non-destructive workflow, makes Adaptive Color an indispensable asset in the modern digital darkroom.