Adobe Photoshop is an indispensable tool for graphic designers, photographers, and digital artists, offering a robust suite of features for image manipulation. Among the most fundamental yet crucial operations is resizing images and objects. Whether you need to prepare an image for web use, print, or simply adjust its scale within a larger composition, understanding how to resize effectively in Photoshop is paramount. This guide delves into various methods, from simple transformations to advanced techniques like Smart Objects, ensuring you can resize with precision and maintain optimal image quality.
Understanding Image Dimensions and Resolution
Before diving into the resizing process, it's essential to grasp the core concepts of image size and resolution. Image size, often referred to as pixel dimensions, represents the width and height of an image in pixels. Resolution, measured in pixels per inch (PPI), dictates the density of pixels within that image. A higher resolution means more pixels packed into each inch, resulting in greater detail and a larger file size. Conversely, a lower resolution has fewer pixels per inch, leading to less detail and smaller files.

The intended use of an image heavily influences the required resolution. For most web applications, a resolution of 72 PPI is generally sufficient. However, for high-quality printing, resolutions of 300 PPI or higher are often necessary to ensure crisp and detailed output. Adjusting these parameters is easily done through Photoshop's "Image Size" dialog box, accessible by navigating to Image > Image Size. Here, you can modify width, height, and resolution, and even change units of measurement via convenient drop-down menus.
Resizing Individual Layers and Objects
When working with projects composed of multiple layers, it's common to need to resize a specific element without altering the overall canvas size. Photoshop makes this straightforward.
The Free Transform Tool
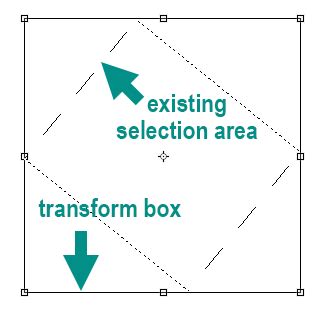
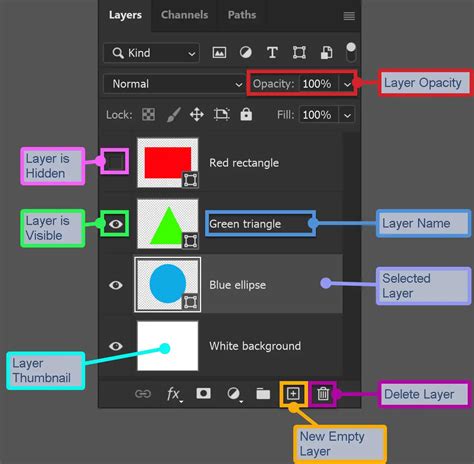
A primary method for resizing individual layers or objects is the Free Transform tool. To activate it, select the desired layer in the Layers panel and press Ctrl + T (Windows) or Cmd + T (Mac). A bounding box with handles will appear around the selected content.
- Proportional Resizing: To resize an object while maintaining its original proportions (aspect ratio), drag any of the corner handles. For even greater precision and to ensure the aspect ratio is strictly maintained, hold down the
Shiftkey while dragging a corner handle. This prevents unwanted distortion, ensuring the width and height scale in tandem. - Precise Numerical Input: For exact dimensions, you can enter specific percentage values or pixel dimensions directly into the Options bar that appears at the top of the screen when the Transform tool is active. Entering your desired percentages next to Width and Height allows you to scale the layer to a specific value.
- Transforming Groups: If you need to resize multiple layers simultaneously, you can group them together. Select the layers you wish to group in the Layers panel, then right-click and choose "Group Layers." Once grouped, you can apply the Free Transform tool to the entire group, resizing all contained layers proportionally.
Scaling Layer Effects
When an object with layer styles (like drop shadows or bevels) is resized, you might also want its effects to scale accordingly. To achieve this, select the layer containing the styles, then go to Layer > Layer Style > Scale Effects. You can then enter an appropriate percentage or use a slider to adjust the scale of the applied effects. Alternatively, you can right-click on the FX icon in the Layers panel and select "Scale Effects."
Resizing the Entire Image
To alter the dimensions of the entire image canvas, Photoshop offers several powerful functions.
The Image Size Dialog Box
The Image > Image Size dialog box is the central hub for managing an image's pixel dimensions and resolution.
- Open the Image: Start by opening your image in Photoshop by going to
File > Open. - Access Image Size: Navigate to
Image > Image Size. The dialog box will display the current pixel dimensions, print size, and resolution of your image. - Adjust Dimensions: Enter your desired values for Width and Height. You can change the units of measurement by clicking the drop-down menu next to Width or Height.
- Maintain Aspect Ratio: The chain link icon next to Width and Height constrains its proportions. When this icon is active, any adjustments made to the width will automatically correspond to the image’s height, and vice-versa, preventing distortion.
- Resampling: The "Resample" checkbox is crucial. When checked, Photoshop will change the amount of pixel data within the image to match the new dimensions. If you are increasing the image size, Photoshop will create new pixel information. For enlargements, choosing an appropriate interpolation method is key. "Bicubic Smoother (best for enlargements)" is often recommended as it's based on Bicubic sampling and works well for enlarging images, especially those with high image noise, aiming to maintain smooth edges and reduce pixelation. Conversely, for downsizing, "Bicubic Sharper" often yields good results. If you uncheck "Resample," changing the width or height will only adjust the resolution, not the total number of pixels.
Using Image Size to correctly resize a image in Photoshop
Preserving Quality During Resizing
Repeatedly resizing an image, especially upscaling it significantly, can lead to a reduction in quality, manifesting as pixelation or blurriness. To mitigate this:
- Start with High-Resolution Images: The best way to avoid quality loss is to begin with images that have sufficient pixel data. Large photos or those with a high resolution - images with a greater number of pixels - offer more flexibility.
- Minimize Drastic Changes: While Photoshop can enlarge images, it's recommended to keep enlargements minimal. When enlarging, Photoshop has to create new pixel information, which can never perfectly replicate the detail of the original.
- Use Smart Objects: For non-destructive resizing, converting your layer to a Smart Object is highly recommended.
Leveraging Smart Objects for Non-Destructive Resizing
Smart Objects are a cornerstone of non-destructive editing in Photoshop. A Smart Object is essentially a container that preserves an image's source content with all its original characteristics. When you resize a Smart Object, you are actually transforming the container, not the image data within it.
The Advantage of Smart Objects
Normally, when you scale an image down, Photoshop discards pixels to achieve the smaller size. This is a destructive edit because those lost pixels cannot be recovered. If you later try to scale that image back up, the result will be degraded because the lost detail cannot be magically recreated.
Smart Objects circumvent this problem. When you resize a Smart Object, Photoshop retains the original, high-quality image data. Each time you transform a Smart Object, it resamples the original data, ensuring that quality is preserved, no matter how many times you scale it up or down. This means that even after multiple resizing operations, the image remains crisp and sharp.
Working with Smart Objects
- Convert to Smart Object: Select the layer you want to resize in the Layers panel. Then, go to
Layer > Smart Objects > Make Smart Object. Alternatively, you can right-click on the layer and select "Convert to Smart Object." - Transform: Now, use the Free Transform tool (
Ctrl + TorCmd + T) as usual. Dragging the corner handles (holdingShiftfor proportional scaling) or entering values in the Options bar will transform the Smart Object. - Edit Contents: To edit the actual image content within a Smart Object, double-click the Smart Object layer thumbnail in the Layers panel. This will open the original image in a separate document, where you can make your edits. Save and close this document, and your changes will update in the main document.
The advantage of Smart Objects is most apparent when scaling an image beyond its original dimensions. While Photoshop can still create new pixel data for enlargements, using a Smart Object ensures that the process is based on the pristine original data, leading to superior results compared to resizing a standard pixel layer. However, it's important to note that going beyond 100% of the original size will still require Photoshop to generate new detail, which can impact quality.
Batch Resizing with Image Processor
For users who need to resize a large number of images efficiently, Photoshop offers a powerful script called "Image Processor."
- Access Image Processor: Navigate to
File > Scripts > Image Processor. - Select Images: Choose the files or folders containing the images you want to process.
- Choose Actions: Specify whether you want to resize the images, change file type, or run an Action. You can also set a destination folder for the processed files.
- Define Size: If resizing, you can enter specific pixel dimensions or choose from preset sizes. You can even specify the desired resolution for the output images.
- Run: Click "Run" to initiate the batch processing.
This script is invaluable for efficiently preparing multiple images for web use, consistent print runs, or any scenario requiring uniform sizing across many files.
Considerations for Web and Print
The intended destination of your resized image significantly impacts the best practices.
For Web Use
- Resolution: 72 PPI is generally sufficient for web display.
- File Size: Large files can slow down website loading times. Downsizing images appropriately is crucial.
- Format: JPEG is common for photographs, offering good compression with acceptable quality. PNG is better for graphics with transparency or sharp lines.
- Exporting: Use
File > Export > Save for Web (Legacy)for optimized web images, allowing fine-tuning of quality and file size. Alternatively,File > Export Asprovides a streamlined export workflow.
For Print Use
- Resolution: 300 PPI or higher is typically required for high-quality prints.
- Dimensions: Ensure the pixel dimensions are sufficient for the desired print size at the chosen resolution. For example, to print a 4x6 inch photo at 300 PPI, you'll need an image of 1200x1800 pixels (4 inches * 300 PPI = 1200 pixels, 6 inches * 300 PPI = 1800 pixels).
- File Format: TIFF is often preferred for print as it's a lossless format, preserving maximum image data.
- Color Mode: Ensure your image is in CMYK color mode if it's intended for professional printing, although many print services can convert RGB to CMYK.
Advanced Resizing Techniques and Tips
- Canvas Size vs. Image Size: Remember that
Image > Canvas Sizechanges the dimensions of the canvas (the background area) without resizing the image content itself. You can use this to add or remove space around your image. - Interpolation Methods: When resampling, understanding interpolation methods is key. Besides "Bicubic Smoother," other options include "Nearest Neighbor" (fastest, but pixelated results, good for pixel art) and "Bicubic Automatic" (Photoshop chooses the best bicubic method).
- Smart Sharpen: If you notice some softness after resizing, especially after enlargement, applying a subtle "Smart Sharpen" filter (
Filter > Sharpen > Smart Sharpen) can help enhance details. - Saving Originals: Always save a copy of your original, full-resolution file before making significant resizing changes. This ensures you always have the master file to revert to if needed. Use
File > Save Asto create new versions.
Mastering image resizing in Photoshop is a fundamental skill that empowers you to prepare your visuals for any medium with confidence. By understanding the interplay of dimensions, resolution, resampling, and leveraging tools like Free Transform and Smart Objects, you can ensure your images look their best, whether for a global audience on the web or a tangible print.