Resizing images in Photoshop is a fundamental skill for digital artists and photographers, essential for preparing visuals for a multitude of applications, from web display to high-quality print. Photoshop offers multiple methods for resizing, each suited to different needs and technical considerations. This guide will explore the primary tools and techniques available, focusing on how to maintain image quality throughout the resizing process. We will delve into essential concepts such as pixel dimensions, resolution, and resampling, providing a thorough understanding of how these elements influence the final output.
Understanding the Building Blocks: Pixels, Resolution, and Dimensions
At the heart of every digital image are pixels. These are the tiny, individual squares of color that, when combined, form the complete picture you see on your screen or in a print. Pixels are the building blocks of digital images. Understanding pixel dimensions is crucial; it refers to the width and height of an image measured in pixels. When we resize an image, we are fundamentally altering its pixel dimensions.
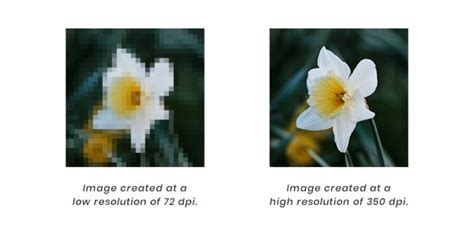
Resolution, often measured in pixels per inch (PPI), dictates the density of these pixels within a given physical space. For images destined for the web, a resolution of 72 PPI is standard, as most screens display images at this density. However, for high-quality prints, a much higher resolution, such as 300 PPI or even more, is generally recommended to ensure sharpness and detail. It's important to note that simply increasing the resolution value in Photoshop without actually adding more pixel data will not magically improve image quality.
File size is a direct consequence of pixel dimensions and resolution; more pixels and higher resolution generally mean a larger file size, containing more data. Conversely, document size relates to the physical dimensions of an image when it is printed, taking into account its resolution. Photoshop's Image Size dialog box is the central hub for adjusting these interconnected elements.
Navigating the Image Size Dialog Box
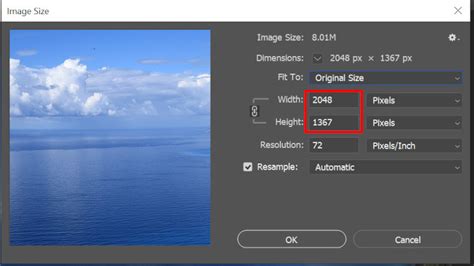
The Image Size dialog box in Photoshop is a powerful tool for resizing images. To access it, navigate to the top menu bar and select Image > Image Size. This dialog box presents a comprehensive array of options for manipulating your image's dimensions and resolution.
Within this dialog, you'll find fields for width and height, allowing you to enter specific numerical values for resizing. For instance, to resize an image to precisely 1000 pixels wide, you would simply enter "1000" in the width field. Adjacent to these fields, dropdown menus offer the flexibility to switch between various units of measurement, including pixels, inches, centimeters, points, and picas, catering to different project requirements.
The "Resolution" field, measured in pixels per inch (PPI), directly impacts the image quality and file size. As mentioned, 72 PPI is standard for web images, while 300 PPI or higher is typically used for high-quality prints. It's a common misconception that increasing resolution beyond the original value will improve image quality; in reality, this often leads to a softer, less detailed image.
A critical option within the Image Size dialog is "Constrain Proportions," often represented by a chain-link icon. When this option is enabled, it ensures that the image's original aspect ratio is maintained. This is crucial for preventing image distortion, especially when resizing for different platforms, screen sizes, or output formats. If you intentionally need to alter the aspect ratio - for example, to fit a specific template - you can uncheck this option, though this should be done with caution to avoid unnatural stretching or squashing of the image content.
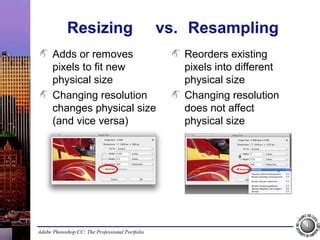
The Art of Resampling: Adding or Removing Pixels
Resampling alters an image's pixel count, and understanding this process is key to managing image quality during resizing. When you increase the pixel count (upscaling or enlarging), Photoshop must add new pixels to fill the expanded dimensions. It does this by interpolating data from existing pixels, essentially making educated guesses about what the new pixels should look like based on their neighbors. Conversely, when you decrease the pixel count (downscaling or reducing), Photoshop removes pixels, again using interpolation to blend the remaining pixels.
Resampling in Photoshop changes the number of pixels in an image. For enlarging photos, Photoshop offers several resampling algorithms. The dialog box will present options such as "Bicubic Smoother (enlargement)" or "Preserve Details," which are generally recommended for upscaling as they aim to minimize the introduction of artifacts and maintain as much detail as possible. For reducing images, "Bicubic Sharper (reduction)" is often the preferred choice, as it helps to retain sharpness when pixels are removed.
It's important to be aware that quality loss can occur when drastically changing pixel dimensions, particularly when enlarging an image significantly beyond its original pixel data. While Photoshop's algorithms are sophisticated, they cannot create detail that wasn't there to begin with. Therefore, it's always recommended to start with the highest resolution original file possible.
Free Transform: Flexible Resizing and More
The Free Transform tool is a versatile feature in Photoshop for resizing images, as well as performing other transformations. It provides a more interactive and immediate way to adjust an image's size and shape directly on the canvas.
To activate Free Transform, you can select it from the Edit menu or use the keyboard shortcut Ctrl+T (Cmd+T on Mac). Once activated, a bounding box with handles will appear around your selected image or layer. You can then click and drag any of the corner or side handles to resize the image.
To maintain the image's aspect ratio while using Free Transform, hold down the Shift key while dragging a handle. This ensures that the width and height scale proportionally. If you need to resize from the center outward, hold down the Alt (Option on Mac) key.
The Free Transform tool's capabilities extend beyond simple resizing. It also allows you to rotate, skew, and distort images with intuitive drag-and-drop controls. For precise control, you can enter specific numerical values for scaling, rotation, and skewing directly into the options bar that appears at the top of the Photoshop interface when Free Transform is active. Once you are satisfied with the transformation, press Enter or click the checkmark icon in the options bar to apply the changes.
Photoshop Tutorial - Using FREE TRANSFORM to resize
Layer-Specific Resizing and Smart Objects
When working with layered documents, you often need to resize individual layers rather than the entire image. To do this, select the specific layer you wish to resize in the Layers panel. Then, activate Free Transform (Ctrl+T / Cmd+T) and adjust the layer's size as described previously. This is particularly useful for compositing and design work where elements need to be scaled independently.
For advanced workflows, Smart Objects are a powerful tool for image resizing. When an image is converted into a Smart Object (Layer > Smart Objects > Convert to Smart Object), it becomes a separate container that preserves its original image data. This means you can scale a Smart Object up or down multiple times without the cumulative loss of quality that would occur with a standard raster layer. Any transformations applied to a Smart Object are non-destructive; you can always go back and re-edit them. To resize a Smart Object, select it, use Free Transform, and apply the changes. The original pixel data remains intact within the Smart Object.
Cropping and Canvas Size: Adjusting Composition and Space
While resizing directly changes the pixel dimensions of the image content, the Crop Tool and Canvas Size options allow for adjustments to the image's overall dimensions and composition without necessarily altering the existing pixels.
The Crop Tool in Photoshop offers precise control over image composition by allowing you to trim away unwanted areas or expand the canvas. You can select it from the toolbar or by pressing the C key on your keyboard. In the options bar, you can enter exact dimensions, aspect ratios, or resolution values to define the cropping area. The Crop Tool can also be used to straighten crooked images. To maintain the aspect ratio while using the Crop Tool, hold down the Shift key while dragging the crop handles.
The Canvas Size command, found under Image > Canvas Size, allows you to add space around an image or trim it without affecting the image content itself. When you increase the canvas size, Photoshop adds new blank space. You can choose a background color for this new space, which is useful for creating borders or adding padding. If you decrease the canvas size, Photoshop will trim the image from the edges. For precise adjustments, you can input new dimensions using percentages or pixels.
Best Practices for Maintaining Image Quality
Resizing images in Photoshop can be tricky, but adhering to certain best practices will significantly help you maintain image quality.
- Avoid Upscaling Whenever Possible: While Photoshop offers tools to enlarge images, significant upscaling inevitably leads to a loss of detail and can introduce artifacts. It's always best to start with an image that is already larger than your final desired dimensions. If upscaling is unavoidable, experiment with different resampling methods (like "Preserve Details") and be prepared to apply sharpening afterward.
- Work with High-Resolution Originals: The foundation of good resizing is starting with high-quality, high-resolution source files. The more pixel data Photoshop has to work with, the better it can handle transformations.
- Understand Your Output Medium: The ideal resolution and dimensions depend on where the image will be used. Instagram favors square images at 1080x1080 pixels, while a high-resolution print might require 300 PPI. For web optimization, aim for file sizes that load quickly, often under 200KB, while still retaining acceptable visual quality.
- Use "Constrain Proportions": Unless you have a specific reason to distort the image, always ensure the "Constrain Proportions" (chain link) option is enabled in the Image Size dialog or when using Free Transform.
- Sharpen After Resizing: Resizing, especially downscaling, can sometimes soften an image. Applying a subtle sharpening filter after resizing can help restore lost clarity. Use the "Unsharp Mask" or "Smart Sharpen" filters judiciously.
- Consider Smart Objects: For images that might need to be resized multiple times or at different stages of a project, converting them to Smart Objects provides a non-destructive workflow that preserves original quality.
Batch Resizing and Automation
For photographers and designers working with large volumes of images, manually resizing each one can be incredibly time-consuming. Photoshop offers solutions for batch resizing and automation.
The Image Processor (File > Scripts > Image Processor) is a built-in tool that allows you to resize, change file formats, and run Photoshop actions on a batch of images simultaneously. You can specify a target size, choose to run an action, and select output formats like JPEG, PSD, or TIFF.
Furthermore, you can create custom Photoshop Actions to automate specific resizing workflows. Navigate to the Actions panel (Window > Actions). Click the "Create New Action" button, name your action, and then click "Record." Perform the sequence of resizing steps you want to automate - this could involve going to Image Size, setting dimensions and resampling method, or using Free Transform on a selected layer. Once you've completed the steps, click the "Stop Playing/Recording" button. Now, you can apply this recorded action to any image by selecting it from the Actions panel and clicking the "Play" button. This is incredibly powerful for applying consistent resizing and optimization to entire folders of images.
Beyond Photoshop: AI and Online Tools
While Photoshop remains the industry standard for professional image manipulation, the landscape of image resizing is evolving. For those who don't have Photoshop readily available or prefer simpler solutions, several alternatives exist.
AI-powered image editing tools are becoming increasingly sophisticated. Services like Envato's ImageEdit can perform complex tasks, including resizing, with remarkable ease. These tools often require minimal user input; you can simply upload your image and specify the desired outcome, and the AI handles the intricate processes. This approach is especially beneficial for users who lack in-depth Photoshop knowledge or need to resize images quickly.
Additionally, numerous free online tools can assist with image resizing and cropping. Platforms like Placeit offer user-friendly interfaces for adjusting image dimensions and composition without requiring any software installation. These online resizers are convenient for quick edits or when working on devices that don't support desktop applications.

Ultimately, learning to resize images effectively in Photoshop is a foundational skill that empowers you to prepare your visuals for any intended purpose, ensuring optimal quality and impact across different media. Whether you're a beginner or an experienced professional, mastering these techniques will elevate your digital creations.