Audio clipping, often perceived as an irritating distortion or a sudden, unpleasant loudness, is a common concern for content creators using OBS Studio. This phenomenon occurs when an audio signal's amplitude exceeds the maximum level that the recording or broadcasting equipment can accurately represent. In OBS Studio, understanding the causes and implementing effective solutions for clipping is crucial for delivering a professional and enjoyable viewing or listening experience. This article delves into the intricacies of audio clipping within OBS Studio, exploring its origins, identifying common scenarios, and providing practical, actionable steps to mitigate and prevent it.
The Nature of Audio Clipping in OBS Studio
At its core, audio clipping in OBS Studio, or any audio processing software, is a result of signal overload. When the audio input, whether from a microphone, game audio, or other sources, is too loud for the system's digital-to-analog converters or the software's internal processing capabilities, the waveform's peaks are "clipped" off. This effectively truncates the signal, introducing harsh distortion. In OBS Studio, this often manifests as a sudden spike in the audio meter, turning red, indicating that the signal is exceeding the acceptable threshold.
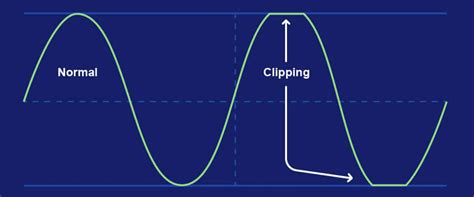
The user's experience highlights this: "My microphone keeps flashing red thereby alerting me of clipping. It doesn't do this with any other software or in any other circumstance." This suggests that the issue is specific to the OBS Studio configuration or the way it's interacting with the audio input during a particular session, such as a "livestream a rock concert from my music studio." The "occasional clip in the audio" during such an event points to dynamic audio levels that are pushing the system to its limits.
Identifying Sources of Clipping
Clipping can originate from various points within the OBS Studio workflow. Understanding these sources is the first step toward effective management.
Microphone Input and Gain Staging
The most frequent culprit for audio clipping is an improperly set microphone gain. If the microphone is too sensitive or the input gain is set too high in OBS Studio, even moderate speaking volumes can result in clipping. This is particularly true for vocalists or speakers who have a wide dynamic range, meaning their vocal output can vary significantly in loudness. The user's observation, "So I can scream really loud into my mic and my limiter limits it perfectly," indicates an awareness of this, but the problem persists with other audio sources, suggesting a broader issue beyond just the microphone's direct input.
Game and System Audio
Beyond direct microphone input, game audio and other system sounds can also contribute to clipping. Games often have dynamic soundtracks and sound effects that can suddenly increase in volume. If these sources are not managed properly within OBS Studio's audio mixer, they can overpower other elements or exceed the overall output limits. The specific mention of "PS5 Remote Play Audio (Not coming from my mic)" points directly to this scenario, where the audio from a console being streamed or played remotely is causing the clipping. This suggests that the audio signal being sent from the PS5, or being processed by the remote play software, is already at a high level or is experiencing peaks that are not being adequately attenuated before reaching OBS.
Third-Party Software and Scripts
The user's initial mention of "scripting" and "instant replays" hints at the complexity that can arise from additional software or custom configurations. While these tools add immense value, they can also introduce unforeseen audio routing or processing that might lead to clipping. The "Instant Replay" feature, for instance, relies on capturing and replaying audio, and if not configured correctly, could potentially reintroduce or amplify clipped audio.
Insufficient Headroom
A critical concept in audio engineering is "headroom," which refers to the difference between the normal operating level of a signal and its maximum level before clipping occurs. The question, "Hi, does anyone know how much headroom OBS needs to not distort the audio signal?" is fundamental. In digital audio, it's generally recommended to leave at least 6-10 dB of headroom to accommodate unexpected peaks and dynamic range. Without adequate headroom, even well-managed audio levels can clip.
Strategies for Preventing and Fixing Clipping in OBS Studio
Fortunately, OBS Studio offers a suite of tools and techniques to combat audio clipping. A multi-pronged approach, addressing gain staging, filtering, and output levels, is usually the most effective.
Mastering Audio Levels and Gain Staging
The most fundamental step is to ensure that no single audio source is overwhelming the mixer.
- Monitor Audio Meters: Always keep an eye on the OBS Studio audio mixer. Audio meters should ideally stay in the green or yellow range, with occasional brief excursions into the orange. Red indicates clipping.
- Adjust Source Volumes: Lower the volume of individual sources in the OBS Studio audio mixer until they are at appropriate levels.
- Microphone Gain: If a microphone is consistently too loud, reduce its input gain at the source (e.g., on the microphone itself or in your operating system's sound settings) before adjusting it in OBS Studio.
Utilizing OBS Studio's Built-in Filters
OBS Studio provides powerful audio filters that can be applied to individual sources to manage their dynamics and prevent clipping.
Compressor: A compressor reduces the dynamic range of an audio signal, making the loud parts quieter and, often, the quiet parts louder. This is invaluable for evening out vocal performances or game audio. When setting up a compressor, pay attention to the "Threshold" (the level at which compression begins), "Ratio" (how much the signal is compressed), and "Attack/Release" times. A common starting point for vocals is a threshold around -10 dB, a ratio of 3:1 or 4:1, and moderate attack/release times.
How to add Compressor filter in OBS Studio
Limiter: A limiter is essentially a compressor with a very high ratio. It's designed to prevent the signal from exceeding a specific level. As the user mentioned, "my limiter limits it perfectly," this is a key tool. Setting the "Output Ceiling" of the limiter to -0.1 dB or -0.3 dB is a standard practice. This ensures that even if other settings cause a transient to exceed the desired level, the limiter will "clip" it at the ceiling, preventing audible distortion.
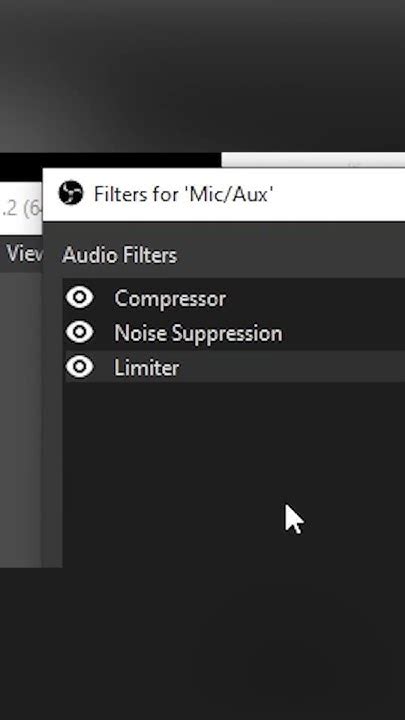
Gain: While the gain slider in the audio mixer is the first line of defense, the "Gain" filter can be used to boost or cut the volume of a source. It's generally better to use this for subtle adjustments or to compensate for low-level sources after other filters have been applied.
Noise Gate: A noise gate mutes the audio when it falls below a certain threshold, which can be useful for microphones to eliminate background noise during quiet moments. While not directly related to clipping, it contributes to overall audio clarity.
Addressing Specific Clipping Scenarios
PS5 Remote Play Audio Clipping: For issues with PS5 Remote Play audio, the problem might lie in how the audio is being captured or transmitted.
- Check PS5 Audio Settings: Ensure that the audio output settings on the PS5 itself are not set to an excessively high volume or a format that might be causing issues.
- Capture Card Settings: If using a capture card, check its accompanying software for any audio input or output level controls.
- OBS Capture Method: Experiment with different audio capture methods for the PS5. If you're capturing it as a desktop audio source, try capturing it as a dedicated audio input device if possible.
- Apply Filters to the Capture Source: Treat the PS5 audio source within OBS just like any other audio input. Apply a compressor and, crucially, a limiter to its track in the OBS audio mixer.
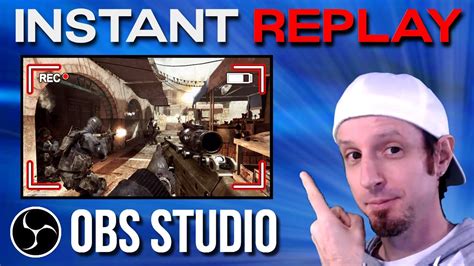
Instant Replay Buffer and Clipping: The "Instant Replay" functionality, powered by scripting or plugins, needs careful configuration.
- Buffer Length and Memory: As noted, "Longer replay buffers require more memory." While this is about performance, an overloaded system can sometimes lead to audio processing delays or glitches that might manifest as clipping. Ensure your system has sufficient resources.
- Media Source Settings: When setting up the "Instant Replay" media source, ensure its audio settings are not inadvertently boosting the signal. The process described involves adding a "Media Source" and selecting the "Replay buffer file." Ensure that the volume of this media source itself is not set too high.
- Hotkey Configuration: The hotkey settings for saving the replay buffer are crucial. While unlikely to directly cause clipping, a misconfigured hotkey could lead to accidental activation or deactivation, affecting the intended audio flow. The instruction to "Set a hotkey for saving the replay buffer" and then "Start the replay buffer by clicking on 'Start Replay Buffer'" is clear. The subsequent step of adding a media source and selecting the "Replay buffer file" is where careful attention to its individual volume within the mixer is needed.
The Role of the Limiter as a Final Safeguard
The limiter is often the last line of defense against clipping. By setting an "Output Ceiling" (e.g., -0.1 dB), you are telling OBS Studio that no audio signal, regardless of its source or processing, should ever exceed this level. This is particularly important for live streams where sudden, unexpected audio spikes can be highly detrimental to the viewer experience. The user's mention of a limiter working perfectly for their microphone suggests they understand its function, but it's vital to ensure a limiter is applied to all audio sources that contribute to the final output, or at least to the master output itself.
Headroom in Practice
To ensure adequate headroom, aim to keep your master output levels in OBS Studio consistently below 0 dBFS (Decibels Full Scale). During the loudest parts of your stream or recording, the meters should not be consistently in the red. This often means turning down the overall volume of your sources or the master output itself. The question about how much headroom OBS needs is answered by the general audio engineering principle: leave a buffer. For digital audio, this buffer is managed by ensuring your peak levels are well below the maximum representable value.
Advanced Considerations and Troubleshooting
For persistent clipping issues, especially with complex setups involving remote play or specific hardware, a more in-depth troubleshooting approach may be necessary.
Checking for Clipping in the Source Itself
Before blaming OBS Studio, verify if the clipping is occurring at the source. If you're capturing audio from a PS5, check if the audio is clipping within the PS5's own audio output or in the remote play application on your PC before it even reaches OBS. This involves listening to the audio directly from the PS5 or its remote play feed without OBS active.
Audio Driver Issues
Outdated or corrupted audio drivers can sometimes cause unexpected audio behavior, including clipping. Ensure your audio drivers are up to date for all relevant hardware, including your sound card, microphone interface, and capture card.
OBS Studio Version and Plugin Compatibility
While OBS Studio is generally stable, older versions or specific plugins can sometimes introduce bugs. Ensure you are using the latest stable version of OBS Studio. If you are using third-party plugins or scripts, check for updates or known issues related to audio processing. The mention of "scripting" and "thanks to the hard work of volunteers on OBS Studio, it now includes the powerful functionality of scripting" suggests a reliance on these community-driven enhancements, which are powerful but can sometimes be a source of unforeseen interactions.
Testing and Iteration
Resolving audio clipping often involves a process of testing and iteration. Make one change at a time and then test to see if the clipping persists. This systematic approach helps identify which specific adjustment resolved the issue. For example, if you're experiencing clipping with PS5 remote play audio, try applying a limiter to that specific audio source in OBS and test. If that doesn't work, try adjusting the volume of that source itself.
The user's situation, where "its just my microphone? I have my filters fine tuned really well and it works the way it should. Well… So I can scream really loud into my mic and my limiter limits it perfectly. Help! TL:DR Audio clips during high-pitched sounds while recording PS5 Remote Play Audio (Not coming from my mic)," clearly indicates that the problem is not with the microphone's direct input but with another source, likely the PS5 remote play audio. This reinforces the need to isolate the problematic source and apply appropriate filters to it. The fact that the user has been "experimenting with OBS for the first time" and has "created this filter for a special use case for myself" shows a willingness to dive deep, but also a potential for misconfiguration when first learning.
The core of the problem, as described by multiple users, revolves around managing dynamic audio levels across different sources within OBS Studio to prevent signal overload and the resulting distortion. By understanding the principles of gain staging, utilizing filters like compressors and limiters, and systematically troubleshooting each audio source, users can achieve clean, professional-sounding audio in their OBS Studio productions.