The allure of torn paper, with its inherent imperfections and handcrafted feel, has long been a staple in visual design, lending a unique, tactile quality to digital creations. This effect is particularly potent in achieving a distressed or collage aesthetic, instantly conveying a sense of authenticity that can be challenging to replicate through purely digital means. Whether you're aiming to add a realistic touch to your photography, create dynamic graphic designs, or infuse your illustrations with a layer of mystery, mastering the ripped paper effect in Photoshop is an invaluable skill. This tutorial delves into the intricacies of generating this compelling visual element from scratch, empowering you to achieve precise and natural-looking results tailored to your specific artistic vision.
Understanding the Foundation: Creating the Base Paper Layers
To begin crafting a convincing ripped paper effect, it's essential to establish a solid foundation. This involves setting up the initial layers that will form the basis of our torn paper elements. The process starts with creating a new document in Photoshop, with dimensions that suit your project's needs.
The first crucial step is to introduce a base color that will represent the paper itself. This is achieved by navigating to Layer > New Fill Layer > Solid Color. This action will present a color picker, allowing you to select any hue that best complements your design. Once chosen, this solid color layer serves as the canvas upon which our torn paper will be built.
Following this, we introduce a second solid color layer. This layer will be instrumental in defining the torn edges and providing depth. Navigate again to Layer > New Fill Layer > Solid Color. This time, the color chosen might be a slightly darker or lighter shade than the base layer, or even a contrasting hue, depending on the desired visual impact. This layer, when manipulated, will form the visible torn edges of the paper.
Refining the Torn Edge: Initial Transformations
With the two foundational color layers in place, the next phase involves shaping the torn edge. This is where the "Paper edge" layer, as it might be referred to in more advanced workflows, comes into play. To begin, ensure this layer is selected. A common technique involves using selection tools to define the desired jagged edge. The Lasso Tool (L) is particularly effective for drawing irregular, freehand selections that mimic the organic nature of a tear.
Once the jagged edge is drawn on the "Paper edge" layer, a critical step is to create a selection from it. This is done by holding Control+click (on Windows) or Command+click (on macOS) on the mask of the "Model layer" if you are working with an existing image or element. This action precisely captures the shape of the torn edge. After making the selection, it's important to deselect the "Paper edge" layer by holding Control+D (Windows) or Command+D (macOS). Subsequently, this "Paper edge" layer is repositioned to be placed directly below the "Model layer" (or the main image layer you are working with).
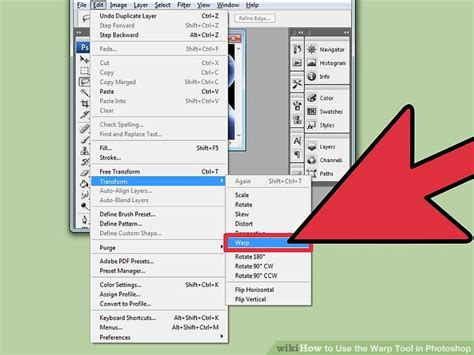
To further enhance the naturalism of the torn edge, the Warp tool becomes invaluable. With the "Paper edge" layer still active, access the Warp tool via Edit > Transform > Warp. This tool allows for granular control over the shape of the selected area. By dragging the handles, particularly the top ones, you can customize the curve and irregularity of the ripped edge, ensuring it appears less uniform and more organic, as if genuinely torn by hand. This meticulous shaping is key to achieving a realistic ripped paper effect.
Adding Depth and Realism: Texture and Dimension
A truly convincing torn paper effect transcends a simple flat shape. To imbue the torn paper with a sense of realism and dimension, we need to incorporate texture and depth. This is achieved through a combination of layer styles and the application of actual paper textures.
To introduce dimension, the "Paper edge" layer is the focus. Double-clicking this layer will open the Layer Style dialog box, a powerful panel for applying various effects. Within this dialog, options like Inner Shadow, Bevel and Emboss, and Drop Shadow can be employed to simulate the thickness and shadow cast by the torn paper, making it appear as if it's lifting off the background. For instance, an Inner Shadow can create a subtle darkening along the torn edge, mimicking the way light would fall on a physical tear. A carefully adjusted Bevel and Emboss can simulate the subtle curvature and thickness of the paper's edge.
Beyond layer styles, integrating a real paper texture is paramount. This can be done by dragging a paper texture image directly from your desktop into the open Photoshop document. Once imported, this new layer should be positioned just above the "Paper edge" layer. This texture layer will provide the granular detail and imperfections characteristic of real paper. By adjusting the blending mode of this texture layer (e.g., Multiply, Overlay, or Soft Light) and its opacity, you can seamlessly integrate the texture with the underlying torn paper shape, enhancing its believability.
Introduction to Photoshop Layer Styles
Advanced Techniques: Fibrous Edges and Filter Effects
While the initial steps lay the groundwork, achieving a truly exceptional ripped paper effect often involves more nuanced techniques. These methods focus on creating the delicate, fibrous edges that are a hallmark of authentic torn paper and utilizing Photoshop's filters to add further realism.
One highly effective method for generating fibrous edges involves working with paths and brushes. After using the Lasso Tool to define the torn edge, you can convert this selection into a path. With the Lasso Tool still selected, right-click (or CMD-click on macOS) on the mask and choose Make Work Path from the context menu. This converts the jagged selection into a editable vector path.
Next, it's time to prepare your brush. Open the Brush Options window and navigate to the Shape Dynamics settings. Here, you can adjust parameters like Size Jitter, Angle Jitter, and Roundness Jitter to create a brush that, when stroked along the path, produces a varied and fibrous stroke. Experiment with these settings until you achieve a stroke that mimics the fine, irregular fibers of torn paper.
With the brush configured and the path active, you can now stroke the path. Using the Pen Tool or Path Selection Tool, right-click (or CMD-click) on the path and select Stroke Path from the menu. Ensure that the Tool is set to Brush in the subsequent dialog. Crucially, ensure Simulate Pressure is turned off for a consistent stroke along the path. This process, when applied with a suitable brush, will produce the fundamental appearance of torn paper, complete with its characteristic fibrous texture.
Furthermore, Photoshop's Filter Gallery offers powerful tools to enhance the realism of the torn paper. For instance, you can apply the "Cutout" effect from the Artistic tab of the Filter Gallery to the layer mask of your "Torn Color" layer. This effect can help to further break up the edges and add a more irregular, fragmented appearance.
Subsequent transformations can also be applied. With the layer mask selected, pressing Ctrl+T (Windows) or Command+T (macOS) to enter Free Transform mode allows for further manipulation. Adjusting the Width and Height slightly, for example, setting the Width to 101% and the Height to 99%, can introduce subtle distortions that contribute to a more natural, less perfect tear.
Integrating Content: Smart Layers and Placement
The ultimate goal of creating a ripped paper effect is often to use it as a frame or element within a larger composition. Photoshop's Smart Layers provide an elegant solution for this. Once the torn paper effect is established, you can designate a layer as a Smart Layer.
To do this, right-click on the layer containing your torn paper effect and select Convert to Smart Object. This action encapsulates all the layer styles, transformations, and effects into a single, editable entity. The true power of a Smart Layer is revealed when you need to place content within the torn paper. You can simply place any image or design you want right above this Smart Layer.
When you drag an image or design file into your Photoshop document and position it above the Smart Layer containing your torn paper, you can then "clip" this new content layer to the Smart Layer below. This is achieved by right-clicking the content layer and selecting Create Clipping Mask. This ensures that the content is only visible within the boundaries of the torn paper shape, effectively making the torn paper act as a mask for your image.
For instance, if you have created a torn paper shape that resembles a hole, placing an image above it and creating a clipping mask will reveal that image only through the torn opening. This technique is fundamental to creating convincing collage-like images and seamlessly integrating ripped paper elements into your designs. The process is straightforward: simply place your desired image or design inside the Smart Layer, and Photoshop will automatically handle the rest, rendering the content within the confines of the torn paper's shape.
Lidia Lukianova's Artistic Approach: Mystery and Texture
The artist Lidia Lukianova, known for her passion for illustration and a penchant for adding a layer of mystery to her work, exemplifies how the ripped paper effect can be employed to elevate artistic expression. Her approach often involves integrating torn paper elements with photographic subjects, creating a unique blend of realism and abstract form.
Lukianova's process often begins with a photographic base, such as a portrait. She then utilizes the ripped paper effect not merely as a decorative element, but as an integral part of the composition, sometimes even using it to obscure or reveal parts of the subject. This deliberate use of torn paper adds a narrative dimension, inviting the viewer to ponder what lies beneath or beyond the jagged edges.
Her technique, as observed in her practice, often involves using Adobe Stock images, which can be licensed for use in tutorials and projects. This highlights the accessibility of high-quality assets for achieving professional results. When Lukianova uses a sample file, she understands that while it can be used for practice within the tutorial, a license is required for any further use beyond that scope.
A key tool in her arsenal is the Lasso (L) tool, which she employs to draw the jagged edge of the ripped paper. This tool allows for the organic, freehand creation of irregular tear lines, which are crucial for a naturalistic effect. When working with a model's face, for example, she might draw a torn edge that artfully cuts across or partially obscures facial features, adding that signature layer of mystery.
To precisely apply this torn edge to her subject, Lukianova uses a selection technique. With the "Paper edge" layer selected, she would perform a Control+click (Windows) or Command+click (macOS) on the mask of the "Model layer." This action generates a selection that precisely matches the contours of the torn edge. Subsequently, she deselects the "Paper edge" layer by holding Control+D (Windows) or Command+D (macOS) and then drags this "Paper edge" layer to a position below the "Model layer." This careful layering ensures the torn effect interacts correctly with the main subject.
To further refine the appearance of the torn edge and introduce a sense of dimension, Lukianova utilizes the Warp tool (Edit > Transform > Warp). By manipulating the handles of the warped edge, she can customize its shape, ensuring it looks less uniform and more akin to a genuine, organic tear. This attention to detail in the edgeâs form is critical for the overall believability of the effect.
When it comes to adding the visual weight and texture of paper, Lukianova often employs layer styles. By double-clicking the "Paper edge" layer, she accesses the Layer Style dialog. Here, she can apply effects like Inner Shadow or Bevel and Emboss to simulate the depth and subtle curvature of the torn paper. Furthermore, she might drag a paper texture image directly from her desktop into the document, placing it above the "Paper edge" layer. This texture layer, when blended appropriately, adds the rough imperfections that are so characteristic of torn paper, contributing to the grungy, handcrafted aesthetic she favors. This holistic approach, combining precise selection, organic shaping, and textural enhancement, allows Lukianova to masterfully integrate the ripped paper effect into her illustrative work, creating compelling visuals that are both realistic and intriguingly mysterious.