Clip Studio Paint (CSP) is a powerful digital art application, a cornerstone tool for artists and designers, brimming with robust features that help tailor your artistic visions from mere thoughts to on-screen brilliance. A crucial aspect of leveraging CSP's full potential lies in effectively managing and utilizing fonts, transforming them from mere annotations into integral components of your design narrative that captivate and communicate. This guide delves into the intricacies of installing and using fonts within Clip Studio Paint, ensuring your text elements enhance, rather than detract from, your creative output.
Installing Fonts on Your Operating System: The Foundation for CSP
Before a new font can grace your digital canvases within Clip Studio Paint, it must first be integrated into your operating system's font library. This fundamental step ensures that the font is accessible not only to CSP but also to other applications on your computer. The installation process varies slightly depending on your operating system, but the core principle remains the same: making the font available system-wide.
Windows Font Installation
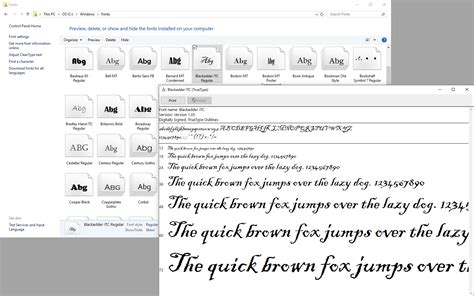
For Windows users, the process is straightforward. Once you have downloaded the desired font file (typically in .ttf or .otf format), locate the file on your computer. A simple double-click on the font file will open a preview window. Within this window, you'll find an "Install" button. Clicking this button adds the font to your system's collection, making it immediately available for use in various applications, including Clip Studio Paint. Alternatively, you can navigate to the "Fonts" folder within "Appearance and Personalization" in your Control Panel and drag and drop the font files into this directory. It is advisable to perform these installations with administrator permissions to ensure the changes apply to all user accounts on the system.
macOS Font Installation
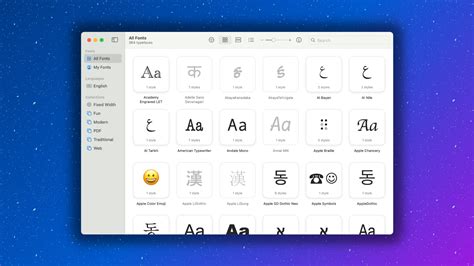
Mac users can leverage the built-in Font Book application for font management. After downloading and unzipping your font file, double-click it. Font Book will launch, displaying a preview of the font. You'll have the option to install the font for the current user or for all users on the system. Clicking "Install Font" will add it to your system's font library. Font Book also provides functionality to disable fonts you no longer wish to use, helping to streamline your font lists. To disable a font, select it in Font Book, click the "Edit" button, and then choose "Disable."
General Installation Best Practices
Regardless of your operating system, it's a good practice to close all running programs before installing new fonts. This prevents potential conflicts and ensures that the system recognizes the newly added fonts correctly. After installation, it's often recommended to restart Clip Studio Paint or, in some cases, your entire computer to ensure the font list is fully updated.
Integrating Fonts into Clip Studio Paint: Accessing Your Typographical Arsenal
Once a font is successfully installed on your operating system, Clip Studio Paint automatically recognizes and incorporates it into its font library. This seamless integration means that any font you add to your system will be readily available within CSP.
The Font Dropdown Menu in CSP
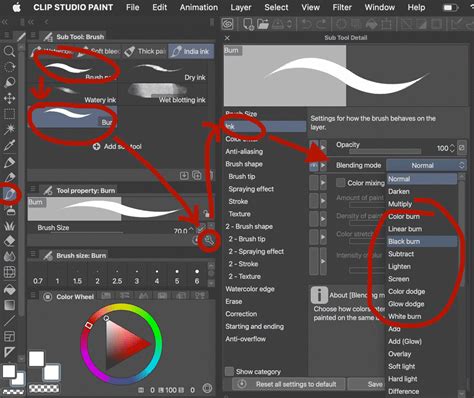
When using the Text tool in Clip Studio Paint, you'll find a font dropdown menu, usually located within the Sub Tool Detail palette under the "Font" category. This menu displays a comprehensive list of all the fonts installed on your operating system. Simply click on the dropdown to reveal the available options, and select your desired font.

Adding Fonts Directly within Older CSP Versions (Less Common Now)
In older versions of Clip Studio Paint, or for users who prefer a more direct approach, there was an option to add fonts directly within the application. This involved navigating to the Text tool, clicking the Font dropdown, and then selecting "Add font from files…". This would prompt you to browse your computer for the font file. Another method involved manually copying font files to a specific directory within your Clip Studio Paint documents folder, typically labeled "Library\Fonts". However, with modern versions, installing fonts on the operating system is the primary and most efficient method.
Utilizing Font Lists for Organization
For artists who manage an extensive collection of fonts, the sheer length of the font dropdown list can become overwhelming. Clip Studio Paint offers a solution in the form of "Font Lists." This feature allows you to create custom collections of fonts, making it significantly easier to find and select frequently used or project-specific typefaces. To create a font list, access the font management options within CSP, typically found via the font dropdown menu or Sub Tool Detail palette. You can then select fonts from your system's library and group them into named lists. This organizational tool is invaluable for maintaining an efficient workflow, especially when dealing with a large number of installed fonts. The pane that shows the list of fonts is re-sizable, allowing you to adjust its size to better suit your needs.
Font Types and Licensing Considerations
Clip Studio Paint boasts broad compatibility with various font formats, ensuring flexibility for your creative projects.
Supported Font Formats
Clip Studio Paint supports the most common font types, including TrueType (TTF) and OpenType (OTF). OpenType fonts, in particular, often offer advanced typographic features like ligatures and alternate characters, which can add a sophisticated touch to your designs. Whether you're using TTF or OTF, adding them to your system will seamlessly integrate them into CSP, enhancing your project's typographical flair.
Licensing for Commercial Use
A crucial consideration, especially for professional artists and designers, is font licensing. While Clip Studio Paint itself doesn't impose limits on the number of fonts you can integrate, it's imperative to ensure that any font used in commercial projects is appropriately licensed for such use. Many free fonts are available for personal use only, and using them commercially can lead to legal issues. Always check the licensing terms of a font before incorporating it into work intended for sale or distribution. Resources like the Adobe Fonts library often provide clear licensing information.
Advanced Font Usage and Management in Clip Studio Paint
Beyond basic installation, Clip Studio Paint offers features to refine your text handling and improve workflow efficiency.
Previewing Fonts
CSP provides a convenient way to preview fonts directly within the application. When you select the Text tool, the font dropdown menu often includes a preview function. Some versions allow you to highlight text and then see how it would appear in different fonts, or the button on the right will list the fonts in alphabetical order using the highlighted text instead of the font name, but in the style of the font. This feature is incredibly helpful for making informed choices without having to constantly apply and revert fonts. In a perfect world, the highlighted text in the image would change as you hovered over each font, but this functionality is not universally available.
Font Management and Organization
As mentioned, Font Lists are a powerful tool for organizing your typography. Beyond creating lists, Clip Studio Paint allows you to manage your font library to some extent directly within the application. You can search font names using a search box at the top of the font drop-down, which is particularly useful when dealing with a large number of installed fonts. While CSP doesn't have a dedicated "uninstall font" button within the app, removing a font from your operating system's font library will also remove it from CSP's available fonts.
Adjusting Font Size and Resolution
The effectiveness of a font is also dependent on its size and the resolution of your canvas. Ensure that the font size and resolution settings in CSP are appropriate for your project. Text that appears legible at a high resolution might become pixelated or too small to read at a lower resolution. Pay attention to these settings to maintain clarity and visual appeal.
Font Considerations for Animation and Comics
The application of text in comics and animation often requires a more specialized approach compared to general graphic design.
Expressive Typography in Comics
Artists generally prefer to use comic fonts that help them express emotions and add personality to their narratives. These fonts can range from bold and impactful to delicate and whimsical, mirroring the tone and mood of the artwork. The visual style of the font plays a significant role in conveying character voice and atmosphere.
Legibility vs. Impact in Different Contexts
The choice of font is heavily influenced by the intended application. In traditional advertising, fonts must be eye-catching and grab attention. Conversely, in academic or business presentations, the font must be highly legible to ensure clear communication of information. For comic and animation work, a balance is often struck between expressiveness and readability, ensuring that dialogue and captions are easily understood while still contributing to the overall aesthetic.
Troubleshooting Font Issues in Clip Studio Paint
Occasionally, you might encounter issues where a newly installed font doesn't appear in Clip Studio Paint.
Common Solutions for Missing Fonts
If your new font isn’t displaying in CSP, the first step is to ensure it was correctly installed on your operating system. If the installation was successful, try restarting Clip Studio Paint. If the problem persists, rebooting your computer is often the most effective solution, as it forces all running applications to re-read the system's font library.
Mobile and Tablet Integration
Clip Studio Paint's versatility extends to its mobile and tablet versions, including the iPad app.
Font Installation on iPad
Adding fonts to Clip Studio Paint on an iPad is also possible. While the process might differ slightly from desktop installations, you can often add fonts directly through the app or by synchronizing your device via iTunes or iCloud, depending on your workflow. This ensures that your creative process isn't interrupted, even when working on a mobile platform.
Platform-Specific Font Availability
It's important to note that on Android and Chromebook devices, Clip Studio Paint may be limited to using only the default fonts available within the application. This is due to the differing font management systems on these platforms compared to Windows and macOS. On Windows and macOS, Clip Studio Paint primarily uses the device fonts installed on the operating system.
Font Lists in Clip Studio Paint
Mastering how to add and manage fonts in Clip Studio Paint emerges as a game-changer for any digital artist. By understanding the installation process, leveraging organizational features like Font Lists, and being mindful of licensing and application-specific needs, you can significantly enhance the impact and professionalism of your digital artworks. The text in your digital creations will transform from mere annotations to integral components of your design narrative, effectively captivating your audience and communicating your artistic vision.
Bogdan, a seasoned professional renowned for his expertise in logo design and visual branding, has developed a multitude of logos for various clients. His skills extend to creating posters, vector illustrations, business cards, and brochures. Additionally, Bogdan's UI kits were featured on marketplaces like Visual Hierarchy and UI8. He also wrote in the past years on sites like Design Your Way, WebDesignerDepot, WPDean, Designmodo, Speckyboy, Slider Revolution, and more, contributing his insights to the design community.