In today's collaborative work environments, the ability to seamlessly transfer design assets between different software applications is crucial. For creative professionals working extensively with Adobe InDesign, a common challenge arises when needing to share or repurpose layouts for colleagues or clients who primarily use Microsoft Word. The desire is often to create a Word template that retains the visual structure of an InDesign document, allowing for user-editable text areas while keeping graphical elements locked in place. This article explores various methods and considerations for converting InDesign files into functional Microsoft Word templates.
Understanding the Core Challenge: InDesign vs. Word
Adobe InDesign is a sophisticated page design and layout application built for print and digital publishing. It offers precise control over typography, graphics, and page elements, enabling the creation of complex and visually rich documents. Microsoft Word, on the other hand, is a word processing application designed for text-heavy documents, with a focus on content creation, editing, and standard document formatting.
The fundamental difference in their design philosophies and underlying structures makes a direct, one-to-one conversion challenging. InDesign's sophisticated layout engine and object-based approach do not directly translate to Word's flow-based text and simpler object manipulation. This inherent disparity is why a simple "Save As" InDesign to Word is not an available function.
Method 1: The PDF Round-Trip (Acrobat Pro)
One of the most commonly suggested methods for converting InDesign to Word involves an intermediate step: exporting to PDF and then converting the PDF to a Word document. This approach leverages the robust conversion capabilities of Adobe Acrobat Pro.
Step-by-Step Conversion via PDF:
Export from InDesign to PDF: Open your InDesign document. Navigate to
File > Adobe PDF Presetsand select a high-quality preset, such as[Press Quality]or[High Quality Print]. Alternatively, you can choosePDF/X-4:2010settings, which are often recommended as they preserve native color spaces for images, a crucial factor since Word does not natively support CMYK. If CMYK conversion is essential,PDF/X-1a:2001can be used. Save the PDF to a desired location.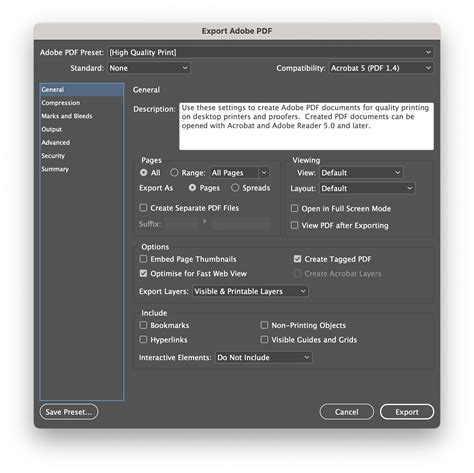
Convert PDF to Word using Acrobat Pro: Open the exported PDF file in Adobe Acrobat Pro. Go to
File > Export To > Microsoft Word > Word Document. This will initiate the conversion process.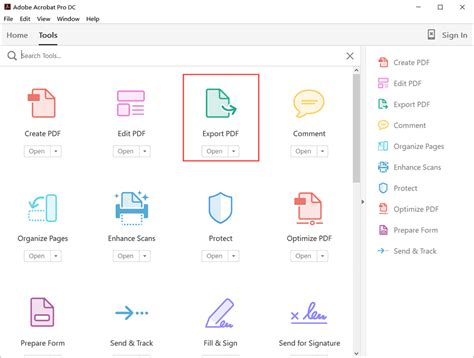
Configure Conversion Settings (Optional): Before saving, you may have the option to click on
Settingswithin the "Save As" window. Here, you can often choose between preserving the layout as closely as possible or prioritizing text flow. Experimenting with these settings can yield different results depending on the complexity of your InDesign layout.Save the Word Document: Choose a location to save your new Word document and click
Save. Acrobat will then perform the conversion, and the resulting .docx file will typically open automatically in Microsoft Word.
Pros and Cons of the PDF Round-Trip:
Pros:
- Accessible if you have Adobe InDesign and Adobe Acrobat Pro.
- Can maintain a reasonable visual fidelity for simpler layouts.
- Offers some control over text flow versus layout preservation.
Cons:
- High-level InDesign information, such as style sheets, paragraph properties, and table properties, is often lost.
- Layout inconsistencies are common, especially with complex designs, overlapping elements, or intricate typography.
- Foreign language characters (e.g., Arabic, Hebrew, Chinese, Korean, Japanese) may not convert accurately.
- The conversion can sometimes introduce extra line breaks, breaking the natural flow of text.
- Images might be squished to fit the InDesign file's line-for-line requirements.
Method 2: Dedicated Plugins and Software
For more accurate and robust conversions, specialized plugins and standalone software offer advanced solutions. These tools are designed to understand and translate InDesign's native properties into their Word equivalents.
ID2Office Plugin:
ID2Office is a prominent plugin for Adobe InDesign that is specifically engineered to export InDesign files to Microsoft Word, PowerPoint, and Apple Keynote formats. It aims to preserve native InDesign data and properties, leading to a more accurate conversion.
How ID2Office Works:
Installation: Install the ID2Office plugin into your Adobe InDesign application.
Export Command: Within InDesign, access the plugin through the
Recosoftmenu and select theID2Office - Export to Office formatcommand.Select Output Format: In the
ID2Office - Optionswindow, chooseMicrosoft Wordas the target format. You may have options for "free-flowing" text or text within frames.Export: Click
Exportand thenSave. ID2Office processes the native InDesign file and converts it to a Word document.
Benefits of ID2Office:
- High Accuracy: Processes native InDesign data, accurately converting character and paragraph style sheets, paragraph structure, hyperlinks, text, tables, images, and vector graphics.
- Layout Preservation: Maintains the layout to a high degree, with options for tweaking the converted file.
- Multi-language Support: Supports a wide range of foreign languages, including Arabic, Hebrew, Chinese, Japanese, and Korean.
- Seamless Integration: Works directly within InDesign, eliminating the need to open separate applications.
Considerations for ID2Office:
- Cost: ID2Office is a commercial product, meaning there is a cost associated with its use, although a free trial is typically available.
- Version Compatibility: Ensure compatibility with your specific version of Adobe InDesign.
Other Third-Party Converters:
Beyond ID2Office, various other third-party tools and online converters exist that can attempt to bridge the InDesign to Word gap. These can range from standalone applications to web-based services.
PDF2Office:
This tool, mentioned in forum discussions, converts PDF files to Word, Excel, and PowerPoint formats. The workflow involves exporting from InDesign to PDF first, then using PDF2Office to perform the conversion to Word.
- Pros: Can be effective for PDF to Word conversion.
- Cons: Similar to the Acrobat Pro method, it relies on the PDF as an intermediary, potentially leading to loss of high-level InDesign properties.
Online Converters:
Numerous online platforms offer PDF to Word conversion. While convenient for quick conversions, they often have limitations in accuracy, especially with complex layouts, and may raise privacy concerns for sensitive documents.
how to export an indesign file to word
Method 3: Scripting for Text Extraction
For users who primarily need to extract the text content from InDesign for use in Word, scripting offers a more direct approach to text extraction, though it typically bypasses complex layout preservation.
"Export All Stories" Script:
Adobe InDesign itself comes with a built-in script called "Export All Stories." This script can export text from all InDesign stories into separate Word files.
- Pros: Built into InDesign, no additional cost.
- Cons: Creates a separate Word file for each InDesign story, which can be unmanageable for large documents with many stories. It doesn't preserve layout elements.
Third-Party Scripts (e.g., Rorohiko's Text Stitch, Id-Extras.com's Export to Word):
Scripts like Rorohiko's Text Stitch (free plugin) aim to stitch together all frames in an InDesign document. Other scripts, such as those from Id-Extras.com, offer more advanced functionality, like exporting an entire InDesign document to a single Word file with options to maintain page size, margins, and chapter breaks.
- Pros: Can offer more streamlined text extraction than built-in scripts. Some offer advanced features like chapter breaks.
- Cons: May require installation of plugins or scripts. Some advanced features might be part of paid versions. The focus is primarily on text extraction, not full layout replication.
Considerations for Creating a "Locked Graphics" Word Template
The user's specific requirement is to create a Word template where graphics are locked, and only text areas are user-editable. This presents a unique challenge within Word's environment.
Using Text Boxes and Frames in Word:
Once an InDesign layout is converted to Word, the graphical elements will typically be embedded as images or shapes. To "lock" them, you can:
Group Elements in Word: Select the graphic and any surrounding text boxes that should remain static. Right-click and choose
Group > Group. This can help in treating them as a single unit.Set Text Wrapping: For images and shapes, use Word's text wrapping options. Select the object, go to the
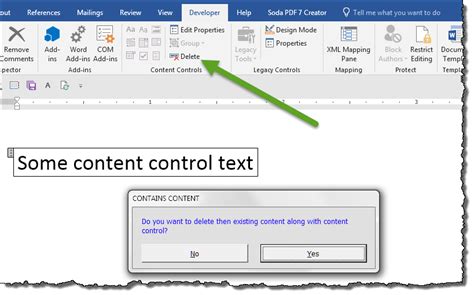
Picture FormatorShape Formattab, and choose a wrapping style likeIn Front of TextorBehind Text. You can then position these elements precisely. To prevent them from moving accidentally, you can often lock their position relative to the page or a specific paragraph.Use Content Controls: For truly locked and editable areas, Microsoft Word's "Developer" tab offers "Content Controls." You can insert Rich Text Content Controls or Plain Text Content Controls, which function as placeholders for user input. These can be styled and positioned within the document. For graphics, you might place them behind these content controls or within a table structure that holds both the graphics and the editable text fields.
Challenges with Locked Graphics:
- Layout Shift: Even with grouping and text wrapping, complex InDesign layouts can be difficult to perfectly replicate and lock in Word. Minor shifts can occur, especially when the document is edited by different users or on different systems.
- Editable Text Areas: Defining precisely where users can and cannot type can be cumbersome. While text boxes and content controls help, ensuring a smooth user experience requires careful setup.
- Master Pages: InDesign's master pages, which are used for recurring elements, do not have a direct equivalent in Word. Elements that would typically be on a master page need to be manually duplicated or managed within Word's structure.
Best Practices and Final Thoughts
When aiming to convert InDesign to Word, especially for template creation with locked graphics, consider the following:
- Simplify the InDesign Layout: The less complex your InDesign design, the more likely a conversion will be successful. Avoid intricate transparencies, complex gradients, or highly specific typographic arrangements if possible.
- Prioritize Text vs. Layout: Decide whether the primary goal is an exact visual replica or a functional template with editable text. If exact visual fidelity is paramount, a direct conversion might be insufficient, and rebuilding the core structure in Word might be a better long-term solution.
- Use Styles in Word: Once converted, immediately apply Word's paragraph and character styles to ensure consistency and ease of future editing. This mirrors InDesign's approach to style management.
- Test Thoroughly: After conversion, rigorously test the Word document. Check for text flow, image positioning, and the functionality of any editable areas. Have colleagues who are not familiar with InDesign test it as well to gauge user-friendliness.
- Consider the Audience: If your audience is primarily non-technical and accustomed to Word, designing the template directly within Word from the outset, perhaps using InDesign as a visual guide, might be the most efficient approach.
While the transition from InDesign to Word can be fraught with challenges, understanding the limitations of each application and leveraging the right tools-whether it's Acrobat Pro for a PDF round-trip, specialized plugins like ID2Office for greater accuracy, or scripting for text extraction-can help bridge the gap. For creating user-friendly templates with locked graphics, a combination of conversion techniques and Word's own templating features, such as text boxes and content controls, will be essential.