Photoshop's power as an image editor lies in its ability to precisely manipulate specific areas of a photograph. At the heart of this capability are selection tools, which allow users to isolate parts of an image, leaving the rest untouched. This isolation is crucial for applying targeted edits, creating compelling composites, and achieving a polished final product. While some selection tools are widely recognized, such as the Magic Wand, others remain less explored, yet equally vital for a comprehensive editing workflow. This guide aims to demystify Photoshop's diverse array of selection tools, offering an overview of their functionalities and best use cases, empowering both novice and experienced users to elevate their image manipulation skills.
Understanding the Fundamentals of Selections
Before diving into the specifics of individual tools, it's essential to grasp the fundamental concept of a selection in Photoshop. A selection is essentially a defined area within an image that Photoshop recognizes as a target for manipulation. Once an area is selected, any adjustments, filters, or transformations applied will only affect the pixels within that selection, leaving the surrounding pixels unaffected. This isolation is what enables non-destructive editing and allows for intricate control over the creative process. Selections can be as simple as a rectangular area or as complex as a finely detailed mask of intricate hair.
The ability to make precise selections is a cornerstone of advanced image editing. It allows for independent editing of elements within a scene, enabling creative endeavors like placing a person into a completely new background or altering specific colors within an image. Selections come in a wide range of complexities, from basic geometric shapes to highly detailed and nuanced outlines.
Basic Geometric Selections: Marquee Tools
Photoshop offers a suite of basic selection tools designed for quickly selecting geometric shapes. These are often the first tools new users encounter due to their straightforward functionality.
Rectangular Marquee Tool
The Rectangular Marquee Tool is a foundational selection tool that allows users to draw perfect squares or rectangles around an area of interest. To use it, simply click and drag across the image to define the desired rectangular boundary. This tool is ideal for selecting objects with sharp, straight edges or for creating precise frames.
Elliptical Marquee Tool
Complementing the Rectangular Marquee Tool, the Elliptical Marquee Tool enables the creation of circular or elliptical selections. Similar to its rectangular counterpart, users click and drag to define the ellipse. Holding the Shift key while dragging constrains the shape to a perfect circle. This tool is invaluable for selecting round objects like eyes, wheels, or creating circular masks.
Single Row and Single Column Marquee Tools
While less commonly used, the Single Row Marquee Tool and Single Column Marquee Tool allow for the creation of selections that are exactly one pixel wide or one pixel tall, respectively. These are highly specialized tools useful for very precise, pixel-level adjustments or for isolating thin lines within an image.
Freehand and Edge-Following Selections: The Lasso Family
The Lasso tools offer more flexibility for selecting irregular shapes by allowing users to draw freehand lines or have Photoshop assist in tracing edges.
Lasso Tool
The standard Lasso Tool is the most basic of the freehand selection tools. It allows users to draw a selection outline by clicking and dragging their mouse cursor around an object, much like drawing with a freehand pen or pencil on paper. While simple to use, achieving precise results with the Lasso Tool can be challenging, especially for complex shapes or when a steady hand is required.
Polygonal Lasso Tool
For selections requiring straight lines, the Polygonal Lasso Tool is a more controlled alternative to the freehand Lasso. Instead of dragging, users click at points to create anchor points, forming a polygon. Each click defines a vertex, and Photoshop draws straight lines between them. Double-clicking or closing the loop by returning to the starting point completes the selection. This tool is excellent for selecting objects with distinct, straight edges, such as buildings or geometric patterns.
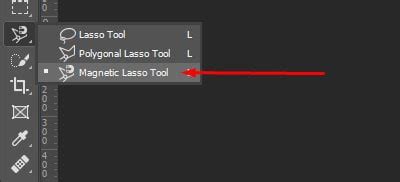
Magnetic Lasso Tool
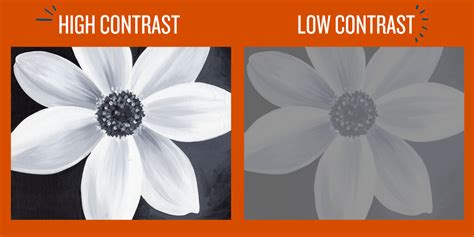
The Magnetic Lasso Tool is designed to intelligently "snap" to the edges of objects in an image. As you move the cursor along the edge of a subject, the tool attempts to detect contrasting color and tonal boundaries and automatically creates anchor points. This tool works best when selecting a subject that has a clear contrast with its background, making the edges well-defined. It significantly reduces the effort required compared to manual tracing, offering a good balance between control and automation.
Color and Tone-Based Selections
Some selection tools leverage the color and tonal information within an image to make selections automatically.
Magic Wand Tool
The Magic Wand Tool is one of Photoshop's oldest and most intuitive selection tools. It selects pixels that are similar in color and tone to the point where you click. The "Tolerance" setting in the Options bar controls how broad or narrow the range of colors the Magic Wand will select. A lower tolerance selects colors very similar to the sampled pixel, while a higher tolerance selects a wider range of colors. It's particularly useful for selecting solid blocks of color or areas with uniform backgrounds.
Quick Selection Tool
The Quick Selection Tool offers a more dynamic approach to color-based selections. Instead of clicking a single point, users "paint" over the area they wish to select. As you paint, Photoshop analyzes the surrounding pixels and automatically expands the selection to include similar colors and tones, intelligently detecting edges. This tool is often faster and more intuitive than the Magic Wand for selecting less uniform areas. When you drag over an area, this tool automatically switches to its Add to Selection option, simplifying the process of building up a selection.
Color Range Command
Accessed via the Select menu, the Color Range command provides a powerful way to select areas based on specific color hues, saturation, or luminosity. This dialog box offers a eyedropper tool that allows you to sample colors directly from the image. You can then use the Add to Sample and Subtract from Sample eyedroppers to refine the color range. This is exceptionally useful for tasks like changing the color of a specific object or adjusting the hue of a particular element in a photograph, such as altering the blue color in makeup or hair.
Mastering Photoshop: Advanced Color Selection Techniques for Stunning Effects
AI-Powered and Automated Selections
Adobe has increasingly integrated artificial intelligence into Photoshop, leading to sophisticated tools that can make complex selections with minimal user input.
Object Selection Tool
The Object Selection Tool is a prime example of AI in action. It allows users to select entire objects within an image with a single click or by defining a rough area. If the "Object Finder" is enabled, hovering over objects in the image will display an overlay of the area that will be selected. Alternatively, users can choose the Lasso or Rectangle mode within the Object Selection Tool to draw a bounding box around the desired object(s). The "Sample All Layers" option enables selection of objects across multiple layers, adding further versatility. This tool is particularly adept at selecting subjects even if they are slightly out of focus.
Select Subject
Another AI-driven feature, Select Subject, found under the Select menu, automatically identifies and selects the main subject of an image. It's a remarkably quick way to isolate a person or prominent object, especially against a relatively simple background. However, as with many automated tools, the results may not always be perfect. Photoshop might sometimes include elements of the background that share similar colors or tonal values with the subject. Therefore, refinement with other selection tools is often necessary.
Select Sky
Specifically designed for isolating the sky, the Select Sky tool (found under the Select menu) is invaluable. This tool is distinct from Sky Replacement and is useful when the goal is to make edits specifically to the sky area without affecting the rest of the image. It uses advanced algorithms to accurately differentiate the sky from other elements in the composition.
Advanced Selection and Refinement Tools
Beyond initial selection, Photoshop provides sophisticated tools for refining and perfecting the selected areas.
Select and Mask Workspace
The Select and Mask workspace is a dedicated environment for fine-tuning selections. It offers a comprehensive suite of tools, including brushes for adding or subtracting from a selection, sliders for adjusting edge refinement, feathering, and smoothing. This workspace allows for both manual and automated refinement processes. Users can paint over areas they want to include or exclude, and Photoshop's AI will assist in determining the selection. Sliders for edge detection, smoothing, feathering, and contrast allow for precise control over the final mask. While it may require more time than automated tools like Select Subject, Select and Mask offers unparalleled precision for complex selections.

Pen Tool
For ultimate precision, especially when dealing with smooth curves and sharp, well-defined edges, the Pen Tool is the professional's choice. It allows users to create vector paths by placing anchor points and manipulating Bézier curves. While it can be time-consuming to master, the Pen Tool offers the most accurate and controllable way to create complex selections, ensuring perfectly smooth outlines. It is particularly useful for product photography or graphic design elements that require crisp, clean edges.
Channels
Channels offer a unique and powerful method for making selections based on tonal values (light and dark areas) within an image. By navigating to the Channels panel, users can examine each color channel (Red, Green, Blue) individually. The goal is to find the channel that exhibits the greatest contrast between the subject and the background â the channel with the brightest whites and darkest blacks where the desired area is most distinct. Once the most contrasting channel is identified, it can be duplicated and further enhanced using Levels or Curves adjustments to increase contrast. Holding the ALT or OPTN key while clicking on the channel thumbnail converts it into a selection, where white areas are selected and black areas are not. This method is exceptionally effective for challenging selections, such as isolating fine details like hair or intricate patterns where color-based tools might struggle.
Modifying and Saving Selections
Regardless of the tool used to create an initial selection, Photoshop provides consistent methods for modifying and managing these selections.
Adding to, Subtracting From, and Intersecting Selections
Once an initial selection is made, it's rare to achieve perfection in a single step. Photoshop allows you to modify the active selection by adding to it, subtracting from it, or intersecting it with a new selection.
- Add to Selection: Holding down the Shift key while using any selection tool will add the new selection to the existing one. Alternatively, the "Add to selection" icon can be clicked in the Options bar.
- Subtract from Selection: Holding down the Alt (Windows) or Option (Mac) key while using a selection tool will subtract the newly drawn area from the existing selection. The "Subtract from selection" icon is also available in the Options bar.
- Intersect with Selection: Holding down Shift + Alt (Windows) or Shift + Option (Mac) will create a selection that is the intersection of the existing selection and the new one. This means only the area that is common to both selections will remain selected.
These modification options are crucial for refining complex selections, allowing users to meticulously build up or carve away areas until the desired result is achieved. For instance, if the Object Selection tool selects too much of the background, you can use the Subtract from Selection mode to remove those unwanted areas.
Feathering and Anti-aliasing
To ensure smooth transitions between edited and unedited areas, Photoshop offers two important settings:
- Feathering: This softens the edges of a selection by creating a gradual transition between the selected and unselected pixels. A feather radius can be set in the Options bar for tools like the Marquee and Lasso families, or within the Select and Mask workspace. This is particularly useful when applying color or tonal adjustments, preventing harsh, abrupt edges.
- Anti-aliasing: This feature smooths out jagged or stair-stepped edges in a selection by subtly blending the edge pixels. It's a standard setting found on many selection tools, including the Marquee tools, Lasso family, and Magic Wand. Anti-aliasing helps create cleaner, more natural-looking selections.
Saving and Loading Selections
For particularly complex selections that you anticipate needing again, Photoshop allows you to save them. Navigating to Select > Save Selection, you can name your selection, which will then be stored as an alpha channel. Later, you can load this saved selection by going to Select > Load Selection and choosing its name from the list. This is an invaluable time-saving feature for recurring projects or intricate masking tasks.
Conclusion: The Art of Selection
Photoshop's selection tools are not merely functional; they are fundamental to unlocking the full creative potential of the software. From the basic Marquee tools for simple shapes to the AI-powered Object Selection and the precision of the Pen Tool, each tool serves a distinct purpose. The true mastery of selections lies not in relying on a single tool, but in understanding how to combine them, refine their outputs, and leverage advanced techniques like Channels and the Select and Mask workspace. By experimenting with each tool and understanding their strengths and weaknesses, users can develop the skill to isolate any element within an image with accuracy and efficiency, paving the way for seamless edits and compelling visual narratives. The journey of mastering Photoshop selections is ongoing, with practice and exploration being the keys to unlocking ever-greater levels of control and creativity.