Adding texture to visual projects, whether digital or physical, can dramatically enhance their aesthetic appeal, imbuing them with depth, character, and a unique visual language. In the realm of digital design and photography, "paint texture overlay" refers to the art of layering textural elements onto an image or graphic design using software like Adobe Photoshop. This technique allows for the transformation of a simple photograph into a vintage keepsake or a logo into a rugged, industrial statement. Textures are incredibly versatile tools, capable of breathing life into vector graphics, web designs, and photographic compositions. For instance, employing old paper or canvas textures can lend a photograph an immediate aged, vintage appearance, evoking a sense of history and nostalgia.
The fundamental principle behind digital texture overlays involves utilizing blending modes and opacity settings within image editing software. Blending modes dictate how pixels from one layer interact with pixels on the layers below, while opacity controls the transparency of the overlay. By judiciously adjusting these parameters, designers can achieve a seamless integration of textures, creating effects that range from subtle enhancements to dramatic transformations. This process is not merely about applying a visual effect; it's about storytelling and conveying a specific mood or atmosphere.
Importing and Manipulating Textures in Photoshop
To begin incorporating textures into your digital workflow, the initial step in Photoshop involves importing the desired texture image into your project. A highly recommended method for this is to use the "Place Linked" function. This is accessed by navigating to File > Place Linked. This command imports the texture as a separate, independent layer within your main document, crucially maintaining a link to the original texture file. This linkage offers significant advantages, allowing you to update the texture if the original file is modified, without having to re-import it manually. Furthermore, it helps keep your main Photoshop file size manageable.
Once the texture is placed, a world of creative manipulation opens up. You can resize the texture to fit your canvas precisely, rotate it to achieve the desired orientation, and adjust its opacity to control its intensity. The Free Transform tool (CTRL+T) is invaluable here, enabling you to scale, rotate, skew, and distort the texture layer to perfectly complement your underlying image. Experimentation is key; move the texture around, flip it horizontally or vertically, and explore different blend modes to see how it interacts with your base image. This iterative process of adjustment and refinement is what leads to unique and compelling results.
Text Effect Photoshop Tutorial: Add Texture to Your Designs!
Creating Custom Brushes from Textures
Beyond simply layering textures, Photoshop offers the powerful capability to transform textural elements into custom brushes. This multi-step process can add an extraordinary level of depth and artistic control to your projects. The procedure typically begins by selecting the specific area of a texture that you wish to convert into a brush. The Lasso Tool is often employed for this purpose, allowing for precise selection of irregular shapes. Once the desired portion of the texture is selected, navigate to Edit > Define Brush Preset. This action registers the selected pixels as a new brush tip, which can then be accessed and utilized from Photoshop's Brush panel.
The true magic of custom brushes lies in their versatility. You can then apply these texture brushes to specific areas of your artwork, painting with the texture itself. This allows for highly targeted application, enabling you to build up textured areas gradually or apply intricate patterns with a single stroke. The brush settings themselves offer further customization: you can adjust spacing, scattering, size jitter, color dynamics, and even incorporate smoothing. This level of control allows for the creation of brushes that can mimic anything from subtle grunge to intricate natural patterns, making your digital artwork truly unique.
The Art of Textured Paint in Home Decor
Shifting from the digital canvas to the physical realm, textured paint offers a compelling way to enhance interior spaces. Applying textured paint to walls and surfaces is a time-honored technique for adding visual interest and imitating the appearance of various natural materials. There are numerous compelling reasons to opt for textured paint in your home. Primarily, it can create a unique and dynamic aesthetic that stands in stark contrast to the flatness of conventional finishes. This visual dynamism can make a room feel more engaging and sophisticated.
Furthermore, certain textured paint finishes possess a practical advantage: they can effectively mask minor imperfections on wall surfaces, such as scuffs, dents, or hairline cracks. This means that walls that might otherwise require extensive preparation and repair can be transformed with a textured finish, making them not only visually appealing but also more forgiving and easier to maintain over time. This dual benefit of aesthetic enhancement and practical problem-solving makes textured paint a popular choice for homeowners and designers alike.

Achieving Textured Paint Effects: Techniques and Tools
The methods for achieving textured paint finishes are as diverse as the textures themselves. One straightforward approach is to utilize specialty paints that come with premixed additives. These paints are designed to create specific textures directly from the can, simplifying the application process. However, remarkable textures can also be achieved using regular wall paint and a bit of creativity with application tools.
For a mottled, organic effect, a natural sea sponge can be employed. By dabbing the sponge, lightly loaded with paint, onto the wall, you can create a varied and natural-looking pattern. Another accessible technique is "rag rolling." This method requires no specialized equipment beyond an old rag. Crumple and twist the rag, then roll it over wet paint. This action lifts some of the wet paint, revealing the color underneath and creating a soft, dimensional, and often slightly aged appearance.
For those aiming for a rustic or weathered aesthetic, using a stiff brush instead of a roller can yield excellent results. The bristles of a stiff brush can create subtle lines and a more rugged surface texture as you apply the paint. Knockdown texture, often seen on ceilings, can also be adapted for walls. This technique involves applying a layer of mud or plaster, then using a trowel to knock down the peaks, leaving a smooth, undulating surface. A stippling brush, characterized by its dense bristles, is used to dab paint onto the surface, creating small, raised bumps that add a tactile dimension.
The concept of distressing furniture, where layers of paint are applied and then sanded back to reveal underlying colors and create an antique look, can also be applied to walls. Don't be afraid to experiment with different tools, materials, and application techniques. The key is to be adventurous and discover what works best for your desired outcome. It is always advisable to test your chosen technique on a small, inconspicuous area of the wall first to ensure you are happy with the results before committing to the entire surface.
Professional Application of Texture
While many textured paint techniques are DIY-friendly, achieving a consistently professional look, especially on larger surfaces or for complex finishes, can be challenging. In such instances, collaborating with experienced painting professionals can be highly beneficial. Companies like Brush Brothers Painting, for example, employ highly trained painters who possess the expertise and specialized tools to execute a wide range of textured finishes with precision and flair. These experts can guide homeowners in selecting the most suitable textures for their space and ensure flawless application, significantly enhancing the home's overall aesthetics through the strategic use of texture.
Creating PNG Overlays from Textures in Photoshop
A sophisticated digital technique involves creating a transparent PNG overlay from a texture. This is particularly useful when a texture has an attractive border or frame that you wish to preserve while isolating the textural effect. The process allows for easy modification of the overlay's color using adjustment layers like Color Fill or Hue/Saturation, which can be clipped to the texture layer. This ensures that the textural effect can be applied with a consistent aesthetic across various projects.
The workflow for creating such an overlay typically begins with opening the desired texture in Photoshop. It's a good practice to duplicate the texture layer and then hide the background layer. This provides a safety net, allowing you to revert to an earlier state if any mistakes are made during the selection process.
The next crucial step is to select the area of the texture that you want to retain. A common and effective method involves using the Select > Color Range function. Within the Color Range dialog, selecting "Highlights" can often isolate the lighter, more prominent parts of the texture, which are frequently the areas where the textural detail is most pronounced. If this selection is too broad or not quite right, you can refine it by using "Sampled Colors" and clicking or dragging on specific areas of the texture in the preview window. The preview pane is invaluable for visualizing what is being selected; remember that white typically indicates the selected areas. If it's easier to identify the areas you don't want, the "Invert" option can be used to select the inverse of your initial selection.
With the desired area selected, the next action is to add a layer mask. This mask will define the transparent areas of your eventual PNG overlay. To visualize how the texture will appear when applied as an overlay, place an image or a solid color layer beneath the texture layer. To refine the mask and create a clear central area or to subtly soften the edges of the texture, a soft black brush set to a low opacity can be used. Painting with this brush on the layer mask will gradually reveal the underlying layer, effectively "painting out" areas of the texture. Using a large brush at a low opacity (e.g., 500px at 12%) allows for gentle, controlled adjustments, gradually building up the desired clarity without removing too much of the texture at once.
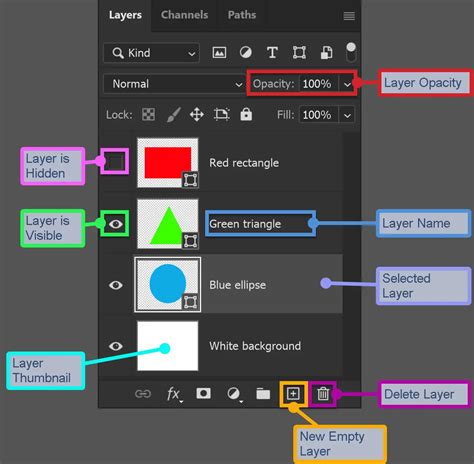
Once the layer mask has been refined to your satisfaction, right-click on the layer mask thumbnail and select "Apply Layer Mask." This action permanently incorporates the mask into the layer, making the selected areas opaque and the masked areas transparent. It's often beneficial to duplicate the layer at this stage and hide the original, working on the duplicated layer for the subsequent steps.
The final stage of creating the PNG overlay involves exporting the layer as a PNG file. Ensure that only the layer you wish to export is visible by turning off all other layers in the Layers panel. Then, navigate to File > Scripts > Export Layers to Files. In the dialog box that appears, select "PNG-24" as the File Type. Specify a destination folder for your new file and provide a name. Be aware that Photoshop may append a naming convention, but you can rename the file later. The remaining settings can typically be left at their defaults. Clicking "Run" will export your texture as a transparent PNG. The process might take a moment, after which you'll be returned to Photoshop with your original image unchanged. It's prudent to save your Photoshop document (.psd) at this point, as it preserves all your layers and settings, allowing for future modifications or re-exporting.
The resulting PNG file can now be added as an overlay to any image. Use the Free Transform tool (CTRL+T) to scale and position it. Experiment with flipping the overlay, changing its blend mode, adjusting its opacity, or even adding another layer mask to further refine its integration with your base image.
Advanced Texture Overlay Techniques
For those seeking more nuanced and sophisticated texture effects, further customization is possible. For instance, to achieve a softer, more diffused overlay effect, a "Color Overlay" can be applied before rasterizing the layer. This is done by double-clicking the layer (outside the thumbnail) to open the Blending Options dialog. Setting the Color Overlay to "Normal" blend mode, with white as the color and an opacity around 29%, can lighten the entire texture evenly. This effect can then be rasterized by right-clicking the layer and choosing "Rasterize Layer Style."
Further refinement can be achieved by converting the layer to a Smart Object (right-click > Convert to Smart Object). This allows for non-destructive application of filters. Applying a Gaussian Blur filter (e.g., Radius 180.3) followed by a Noise filter (e.g., Noise setting of 8) can introduce a subtle, dreamy quality, preventing the texture from appearing too sterile. Because it's a Smart Object, these filter settings can be adjusted later if the effect doesn't look quite right over the target image. Once satisfied, the process of exporting the layer as a PNG can be performed on this refined Smart Object.
The stacking order of layers is also crucial. For example, a layer mask might be added to the texture overlay, allowing you to paint back specific elements of the underlying image that you want to remain prominent. The overlay itself can then be adjusted in opacity (e.g., 66%) and further refined with its own layer mask to ensure the main subject of the image remains in focus.
The possibilities for adjusting textures before converting them into overlays are vast. Experimenting with different blend modes for the texture layer itself, or utilizing the "Blend If" sliders within the Layer Style dialog, can yield dramatically different results. These sliders allow for sophisticated control over how highlights and shadows of the texture layer interact with the underlying layers, enabling the creation of highly integrated and nuanced effects.
The History and Evolution of Texture in Photography
It's important to recognize that the concept of adding texture to photographs predates digital editing software by many decades. In the traditional darkroom era, photographers employed various ingenious methods to impart texture. These included scratching negatives with pins, sanding photographic paper, staining the paper with fixer solution before exposure, layering two negatives on top of each other in the enlarger, or pushing film ISO settings to increase grain, which itself is a form of texture.
In the context of digital photography, applying a texture overlay is conceptually similar: it's essentially adding another layer to your photograph within an editing program. This layer is typically an image of a textural surface, such as paper, wood, concrete, fabric, or even abstract patterns. However, the beauty of digital manipulation is that virtually any image can be used as a texture, opening up an almost limitless creative palette.
Sourcing and Creating Textures
You don't need to be an expert to start adding texture to your images. Numerous pre-made, free textures are readily available online. A simple Google search for "free texture packs" or "Photoshop texture overlays" will yield a plethora of options. When using free resources, it's crucial to pay attention to copyright permissions. Many artists offer their textures for personal use, often requesting attribution or a link to the created work as a form of reciprocation. Websites like DeviantArt are excellent resources for finding stock textures offered by artists.
Creating your own textures can be a rewarding and deeply personal process. While downloading free textures is convenient, crafting your own ensures that your work is entirely unique and that the textures are perfectly tailored to your specific images. This can be as simple as taking a photograph of an interesting surface. For example, scanning the bottom of an old baking tray can produce a surprisingly versatile texture. The author of this guide has used such a texture in combination with a manuscript image for a portrait of a cello player, and also to unify a series of photographs for album artwork, even when some images were shot by different photographers.
Beyond photography, digital texture creation can involve digital painting. By applying colors, using filters like "Render Clouds," adjusting contrast, and adding color and vignette effects, you can generate unique digital textures from scratch. This approach offers complete control over the final look and feel of the texture.
Practical Application and Experimentation
Applying a downloaded or created texture to your image is straightforward. Drag and drop the texture image file directly onto your Photoshop project. It will appear as a new layer. Adjust its transparency using the Opacity slider in the Layers panel. The Free Transform tool (CTRL+T) is then used to resize, rotate, and position the texture layer until it sits harmoniously with your base image.
Fine-tuning often involves using the Eraser Tool at a low opacity to selectively remove parts of the texture, thereby blending it more naturally with the underlying image. The beauty of this process lies in experimentation. Try different layer blend modes (e.g., Multiply, Screen, Overlay) to see how the texture interacts with your image. Layering multiple textures, or even applying the same texture multiple times with slight variations in hue or opacity, can lead to complex and captivating results.
Professional Resources for Texture Overlays
For those seeking professional-grade texture overlays and a streamlined workflow, several resources are available. Adobe Stock offers a vast library of high-resolution textures, available for purchase or download, catering to a wide range of aesthetic needs.
For users who prefer a subscription model that provides unlimited access to resources, Envato Elements is a valuable platform. It offers a comprehensive collection of Photoshop paper texture overlays, grunge textures, and other design assets. If subscriptions are not preferred, GraphicRiver, part of Envato Market, provides individual purchase options for professional Photoshop background textures and overlay packs.
When exploring texture packs, consider their intended use. Grunge texture overlay packs are particularly useful for creating vintage effects. Packs containing dust and scratch textures can help achieve a faded or old look. For more creative and unusual designs, look for packs that incorporate geometric or abstract elements. Some bundles offer a large number of textures within a single PSD template, simplifying the selection process. If you intend to apply textures not only to photos but also to text and vector graphics, packs with smart PSD templates are ideal. For a softer vintage aesthetic, packs of soft grunge textures can be very effective.
Ultimately, the journey of working with textures is one of continuous learning and creative exploration. Whether you're digitally layering vintage paper or physically applying a stucco finish, texture adds a tangible and visual dimension that enriches the final outcome.