Photoshop offers a versatile toolkit for refining edges, a crucial step in achieving polished and realistic image compositions. Whether you're integrating new elements, removing distractions, or simply aiming for a cleaner aesthetic, understanding how to manipulate edges can elevate your work from amateur to professional. This guide explores various techniques within Photoshop, from foundational anti-aliasing and feathering to more advanced methods involving masks and specialized filters, all designed to help you achieve smooth, natural-looking transitions in your images.
Understanding Edge Blurring and Softening
When working with images, especially those that have undergone manipulation, edges can often appear harsh, jagged, or artificially defined. This is where techniques aimed at softening or blurring these transitions come into play.
Anti-Aliasing: The Gentle Approach to Smoothness
Anti-aliasing is a fundamental technique used to mitigate the "stair-step" effect, or aliasing, that can appear on diagonal lines and curves in digital images. In Photoshop, its principle is applied to smooth edges by reducing the opacity between the edge pixels and their surroundings. This creates a subtle gradient of color and transparency, making the edge appear finer and smoother to the human eye. It's particularly useful when adding an element to an original image or after removing one, as it can help blend the newly integrated or remaining areas more seamlessly.

The application of anti-aliasing is designed to be subtle, aiming to preserve the integrity of the image while improving its visual flow. While it generally works to create a more natural appearance, a close inspection of a heavily anti-aliased image might reveal the manipulation. However, for general edge smoothing, it's an effective and accessible tool.
Feathering: Blending Borders Harmoniously
Feathering is another powerful method for softening image edges. It works by creating a gradual transition zone around the selected area. Pixels along the border and in the surrounding area blend harmoniously, effectively blurring the hard line.

The key control in feathering is the "Feather Radius." This setting determines the extent of the blending. A larger radius will affect more pixels around the edge, resulting in a softer, more diffused transition. Conversely, a smaller radius will create a more subtle softening. While feathering is an efficient way to smooth edges, it's important to be aware that it can lead to a loss of fine detail along the feathered border. However, when applied judiciously, it can be instrumental in creating a masterpiece by ensuring that elements integrate naturally into their new environments.
The "Strength" parameter, often available in conjunction with feathering tools, allows you to control the intensity of the blurring effect. Selecting a lower strength will result in a more delicate blend, while a higher strength will produce a more pronounced softening.
Advanced Edge Refinement Techniques
Beyond basic anti-aliasing and feathering, Photoshop offers more sophisticated tools and methods for precise edge control, particularly when dealing with complex selections like hair or fur.
The Refine Edge Tool: Precision for Complex Selections
The Refine Edge tool is an indispensable asset for professionals and enthusiasts alike, especially when precise selection and edge cleanup are paramount. This tool is designed to intelligently analyze the edge of a selection and make adjustments to create a cleaner, more natural boundary. It's particularly effective for subjects with intricate details, such as strands of hair, fur, or the delicate edges of foliage.
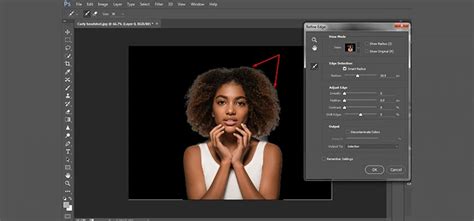
The process typically begins with an initial selection made using tools like the Object Selection tool, Lasso tool, Magic Wand tool, or Quick Selection tool. Once a preliminary selection is established, indicated by the "marching ants" outline, you can access the "Select and Mask" workspace. Within this workspace, the Refine Edge tool can be applied by brushing over the problematic edges. The tool analyzes the pixels under the brush and attempts to differentiate between the subject and the background, intelligently refining the selection.
Crucially, the Refine Edge tool offers parameters to control the extent of its influence. The "Radius" setting, similar to feathering, determines how far the tool will look for edge details. The "Smooth" slider can reduce any jaggedness in the selection, while the "Feather" slider softens the transition. The "Contrast" slider can be used to sharpen fuzzy edges, and the "Shift Edge" slider allows you to expand or contract the selection boundary.
When using the Refine Edge tool, it's often recommended to click inside the selection and draw the brush outward to ensure the tool captures the relevant edge information. The output of the refined selection can then be controlled through the "Output To" option, allowing you to create a layer mask, a new layer, or other desired formats, facilitating seamless integration into your composite image.
Layer Masks: Non-Destructive Edge Control
Layer masks are a cornerstone of non-destructive editing in Photoshop, and they are exceptionally useful for managing image edges. By applying a layer mask to a layer, you can selectively reveal or hide parts of that layer without permanently deleting any pixels. This offers immense flexibility when you need to refine the edges of a cut-out subject.
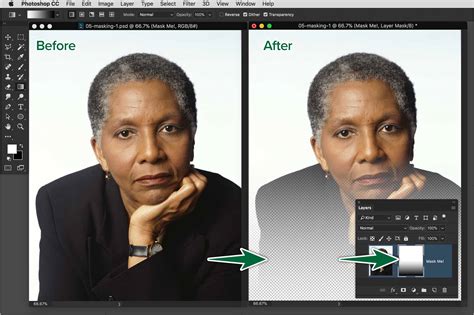
To smooth edges using a layer mask, you would first create your selection of the object you want to isolate. Then, add a layer mask to this layer. With the layer mask selected, you can use a soft, low-opacity brush (often in black or white) to paint over the edges. Painting with black on the mask conceals parts of the layer, while painting with white reveals them. By carefully painting with varying shades of gray, you can create a smooth, feathered transition between the object and its background, achieving a natural blend.
An advanced application involves using an "edge mask" created through filters like "Find Edges." This mask can then be applied to a sharpened layer, allowing the sharpening effect to be precisely confined to the detected edges, thereby enhancing detail without introducing unwanted artifacts elsewhere.
Sharpening Tools and Filters
While smoothing edges is often about softening transitions, sharpening tools are used to enhance detail and definition, which can also play a role in edge refinement.
The Sharpen Tool and Sharpen Edges Command
Photoshop offers several direct sharpening tools and commands. The basic "Sharpen Tool" can be used to increase the sharpness of an image by enhancing contrast between adjacent pixels. However, it offers limited control and can easily lead to over-sharpening or the introduction of undesirable artifacts.
The "Sharpen Edges" command, found under the Filter menu, is designed to specifically target and sharpen the edges within an image. It's a straightforward tool with no adjustable parameters, making it simple to apply. However, due to its lack of control, it's often considered less effective and can produce noticeable artifacts, especially if applied multiple times. For these reasons, it's generally not recommended for professional-level edge sharpening.
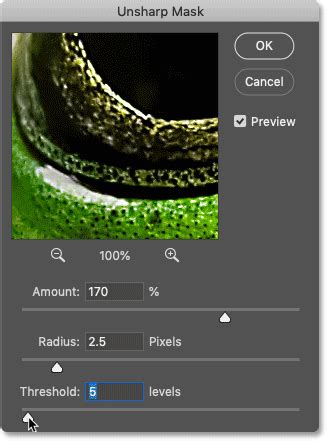
Unsharp Mask Filter: Controlled Sharpening
The "Unsharp Mask" filter is a more powerful and versatile tool for sharpening. It works by creating a mask that highlights the edges in an image, then sharpening those areas. The filter offers three key parameters:
- Amount: Controls the intensity of the sharpening effect.
- Radius: Determines the width of the edge areas that will be affected. A larger radius sharpens broader edges, while a smaller radius focuses on finer details.
- Threshold: This is a crucial slider that dictates how much contrast difference there must be between adjacent pixels for them to be considered an "edge" and thus be sharpened. Setting the Threshold to 0 will sharpen everything. Increasing the Threshold value means only the most pronounced edges will be affected, helping to prevent sharpening of noise or texture.
When using the Unsharp Mask filter, it's often best to apply it destructively to a duplicated layer or, preferably, as a Smart Filter. Converting a layer to a Smart Object before applying the Unsharp Mask allows the filter to be edited non-destructively at any time, providing greater flexibility.
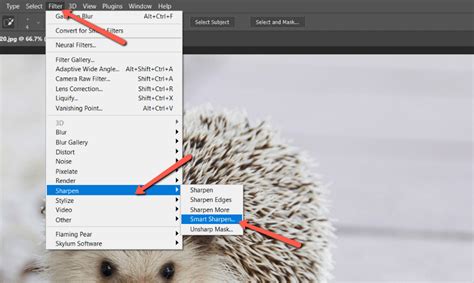
Smart Sharpen Filter: Advanced Sharpening Options
The "Smart Sharpen" filter is an even more advanced sharpening tool that offers greater control over the sharpening process. It provides options to select the sharpening method (e.g., Gaussian Blur, Lens Blur) and includes advanced controls for reducing noise and artifacts. Like Unsharp Mask, it can be applied as a Smart Filter for non-destructive editing.
Integrating Elements: Seamless Compositing
A common scenario requiring edge refinement is when combining elements from different images. Whether you're cutting out a subject to place it on a new background or adding a new object into an existing scene, the edges of the cut-out element must blend naturally.
The Power of Selection Tools
Photoshop's selection tools are the first step in isolating an object. Tools like the Quick Selection Tool, Magic Wand, Lasso, and the more advanced Object Selection Tool can create initial selections. However, these selections are rarely perfect, especially around complex edges.
Combining Techniques for Realistic Composites
After making an initial selection, the "Select and Mask" workspace becomes invaluable. Here, you can employ tools like the Refine Edge brush to meticulously clean up the selection. Once the selection is refined, it's often best to output it as a layer mask.
When adding a new element, consider its lighting and color to match the destination image. The edges of the new element should then be softened using feathering or by painting on the layer mask with a soft brush. The goal is to eliminate any visible halos or jagged lines, making the combined image appear as if it were originally captured as a single scene.
Practice and Experimentation
Mastering edge refinement in Photoshop, like any skill, comes with practice. Regularly experimenting with different tools and techniques on various types of images will build your proficiency. Understanding the subtle differences between anti-aliasing, feathering, and the various sharpening filters, and knowing when to apply each, is key to achieving professional results. Consider exploring specialized retouching panels, which often bundle advanced tools and presets designed to streamline the process of skin retouching and general image enhancement, including edge refinement.