Photoshop offers a versatile suite of tools and techniques for altering and enhancing the colors within an image. Whether you aim to subtly adjust hues, replace entire color palettes, or apply sophisticated color grading, understanding these methods is crucial for any digital artist or photographer. This guide delves into the primary approaches to color manipulation in Photoshop, from straightforward replacements to more nuanced adjustments, empowering users to achieve a wide range of creative outcomes.
Understanding the Fundamentals of Color in Digital Imaging
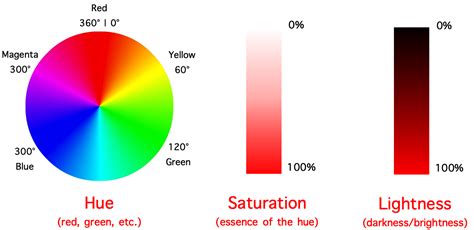
Before diving into the practical application of Photoshop's tools, it's essential to grasp the basic elements that constitute color in digital imaging. At its core, color is defined by three fundamental properties: Hue, Saturation, and Lightness.
- Hue: This refers to the pure color itself, such as red, green, blue, or yellow. It's the attribute that distinguishes one color from another on the color wheel.
- Saturation: This describes the intensity or purity of a color. A highly saturated color is vivid and rich, while a desaturated color appears muted, grayish, or closer to black and white.
- Lightness: Also known as Brightness, this property determines how light or dark a color appears. It ranges from pure black to pure white, with various shades of gray in between.
A firm understanding of these three components is foundational for effectively manipulating colors within Photoshop, as most adjustment tools directly target these attributes.
The Power of Hue/Saturation Adjustment Layers
One of the most accessible and widely used methods for changing colors in Photoshop is the Hue/Saturation adjustment layer. This non-destructive technique allows for precise control over the color characteristics of an image or specific selected areas.
To employ this method, begin by creating a new blank layer in the Layers panel, accessible by clicking the "Create New Blank Layer" icon at the bottom of the panel. Subsequently, navigate to the "Select" menu and choose "Color Range." This option is invaluable for isolating specific colors or tonal ranges within your image.
Once in the Color Range dialog box, utilize the eyedropper tool to click on the color you wish to modify. The "+" eyedropper tool is useful for adding more shades of the selected color to your selection, while the "Fuzziness" slider allows you to fine-tune the tolerance of the selection, expanding or contracting it to encompass more or fewer similar tones. Clicking "OK" will then create a selection, often visualized as "marching ants," around the targeted color area.
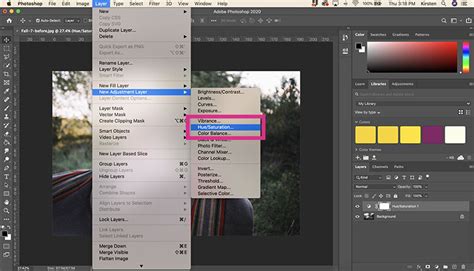
With your selection in place, return to the Layers panel and click on the "create new adjustment layer" icon. From the dropdown menu, select "Hue/Saturation." This action automatically applies a layer mask to the adjustment layer, ensuring that the subsequent color changes are confined to the previously selected area.
Within the Properties panel of the Hue/Saturation adjustment layer, you can now manipulate the Hue, Saturation, and Lightness sliders. Adjusting the Hue slider will shift the color to a different hue on the spectrum (e.g., changing red to blue). The Saturation slider controls the intensity of the color, making it more vivid or muted. The Lightness slider alters the overall brightness of the targeted color. For instance, if you selected a yellow dress, moving the Hue slider could transform it into a blue dress, while adjusting Saturation and Lightness would refine its appearance.
An advanced application of the Hue/Saturation adjustment layer involves using the eyedropper tool within the adjustment layer's properties panel (located next to "Master"). Clicking this eyedropper and then selecting a specific color in your image allows you to target and modify only that particular color range across the entire image, without needing a predefined selection. This is particularly useful for fine-tuning specific color casts or making subtle adjustments to existing colors. The HSL Adjustment Layer, as it's often referred to, can affect multiple layers beneath it, offering a powerful way to make global color adjustments.
Leveraging Blend Modes for Creative Color Effects
Blend modes offer a sophisticated way to interact with existing colors in an image, allowing for the application of new colors or the creation of unique color looks. The "Hue" and "Color" blend modes are particularly effective for this purpose.
To utilize these blend modes, start by creating a new blank layer above your image layer. You can then fill this layer with any color you desire. This could be a solid color, a gradient, or even a texture. The key to achieving the desired effect lies in changing the blend mode of this new layer.
By setting the blend mode to "Hue," the new layer will only affect the hue of the underlying image pixels, leaving their saturation and lightness unchanged. This is an excellent method for changing the color of an object without altering its tonal values, preserving details and realism. For example, if you fill a layer with blue and set its blend mode to "Hue," the underlying colors will shift towards blue, but their brightness and intensity will remain the same.
The "Color" blend mode is another powerful option. When applied, this blend mode replaces the hue and saturation of the underlying pixels with those of the foreground color, while retaining the original luminosity. This can be used to apply a specific color wash over an entire image or a selected area, creating a cohesive color tone. For instance, applying a warm orange color fill layer with the "Color" blend mode can impart a golden-hour look to a photograph.
A variation on this theme involves using a gradient fill layer. After creating a Gradient Fill layer and setting its blend mode to "Color" or "Hue," you gain the advantage of being able to easily scale the layer and change its angle. Furthermore, you can directly manipulate the gradient by dragging on it within the image canvas while the Gradient Fill box is open, offering an intuitive way to sculpt the color application.
For more targeted applications, you can create a black layer mask on your fill layer. By holding down the Option/Alt key while clicking the "Add Layer Mask" button, you create a mask that is initially filled with black, effectively hiding the fill layer. You can then use a white brush on this mask to selectively reveal the color effect only in the areas where you desire it. This allows for precise control, enabling you to paint in colors onto specific objects or regions of the image.
The Science of All 27 Blend Modes in Photoshop!
The Color Replacement Tool and Color Replacement Brush
Photoshop also provides dedicated tools for directly replacing or painting with new colors. The Color Replacement Tool and the Color Replacement Brush offer more direct, pixel-level manipulation.
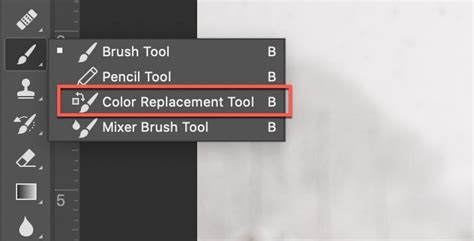
The Color Replacement Tool, accessible by holding down the Brush tool in the toolbar, allows for precise color substitution. When activated, you can sample a target color from your image using the eyedropper. Then, as you paint over areas with that target color, Photoshop replaces it with your chosen foreground color. The tool's options bar provides crucial settings such as "Mode," "Tolerance," and "Limits," which control how the color replacement is applied. The "Mode" setting, for example, can be set to "Color," "Hue," "Saturation," or "Colorness," allowing for different types of color transformations. "Tolerance" dictates how closely sampled colors must match the target color, while "Limits" can be set to "Contiguous" to only affect adjacent pixels or "Find Edges" to preserve object outlines.
It's important to note that the Color Replacement Tool is a destructive editing method, meaning it directly alters the pixels of the active layer. To maintain non-destructive editing, it is advisable to duplicate your image layer (Cmd/Ctrl + J) before using this tool.
The Color Replacement Brush, often found hidden within the Brush tool's settings, functions similarly but offers the brush's familiar painting interface. When selected, you can choose your desired color mode and sampling methods in the Options bar. Then, by painting over an area, you replace the existing colors with your selected foreground color. Similar to the Color Replacement Tool, using a duplicated layer or a layer mask is recommended for non-destructive workflows.
When using these tools, you can add multiple color samples to replace a wider range of tones. The "+" eyedropper allows you to add to the existing selection, while the "-" eyedropper lets you remove unwanted samples. Ticking "Localized Color Clusters" can help refine the selection by targeting only similar colors in proximity, preventing unwanted color shifts in distant areas of the image. The "Fuzziness" slider, as with the Color Range selection, controls the sensitivity of the color selection.
Advanced Color Adjustments and Considerations
Beyond the primary methods, Photoshop offers a variety of other tools and techniques for color manipulation, catering to more specialized needs.
Replace Color Command
For making permanent, global color changes across an entire image, the "Image > Adjustments > Replace Color" command is an option. This feature allows you to select a color range and then substitute it with a new color. While effective for straightforward global replacements, it is a destructive edit and lacks the flexibility of adjustment layers.
Gradient Map
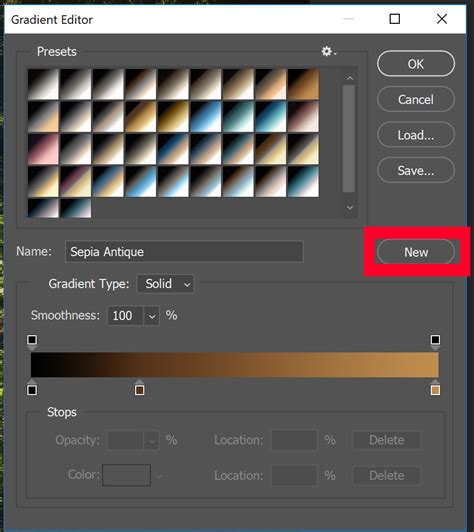
The Gradient Map adjustment is another powerful tool that maps the luminosity values of an image to a gradient. By choosing a custom gradient, you can completely re-color an image or create dramatic tonal shifts. This is particularly useful for stylized effects and abstract color applications.
Color Balance
The Color Balance adjustment allows for fine-tuning the color cast of an image by adding or subtracting specific colors (Cyan/Red, Magenta/Green, Yellow/Blue) from the shadows, midtones, and highlights independently. This offers precise control over the overall color temperature and mood of a photograph.
Sponge Tool
For selective saturation adjustments, the Sponge tool can be employed. It has two modes: "Desaturate" and "Saturate." By painting with the "Desaturate" mode, you can reduce the intensity of colors in specific areas, while the "Saturate" mode enhances them. This is useful for bringing out the vibrancy of certain elements or toning down overly strong colors.
Camera Raw Filter
For photographers, the Camera Raw filter (accessible via "Filter > Camera Raw Filter") provides a comprehensive set of tools for color correction and enhancement, including sliders for White Balance, Tint, Vibrance, Saturation, and HSL adjustments. It also offers advanced color grading options and the ability to work with specific color ranges non-destructively.
Best Practices for Non-Destructive Color Editing
Throughout these techniques, the principle of non-destructive editing is paramount. This means making changes in a way that allows for easy modification or reversal without permanently altering the original image data.
- Adjustment Layers: As repeatedly emphasized, adjustment layers are the cornerstone of non-destructive editing. They operate independently of the base image, can be edited, masked, or deleted at any time.
- Layer Masks: Layer masks are essential companions to adjustment layers. They allow you to control the visibility and application of an adjustment layer to specific parts of your image. By painting with black on a mask, you hide the effect; painting with white reveals it; and shades of gray create partial transparency.
- Smart Objects: Converting your image layer or specific elements into Smart Objects before applying filters or adjustments also enables non-destructive editing. Smart Filters can be reapplied, edited, or removed without degrading the image quality.
Conclusion: Unleashing Creative Color Potential
Adobe Photoshop provides an extensive and powerful toolkit for manipulating color. From the fundamental Hue/Saturation adjustments and creative blend modes to specialized tools like the Color Replacement Tool and advanced features like Gradient Maps and Color Balance, users have the means to achieve virtually any color transformation imaginable. By understanding the basic principles of color and adhering to non-destructive editing practices, you can confidently explore these methods to enhance your images, correct color casts, and infuse your work with unique artistic vision. The ability to change colors in Photoshop is not just about correction; it's about creative expression and bringing your visual ideas to life.