Achieving hyper-realistic skin texture in digital art and photo manipulation is a skill that elevates the quality of your work significantly. This tutorial delves into an "AMAZING technique" to create and apply realistic skin textures within Photoshop CC, offering a deep dive into the process that goes beyond simple application. We will explore how to generate textures from scratch, understand the crucial role of Smart Objects for non-destructive editing, and provide a pathway for further learning. This comprehensive guide is designed to be accessible to a wide audience, from beginners seeking to enhance their portraits to seasoned professionals looking to refine their techniques.
The Art of Realistic Skin Texture
The human skin is an intricate canvas, characterized by a subtle interplay of pores, fine lines, subtle imperfections, and variations in tone. Replicating this complexity digitally requires a nuanced approach. Instead of relying solely on pre-made assets, this tutorial focuses on a method that allows for the creation of unique and believable skin textures. This involves understanding the fundamental elements that constitute realistic skin and learning how to simulate them using Photoshop's powerful tools. The goal is to move beyond a flat, artificial look to one that possesses depth and natural variation.
Generating Textures from Scratch: A Foundation for Uniqueness
In some instances, the most compelling results come from creating a texture from scratch. This approach grants complete control over the outcome and allows for the generation of unique patterns that can be saved and reused. The process begins with understanding the building blocks of skin texture. This might involve using brushes to simulate pores and fine lines, or employing filters to generate organic-looking patterns. For example, the "Filter" menu in Photoshop offers a wealth of options, such as "Noise," "Texture," and "Render" filters, which can be combined and adjusted to create a base texture. The key is to experiment with different filter settings and layer blending modes to achieve a naturalistic feel. Once a satisfactory texture is created, it can be saved as a separate file or, more effectively, integrated into your workflow as a Smart Object. This allows for easy modification and application across multiple projects.
How to Create Your Own Photoshop Brushes
The Power of Smart Objects: Non-Destructive Editing for Flexibility
A cornerstone of professional digital art and photo manipulation is the concept of non-destructive editing. In Photoshop, "Smart Objects" are the primary mechanism for achieving this. A Smart Object is essentially a container that preserves the original image data of a layer. This means you can apply adjustments, distortions, filters, and transformations to a Smart Object without permanently altering the underlying pixels. For skin texture overlays, this is invaluable.
When you apply a texture overlay to a Smart Object layer, you can later go back and tweak the texture's opacity, blend mode, scale, or even replace the texture entirely without redoing any steps. This flexibility is crucial for refining the look of the skin texture to perfectly match the subject and lighting conditions of your image. Furthermore, filters applied to Smart Objects become "Smart Filters," which can be re-edited at any time. This iterative process of applying, adjusting, and refining is essential for achieving a truly realistic result. Learning to convert layers to Smart Objects and understanding how to work with Smart Filters is a fundamental skill that will significantly improve your Photoshop workflow and the quality of your final output.
Implementing the Skin Texture Overlay Technique
The practical application of skin texture overlays involves several key steps, each building upon the last to create a seamless and believable integration.
1. Source Material Selection: Begin with a high-quality image of the subject. The resolution and detail of your base image will directly impact the final outcome. Ensure the lighting in your source image is conducive to showcasing texture.
2. Texture Acquisition: You can either create a texture from scratch as described earlier or source a high-resolution texture image. Look for textures that mimic natural skin patterns. Websites offering royalty-free textures can be a good starting point, but remember that unique, self-created textures often yield the best results.
3. Preparing the Texture Layer:
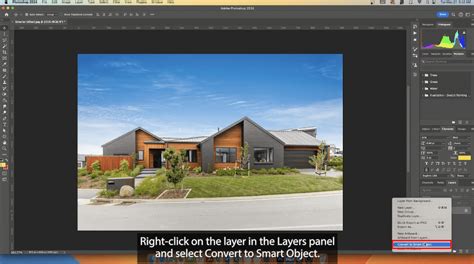
- Convert to Smart Object: Before applying any transformations or filters, right-click on the texture layer in the Layers panel and select "Convert to Smart Object." This is a critical step for non-destructive editing.
- Position and Scale: Place the texture layer above your subject layer. Use the Free Transform tool (Ctrl/Cmd + T) to scale and position the texture so it aligns appropriately with the contours of the face. Avoid stretching or distorting the texture unnaturally.
4. Blending the Texture: This is where the magic happens. The choice of blending mode is crucial for integrating the texture realistically.
- Overlay, Soft Light, or Multiply: These are common starting points. "Overlay" and "Soft Light" tend to blend the texture's luminosity with the underlying image, enhancing contrast and detail. "Multiply" can be effective for darkening areas and emphasizing pore structure.
- Experimentation is Key: Do not be afraid to try other blending modes like "Linear Burn," "Color Burn," or even combinations of modes with opacity adjustments. The best mode will depend on the specific texture and the subject image.
5. Adjusting Opacity and Fill: Once a blending mode is selected, fine-tune the layer's opacity and fill. Often, a lower opacity is more realistic, allowing the underlying skin tones to show through. The fill slider can also offer subtle variations in how the texture interacts with the base image.
6. Masking for Precision: To ensure the texture only affects the skin and not other areas like eyes, lips, or hair, use layer masks.
- Create a Layer Mask: With the texture layer selected, click the "Add layer mask" icon at the bottom of the Layers panel.
- Paint with Black: Use a soft-edged black brush to paint over areas where you don't want the texture to appear. This effectively hides the texture in those regions. Conversely, painting with white reveals the texture.
- Refining the Mask: You can further refine the mask by adjusting its opacity, feathering its edges, or even using gradient tools to create smoother transitions.
7. Fine-Tuning with Adjustments: After applying the texture and refining the mask, further adjustments can be made to enhance realism.
- Hue/Saturation: Use this to subtly shift the color of the texture to better match the subject's skin tone.
- Levels or Curves: These tools can be used to adjust the contrast and brightness of the texture, ensuring it integrates seamlessly with the lighting of the photograph.
- Color Balance: This can help harmonize the color cast of the texture with the overall image.
8. Advanced Techniques:
- Multiple Textures: Layering different textures with varying blending modes and opacities can create even more complex and realistic results. For instance, one texture might provide the general pore structure, while another adds finer details like subtle wrinkles.
- Frequency Separation: For ultimate control, combine texture overlays with frequency separation techniques. This allows you to edit texture (high frequency) and color/tone (low frequency) independently, ensuring that adding texture doesn't negatively impact skin smoothness.
The Importance of Context and Observation
Creating realistic skin texture is not just about applying a filter or an overlay. It's about understanding the subject matter. Take the time to observe real skin. Look at close-up photographs, study different skin types, and note how light interacts with these surfaces. Consider factors such as age, ethnicity, and skin condition, as these all influence the appearance of texture. A young person's skin will have different textures than an older person's, and oily skin will present differently than dry skin. By incorporating these observations into your digital workflow, you can create textures that are not only technically proficient but also authentically represent the subject.
Further Learning and Resources
For those who wish to deepen their understanding and mastery of Photoshop techniques, continuous learning is key. The journey of mastering digital art and photo manipulation is ongoing.
- YouTube Channels: Following dedicated Photoshop educators can provide a wealth of knowledge. The founder of the Photoshop Training Channel, Jesús Ramirez, is a digital graphics expert, speaker, and educator specializing in Adobe Photoshop. He is best known as the founder of the Photoshop Training Channel, one of the most popular Photoshop YouTube channels in the world. His content offers invaluable insights into advanced techniques.
- Structured Courses: For a more comprehensive and guided learning experience, consider dedicated courses. A "Selections and Masking Mastery Course" can be particularly beneficial, as precise selections and masking are fundamental to effectively applying and refining texture overlays. Such a course typically includes step-by-step lessons, structured modules, downloadable practice files, and custom Photoshop brushes, providing a robust foundation for complex manipulations.
By combining the techniques learned in this tutorial with continuous practice and further education, you can significantly enhance your ability to create stunningly realistic skin textures in your Photoshop projects. Remember that practice, patience, and a keen eye for detail are your most valuable tools in this creative endeavor.