Adobe InDesign, a powerful software traditionally geared towards print design, offers a robust platform for creating professional-looking eBooks. While its legacy lies in magazines and graphic-heavy content, its capabilities extend to crafting elegant digital publications. This guide will navigate you through the process of utilizing InDesign templates for eBook creation, focusing on practical application and efficient workflow, from basic formatting to cover design and final export.
Leveraging InDesign Book Templates for Efficient Formatting
Rather than starting from scratch, this guide to InDesign formatting will assume you’re using one of my InDesign book templates. That way, we’ll skip a lot of technical stuff you don’t really need to know about. Even so, InDesign can be frustratingly complex. I recommend hiring someone on Fiverr.com to do the initial formatting. But it’s nice to have InDesign and know how to use it, so that I can later make small changes or fix typos without having to go back to my designer each time. Make sure to sign up for the free package of book formatting templates.
InDesign is a legacy book formatting software, meant for print design - so for magazines and media/graphic heavy content, it makes sense. But basically, you set up a “master” page which is like a page style, that you can apply to all similar pages. Once you’ve got all your master pages set up, you can tweak your headers and fonts, and make sure everything is consistent.
I’m going to start with a very simple, basic InDesign Book Template. You should be able to download this template by clicking it. Pages should automatically be added, so that the rest of the text is pushed down to the end of the document.
Defining Paragraph Styles for Chapter Elements
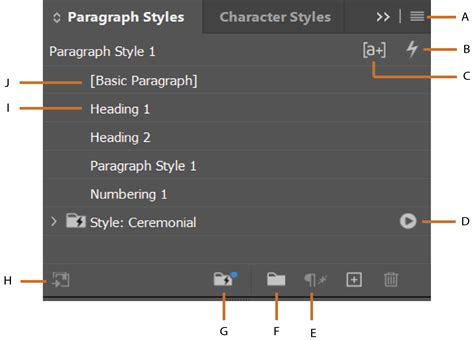
Let's begin by establishing clear typographic hierarchies for your eBook. I’ll highlight the “Chapter One” text and set it to Trajan Pro, all caps to match the cover. Then I’ll highlight the text again, and hit the little panel button on the top right of the Paragraph Styles panel (right under the X to close the panel). Now “Header1” shows up under my Paragraph Styles - next time I get to a chapter heading, I’ll just highlight it and hit that style. I’ll do the same thing for the subtitle, increasing the font size, making sure the text is centered. I change the font to “Lato” to match the cover, then saved it as “Scene” (because in this book, the subtitle describe the scene). For the first paragraph, I’m going to set the font to Sabon, 11pt, with 18pt line spacing. Then I’ll save it as a new style, “NoIndent.” Then I’ll open that style and adjust the “Indents and spacing” so there’s actually no indent. (When you pasted your text in, it probably already had a style assigned by default. You can just redefine the current style so it applies to most of your text. Psst… have you downloaded our free package of templates yet? I wasn’t quite happy so I fiddled some more, making the subtitle smaller.
Navigating and Managing Master Pages
If I scroll down to the next page, I can see that everything looks pretty good, except that I need to adjust my headers. If I click on the Pages Panel, in the main box I can see my document and all the pages - in those little icons, at the top, is an “H” or an “I”. Those are two different master page styles. “H” is totally blank, with no headers, for my chapter pages or front matter. “I” has headings and page numbers. I don’t want to do anything with the page numbers, which display here as only the symbol “I” (if this is confusing, my master pages could have been named “A” or “B” or something else).
Now I’ll scroll all the way down to the end of Chapter One, doing a quick check. Something I notice is that several pages are blank and don’t have headers. My template was only for 49 pages, and when I added my new text InDesign didn’t make new pages for me. First, I’m going to insert some more pages. Then, I’ll go back and click on that little red “+” sign. This will work fine as long as you made enough pages for the overset text. But there’s a way to avoid this if you aren’t sure. After hitting the red “+” and getting the overset text on your mouse, hold down shift when you click in to the next page. A quick cheat is to go back and highlight the first paragraph and heading from the first chapter, and copy+paste it to the first pages of other chapters. Then I just have to change all the text to make it right. If you need to publish a bookshelf quality book, I recommend grabbing over 100 formatting templates and in-depth tutorial videos by signing up to the Master Package. I’m on a quest to make a full-time living with my writing, and I share everything I learn! I have several free guides to writing, publishing and book marketing - they’ll help you avoid serious mistakes that can ruin your journey.
Designing a Modern eBook Cover in InDesign
It’s always best to design the front of your cover only first, before you create a full cover, with spine and back. In this tutorial, we’ll look at giving Leo Tolstoy’s War & Peace a modern makeover. You’ll learn how to set up a paperback (softcover) version of the full cover in Adobe InDesign and create a collage effect with the help of Adobe Illustrator.
Setting Up the Document for Cover Design
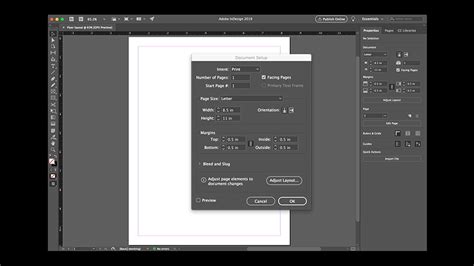
Ready to create your cover? Great! Go to File > New > Document, and set the Intent of the document to Print. Increase the Number of Pages to 2 and deselect Facing Pages. Name the custom size Paperback Book and set the Width to 132 mm and Height to 197 mm. Set the Margins on all sides to 11 mm and the Bleed to 5 mm. We’ll work on the front cover design on Page 1-it’s always much easier to work on the front cover design alone at first.
Creating a Gradient Background
Take the Rectangle Tool (M) and drag onto Page 1, across the whole page, extending up to the edges of the bleed on the top, right and bottom edges of the page. Expand or open the Swatches panel (Window > Color > Swatches). Create a new CMYK Process swatch, C=100 M=97 Y=48 K=56. Move down to the Gradient Ramp and click on the left-hand stop to be able to edit it. Click on the right-hand stop and adjust the Stop Color to Swatches. Choose your new swatch, C=100 M=97 Y=48 K=56 from the list below.
Incorporating Vector Graphics and Images
Expand or open the Layers panel (Window > Layers) and double-click on the default Layer 1 name. Click on the Create New Layer button at the bottom right of the Layers panel to create a new layer. File > Save As your InDesign document, and minimize InDesign. Return to your InDesign document and Edit > Paste the vector onto Page 1 of your document. Next up, you need to choose an image to ‘fill’ the cathedral silhouette. I’ve chosen a commons image of an antique map of Prussia, which you can download here. With the vector selected go to File > Place and choose the map image. Click on the Fill Frame Proportionally button in the top control panel to size the image to the frame. Double-click inside the vector frame to manually adjust the scale of the image, holding Shift while you do so, to make sure you’re happy with the effect. Ctrl-Click (Mac) or Right-Click (Windows) > Transform > Flip Vertical. Position this flipped cathedral at the top of the page, and go to File > Place. Set individual characters in separate text frames to be able to have more freedom with how you place the type on the page.
Designing the Full Paperback Cover
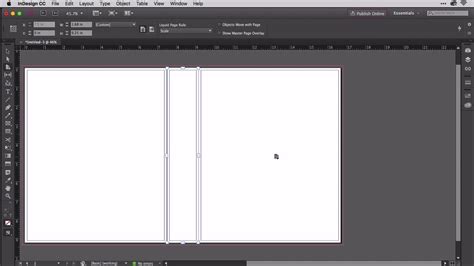
Unlock all the layers in the Layers panel, then drag across Page 1 to select everything on the page. Now we need to work out the width of the full length of the cover. This will depend on the width of the spine, which in turn will depend on the number of pages inside the book. Select the Page Tool (Shift + P) and, holding down Option (Windows) or Alt (Mac), drag the left-hand edge of the page out to the left, increasing the page width to the full 337.7 mm. Rename the swatch Blue Gradient Spine. Keep everything as it is, just move the right-hand stop on the Gradient Ramp to the left, until you reach about 46%. Use the Rectangle Tool (M) to create a shape that extends across the spine, and up to the bleed on the top and bottom (73.7 mm in Width). Set the Fill Color to Blue Gradient Spine. Create a second shape using the Rectangle Tool (M), extending it over the whole of the back cover, up to the left edge of the spine, and up to the bleed on the top, left and bottom edges of the page. Return to the Layers panel and lock the Background Color layer. Copy and Paste the cathedral vectors on the front cover, onto the back cover, and arrange them as shown below. Zoom into the spine and create a few rows of text frames using the Type Tool (T). Type in the title, allowing one text frame for each line of the title, and mimic the typography formatting used on the front cover but at a smaller Font Size. Use the Ellipse Tool (L), and hold down Shift, to create a circle on the center of the back cover. Add a blurb to the back cover, aligning the text centrally. Here, I’ve set the Font to Columna Solid, Size 10.5 pt, Leading 13 pt.
Exporting the Cover for Print
Go to File > Export. Choose Adobe PDF (Print) from the Format drop-down menu. From the left-hand menu in the window, click on Marks and Bleeds. In this tutorial, you’ve learned how to give a classic book a modern makeover, and set up the full paperback cover in Adobe InDesign. Want a free paperback cover InDesign template? Of course you do! Looking for some book design inspiration? Head over to our Inspiration page to pore over beautiful book covers, and find great ideas for book typography.
Creating Engaging eBook Templates in InDesign
Beautiful, branded content is the dream, and having existing templates to make such content makes it easy! InDesign templates make it easy to have gorgeous and unified branded content quickly. But where do you start? Adobe’s InDesign tool is perfect for creating captivating eBook templates for your design team.
Initial Document Setup for eBooks
Begin the process by opening Adobe InDesign and clicking on the button ‘’New File’’ on the top, left of your page. Select your design size by selecting “Inches” from the “Units” menu, setting the orientation to vertical. Quick Tip: It’s also important to uncheck the facing page’s checkbox. Having this checkbox checked will show two pages instead of individually, which can get confusing. Upgrade your branded content creation with an InDesign eBook Template!
Structuring eBook Content Hierarchy
The text hierarchy is clear. Your headline should be the largest font size and the most concise text. Three lines maximum will make it easily digestible by the viewer. The subheadline text should be smaller, but the message can be longer. This section acts as a brief introduction. The cover page should be easy to read, simple yet elevated, and truthful to the client’s branding.
Implementing Essential eBook Components
Start by setting up your Master Page with a footer, page numbers, etc. Need a Laugh? InDesign eBook templates make creating new branded content a breeze. After you set up your cover page, you can create a table of contents that includes all the title pages, followed by the current page numbers. A good table of contents should list all front, main, and back matter, including the headings and page numbers of all chapters, including the bibliography. Your table of contents should be followed by the chapter or title pages. A good chapter page contains the title of the chapter on a header image, but you can use some graphic elements as a page header, followed by a purposeful illustration. Body copy pages can show various layouts to create some texture and intrigue, which is more likely to keep the reader engaged. However, it’s best to keep the layout designs to 4 or fewer to avoid your template looking chaotic. An easy way to break up the copy and switch up the layout is with well-placed images or illustrations that help tell the story of the text. Wrap up your InDesign eBook template with a dedicated CTA page. The acronym ‘’CTA’’ stands for Call to Action and is an instruction to the visitor to encourage them to explore the next steps of your sales funnel. Wondering Where to Spend? Woohoo! You’re ready to share your eBook with your team! Be sure to confirm now that all linked files are accounted for, note how many fonts are used, how many images are embedded, and how many elements are using RGB color space. Once complete, your InDesign file will create a folder of your eBook and all assets to go with it. Having an existing eBook template will not only make your content look sleek and professional, but it will also help your team to create content even faster.
Exporting Your eBook from InDesign: Interactive PDFs and EPUBs
Looking for more tricks of the trade? Wondering how to create an eBook for free? If you've ever wanted to easily convert your Adobe InDesign layouts to eBooks, it’s very simple to do. Before we hop into this eBook template tutorial, try out this 32-page multipurpose eBook that's fully editable in InDesign. There are a few different eBook formats to suit different purposes.
Creating Interactive PDFs with Hyperlinks
An InDesign interactive PDF is not strictly an InDesign EPUB format, but it can be shared easily with others and includes interactive elements that differentiate it from a standard EPUB. Fancy watching a video tutorial to learn how to make an eBook in InDesign? There are two forms of EPUB-reflowable and fixed layout, the former of which we’ll look at creating in section 2 of the tutorial, below.
I’m a big fan of Interactive PDFs in InDesign -they allow you to retain the original layout of your INDD document, along with your choice of fonts, text formatting, and master content. On this page (Page 8), I want to add a clickable cross-reference link, which will take the reader straight over to Page 10 of the eBook. I’ve already added a simple hyperlink to a couple of text phrases above (see highlighted in red in the image below) by Right-Clicking (Windows) or Control-Clicking (Mac) and choosing Interactive > New Hyperlink. Highlight the text you want to use as your cross-reference link. In the window that opens, choose Page from the Link To menu at the top. You can also specify the zoom settings of the destination page. Fixed is usually a sensible pick, but you can adapt the zoom specifically depending on your preference. Click OK to apply the hyperlink and return to the InDesign document.
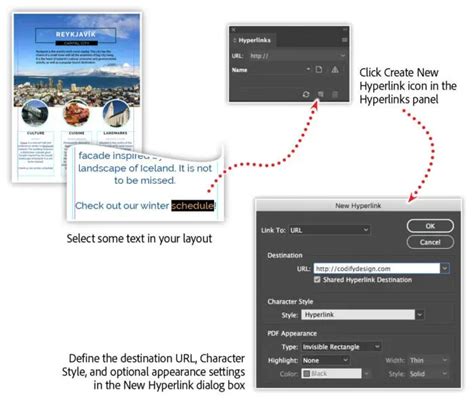
Head up to File > Export. Give your eBook a suitable name and save to a folder you can easily find. If your document is set up to single-page spreads, as is my Inbox Zero eBook, you can check Pages. If you’ve created a document made up of facing pages, like a conventional print book, you have the option of choosing whether to export the document as pairs of facing Spreads, retaining the look of your original design. Check View After Exporting to preview your design after export. You also have the option to Open in Full Screen Mode, which allows the focus to be completely on your eBook. It’s often worth turning on Create Tagged PDF if you’re planning to allow readers to copy and paste sections of your book’s text perfectly. In the Compression section, you can adjust the quality of images in your PDF, to either maximize image quality for a polished result or compress image quality to save on file size. You can also add optional security settings to your eBook. This won’t be appropriate for all scenarios, but can be useful if you’re sharing your eBook with a limited pool of people or wish to retain confidentiality. Click OK to exit the Security window. Your interactive PDF InDesign document will open up in Adobe Acrobat with your interactivity settings preserved. Make sure to test your hyperlinks and cross-references to make sure everything has been set up correctly, before sharing your eBook with others.
Exporting Reflowable and Fixed-Layout EPUBs
- The reader also has the flexibility of enlarging font size to improve legibility, as well as being able to highlight and copy sections of text and insert bookmarks. Another option is to export your book as a fixed layout InDesign EPUB. I won’t cover how to do that in this tutorial, as it’s an ever-changing process at the moment. Adobe InDesign CC can export to a fixed layout, but the results can be a bit unpredictable. If you want to preserve the formatting of your design-heavy book, I would recommend exporting your design as an interactive PDF or investing in an InDesign plug-in or specialist fixed layout conversion app. I’m going to redesign the World AIDS Day document to make it suitable for InDesign EPUB export. Let’s start by adjusting the document for our eBook redesign. In InDesign, go to File > Document Setup. In the window that opens, set the Intent to Web. For the Page Size, set the Width to 612 px (8.5 in) and Height to 792 px (11 in). EPUBs are designed to be flexible, with readers able to set their own font choices if they wish. So don’t worry about preserving the perfect text formatting in your design. Click on the Create New Style button at the bottom of the panel, and double-click on the new style to open the Options window. If you want to insert images into your layout, you will need to ensure they are anchored in place on the page. Place your Type Tool (T) cursor between two paragraphs where you would like the image to be anchored. Then go to File > Place, choose your image, and Open it. You will need to set up a ToC for your book, even if you have already created a contents page. Go to Layout > Table of Contents. In the window that opens, you can set the Title of your ToC. Here I’ve used the default ‘Contents’ name. You want the ToC to automatically create a full list of contents based on the headers in your book. You can also adjust the settings for the Entry Style. You’re now ready to export your document as an EPUB. Go to File > Export, name your eBook, and choose EPUB (Fixed Layout) from the Format menu. You can also choose a Cover for your EPUB under the Setup options. You’ll find more options for your EPUB under the Image and Advanced tabs in the left-hand menu. You can adjust the Resolution of your images. When you’ve tweaked the options, go ahead and click OK. If you checked the View EPUB after Exporting button, the EPUB will open in a default program (as I use a Mac, it opens in Books). Otherwise, you can navigate to the folder where the EPUB is saved and open it from there. If you would like to view your EPUB as Reflowable, just go to File > Export and select EPUB (Reflowable). As you can see in the image below, I stripped out all design elements like the ribbon icons and red circles before exporting again.
InDesign • How to Convert a Print Book into an eBook
You learned how to create an EPUB in InDesign and how to make an InDesign interactive PDF. You can now kick back and admire your shiny new eBook. Perhaps you’ve opted for an interactive PDF to maintain the layout of your original book design, or a reflowable EPUB format to adapt to current eBook selling standards. Either way, you’ll have a file that’s perfectly tuned for viewing on digital devices. eBooks are a great way to get your content out to a wide audience quickly and cheaply, and the process of designing, exporting, and selling can be really fun. In this tutorial, we’ve looked at two main ways of creating an eBook using InDesign. Interactive PDF-this format preserves the layout of your original design, which makes it great for books with non-traditional designs, like handbooks, picture books, portfolios, or magazines. EPUB-here we’ve looked at how you can create a reflowable EPUB, which is suitable for eReaders and tablets.
Essential InDesign eBook Templates and Resources
Looking for a little more help with your eBook designs?
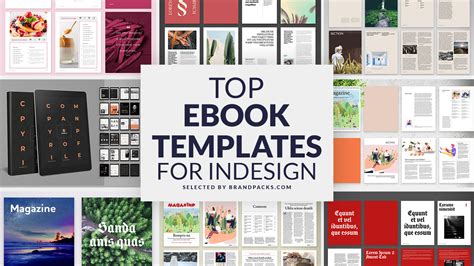
- The Interiorch eBook is perfect for new interior designers, realtors, and entrepreneurs who need a little help getting their business off the ground. This InDesign ebook template is fully editable, so you can customize it to fit your needs.
- No design experience? No problem! Using templates for eBooks is the way to go. Customizing this eBook in InDesign is the perfect place to start.
- You're just a few clicks away from a professional-looking InDesign ebook template. Check out this brand strategy template and start creating your own marketing materials.
- Designing a cover, setting up the inside pages, and formatting an eBook can be a huge hassle.
- Build a marketing eBook for your company to showcase your best offerings. This photography template is photo-ready, and you can easily edit the information to add your own content.
Expert Insights on eBook Creation from InDesign
Anne-Marie: Getting an e-book out of InDesign is pure simple. Just choose the export to reflowable EPUB command, right? But if you've tried that, you've likely been a little disappointed, to put it mildly, at the resulting ebook. I'll share all my EPUB production secrets, shortcuts, and tools. You'll soon see why InDesign is the preeminent publishing program, not just for printing PDF, but for e-books too. I'm Anne-Marie Concepcion, and I'm excited to help you learn how to make great EPUBs from InDesign. Let's jump right in.
Fiction eBook Creation without Code: Do you need to make an ebook from a fiction book without using messy HTML code? This class shows you how to use Adobe Indesign to create a professional eBook without touching one line of code. The best part is you can use this layout for both an ebook and a print book using the techniques in this class. This course is for you! Most other Indesign courses teach lots of extra material that won't help you. This course is specifically targeted at people who want to create an ebook using Adobe Indesign without all the headaches of custom code.
- Walter: "Your course was so helpful. My staff struggled for a month trying to learn Indesign from YouTube. We just wasted our time and missed critical opportunities. Your easy-to-follow teaching style literally hand-held us, taught my team time-saving skills, and saved us $1,000's of dollars in lost revenue. Thank you!" Walter P., Orange and Blue Marketing
- Aaron: "Hi there, my name is Aaron and I've professionally taught Indesign to hundreds of students. I've created hundreds of layouts in Indesign, from simple fiction books to complex guides and textbooks. Together we'll work through real projects with real manuscripts. You'll learn everything you need to know to be successful. This course is filled with instruction that gets you to success fast."
This course will allow you to create your own ebook and send it out to the market. Many "pro" ebook designers learn from YouTube as they go, wasting your money. Other Indesign ebook contractors charge insane amounts of money. That's why I made this course. It's for people who want to learn ebook creating from Indesign, whether it's for their book or to learn a new skill. * Bethany: "What you just taught me almost made me cry. Before your class, my boss made me change the font in our company book twice. It took me a week. With what you showed me, I could've been literally done in a minute. One week cut down to one minute. I hope others find your course." Bethany R., Outdoor Medical Training School
Common eBook Formatting Pitfalls to Avoid
This course helps you avoid these mistakes:
- Improper eBook formatting
- Not adding a cover image
- Classic manuscript import errors
- Incorrectly choosing the wrong file type
- Having no table of contents
It's so easy to make mistakes and not see them during an ebook layout. Aaron has seen books by great authors with terrible, incompatible ebooks. Trying to do an ebook layout in code is a waste of time when you can use Indesign to make a great-looking ebook quickly.
What This InDesign eBook Course Offers
This course includes:
- Sample files for practice
- Sample copyright page text completely free to use
- Ideas for adjusting your ebook
Aaron shares the tricks he's learned over years of doing ebook publication. The goal of this course is to teach you how to make your own ebook and not look like an amateur doing it. You'll learn the necessary skills to get the job done.
Manuscript Software Formatting Guidelines
Manuscript software formatting guidelines include:
- Microsoft Word
- Google Docs
Even if you used a different program, the instructions for the above software will help you figure out what you need to do. Ask questions in the course forum and Aaron will do his best to help you out.
There are a lot of small but important details in the ebook layout. Avoid making errors with this course. You spent 100s of hours perfecting your manuscript. Don't make the rookie mistake of making your ebook look like it was prepared by an amateur.
Who This Course is For
- Anyone wanting to create a professional ebook without using code.
- Aaron's course is for people with no InDesign experience. No previous publishing knowledge is required.
This course is relaxed and bite-sized. It's broken down into small skills that won't overwhelm you. You only need basic computer skills to succeed. Save time wasted on huge "master classes" that cover a lot of what you don't need. This course gives you exactly what you need to get the job done. You won't wade through endless discussions and stories that aren't relevant to your book layout. Save time and get the job done faster with Aaron's courses.
Aaron Linsdau Learning: Skills.