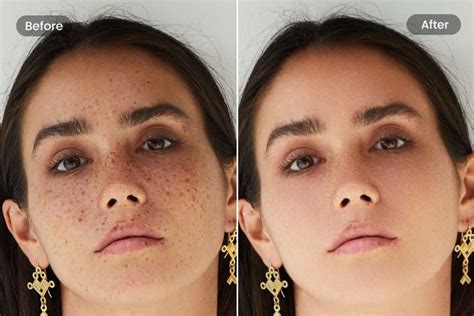
The ability to seamlessly transplant a face from one image onto another body is a powerful technique in digital art and photo manipulation. While often associated with fun, face-swapping apps, this method, when executed with professional software like Adobe Photoshop, unlocks a realm of creative possibilities far beyond simple novelty. From enhancing product photography with diverse models to correcting imperfections in cherished group photos, understanding how to photoshop a face onto another body is a skill that can significantly elevate your editing capabilities. This tutorial will guide you through the intricate steps, ensuring a realistic and convincing blend.
Preparing for the Perfect Swap: Image Selection and Initial Setup
Before diving into the technical aspects, meticulous preparation is key to achieving a professional-looking result. The success of your face swap hinges significantly on the initial images you choose.
Choosing Your Images Wisely
The foundation of a successful face swap lies in selecting two images that possess a high degree of technical similarity. This means paying close attention to several crucial factors:
- Size and Resolution: Ideally, the images should be of similar size and resolution. This similarity minimizes the need for drastic resizing, which can lead to a loss of image quality or introduce artifacts. When an image is shrunk down, there's no inherent loss in its detail.
- Subject Orientation: For a more natural blend, the subjects in both photos should be facing the same direction. This alignment simplifies the process of matching features and perspectives.
- Lighting Conditions: The lighting in both images needs to be as consistent as possible. Similar light sources, angles, and shadow patterns will ensure that the transplanted face integrates realistically with the recipient body. Pay close attention to the location of shadows on both models’ faces; the easiest photos to work with will have minimal shadows and soft lighting.
- Facial Detail: Especially if you are new to this technique, it is advisable to start with faces where there aren’t too many intricate details to match. Simpler features will be easier to align and blend.
- Sharpness: Ensure that the sharpness of both images is the same. Inconsistent sharpness can make the swapped face appear out of focus or unnaturally crisp compared to the rest of the image.
Imagine a scenario where the position of the body in one shot is perfect, but the model has their eyes closed. If you have another photo of the same person where they are smiling, and the lighting, perspective, and focal length are identical, you can seamlessly swap the expressions. This meticulous selection process ensures that the skin tone, hair, and other features will naturally match.
Opening Your Images in Photoshop
Once you have your chosen images, the next step is to open them in Adobe Photoshop. You can do this by navigating to File > Open from the dropdown menu at the top of the application window, or by using the keyboard shortcut CTRL+O (or COMMAND+O on a Mac). For the purpose of this tutorial, let's designate the photo containing the body as "Body" and the photo containing the face you wish to transplant as "Face." If you are working with a flattened JPG, you will automatically be on the correct layer. However, if your files are layered Photoshop documents, ensure you select the correct layer in the Layers panel.
The Core of the Swap: Selecting, Copying, and Pasting the Face
With your images open, the process of isolating and transferring the desired face begins. Photoshop offers several tools to achieve precise selections.
Selecting the Target Face
You'll start by working with the "Face" photo. The goal is to create a precise selection of the face you want to use.
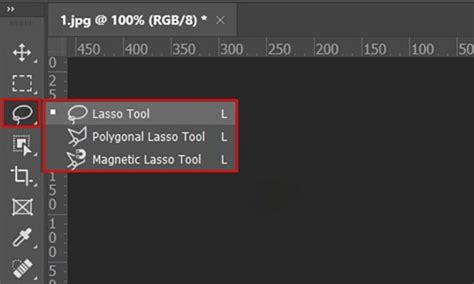
- Using the Lasso Tool: Select the Lasso Tool from the Toolbar on the left side of the application window. If you don't see it immediately, it might be grouped with the Polygonal Lasso Tool or the Magnetic Lasso Tool. Click and hold on these to reveal the Lasso Tool.
- Defining the Selection: Draw a rough outline around all the important features of the model's face that you want to swap. This typically includes the eyes, nose, and mouth, but you should also consider cheekbones, eyebrows, and any distinguishing features like moles. Crucially, avoid selecting any of the model’s hair, as this can complicate the blending process.
You can also select only specific parts, such as just the eyes or the nose, if that is your objective. For a more advanced selection, Photoshop’s Object Selection tool can be invaluable for precisely isolating complex shapes. This tool allows you to grab whatever you like from a photo, be it a single feature or an entire head.
Copying and Pasting the Face
Once you have your selection, indicated by a dashed marquee line (often referred to as "marching ants"), you need to copy it. Use the keyboard shortcut CTRL+C (or COMMAND+C on a Mac), or navigate to Edit > Copy from the application's dropdown menu.
Next, switch to the "Body" photo. Now, paste the copied face onto this image using CTRL+V (or COMMAND+V on a Mac), or by selecting Edit > Paste. At this stage, the pasted face might not look right, but this is expected. The subsequent steps will focus on refining its placement and blending.
Using the Move Tool from your Toolbar, reposition the newly pasted face so that it roughly aligns with the original face on the "Body" image.
Refining the Fit: Resizing and Aligning the New Face
Achieving a realistic swap requires the transplanted face to be correctly sized and positioned. This is where the opacity and transform tools become essential.
Resizing and Positioning
- Access the Layers Panel: Ensure your Layers panel is visible. If not, go to
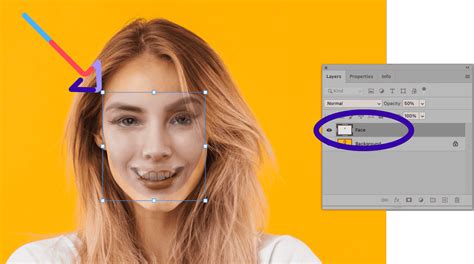
Window > Layersfrom the dropdown menu. - Select the Face Layer: In the Layers panel, make sure the layer containing the newly pasted face is selected. It's good practice to rename this layer to "Face" by double-clicking on its current name.
- Lower Opacity: Reduce the opacity of this "Face" layer to around 50%. This allows you to see the features of the original face underneath, providing a clear reference for alignment.
- Activate Free Transform: Activate the Free Transform tool using the shortcut
Cmd + T(orCtrl + Ton Windows). You’ll see a bounding box appear around the face. - Resize and Align: Place your cursor at one of the corners of the bounding box. Hold down the
SHIFTkey to maintain the aspect ratio and drag the corner handle until the new face is approximately the same size as the original face. While the opacity is reduced, carefully line up key features like the eyes, nose, and mouth. - Rotation (if needed): If the angle of the new face doesn't match the original, you can rotate it. Select
Edit > Transform > Rotatefrom the dropdown menu and adjust the angle until it aligns correctly. - Confirm Transformations: Once you are satisfied with the size and rotation, press
ENTER(orRETURNon a Mac) to apply the transformations. - Restore Opacity: Reset the opacity of your "Face" layer back to 100%.
Preparing the Canvas: Duplicating and Isolating Layers
To ensure non-destructive editing and prepare for the blending process, it's crucial to duplicate your original layers and make specific selections.
Duplicating the Background Layer
The Photoshop face swap technique can be a destructive process. To safeguard your original image and allow for potential touch-ups, always duplicate your background layer.
- Select the Background Layer: In the Layers panel, select the layer containing the original body image (often labeled "Background" and may appear locked if it's a JPEG).
- Duplicate Layer: Click on the small block of four horizontal lines at the upper-left corner of the Layers panel to open the panel menu. From the dropdown, select
Duplicate Layer.... Alternatively, use the shortcutCTRL+J(orCOMMAND+Jon a Mac). - Name the New Layer: In the pop-up window, name this new layer "Body."
- Hide Original Background: Click on the eye icon next to the original "Background" layer to toggle its visibility off. You will no longer need this layer for the next steps.
This duplication ensures that your original image remains intact, serving as a fallback should any issues arise during the editing process.
Making a Selection in the Body Layer
This step involves using the information from your pasted face to create a precise mask on the body layer.
- Select the Face Layer: Go back to the Layers panel and select the "Face" layer.
- Load Selection: From the dropdown menu at the top of the screen, choose
Select > Load Selection. - Configure Settings: In the pop-up window, ensure the "Channel" is set to "Face transparency." Make sure the "Invert" box is unchecked, and the radio button next to "New Selection" is selected. Click "OK."
- Hide Face Layer: Now, click on the eye icon next to the "Face" layer to make it invisible. Do not deselect the active selection.
This selection, based on the transparency of the face layer, will be used to isolate the area on the body layer where the new face will be integrated.
Integrating the Face: Blending and Refinement
The most critical phase of the face swap involves blending the new face with the existing body, ensuring a seamless and natural transition.
Creating an Overlap and Deleting the Original Face
To facilitate a smooth blend, you'll create a slight overlap between the new face and the body, and then remove the original face from the body layer.
- Select the Body Layer: In the Layers panel, select the duplicated "Body" layer.
- Contract Selection: From the dropdown menu, choose
Select > Modify > Contract. In the pop-up menu, enter a value of 10 pixels (this value can be adjusted based on your image resolution and desired blend) and click "OK." This contracts the active selection inwards, creating a small buffer zone. - Delete Original Face: With the "Body" layer still selected and the contracted selection active, press
BACKSPACE(orDELETEon a Mac). This removes the pixels in the selected area on the "Body" layer, effectively deleting the original face. - Deselect: Press
CTRL+D(orCOMMAND+Don a Mac) to deselect the area.
At this point, your image might look somewhat unsettling, with a hole where the original face was. However, this is a temporary stage before the final blending.
Auto-Blending Layers for a Seamless Transition
Photoshop's Auto-Blend Layers feature is designed to intelligently merge multiple layers, creating smooth transitions.
- Reveal Face Layer: Click on the eye icon next to the "Face" layer to make it visible again.
- Select Both Layers: In the Layers panel, select both the "Face" and "Body" layers simultaneously by holding down the
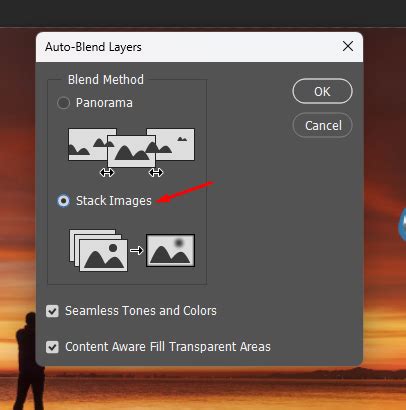
SHIFTkey. - Apply Auto-Blend: Go to the dropdown menu at the top of the screen and select
Edit > Auto-Blend Layers.... - Configure Settings: In the pop-up window, choose "Panorama" as the blend option. Crucially, check the boxes for "Seamless Tones and Colors" and "Content-Aware Fill Transparent Areas." Click "OK."
Photoshop will now analyze both layers and attempt to create a merged layer with a natural blend of tones, colors, and seamless transitions around the edges. This process often creates a new, merged layer on top of your existing ones.
Final Touches and Advanced Techniques
Even after the auto-blend, some minor adjustments might be necessary to perfect the illusion.
Performing Touch-Ups
Sometimes, the auto-blend might not perfectly conceal all imperfections, or parts of the original image might be obscured.
- Toggle Original Layer Visibility: To address these issues, toggle the visibility of your original "Background" layer back on by clicking its eye icon. You may also need to turn off the visibility of any intermediate layers that exist between the merged layer and the original background.
- Use the Eraser Tool: Select the "Face" layer (or the newly merged layer if one was created by Auto-Blend) and choose the Eraser tool. Use a small brush with a soft edge (0% hardness) to carefully erase any areas of the new face that are improperly blended or that obscure desirable parts of the original image, such as hair or clothing details. Work meticulously to reveal the original layer beneath.
- Adjusting Skin Tones: The lighting and skin tones of people's faces can vary significantly between photos. If the skin tones don't quite match, use the
Image > Adjustments > Match Colorfeature. Select the "Face" layer and choose the "Body" image as your source to match colors from. Gradually adjust the sliders for Luminance, Color Intensity, and Fade until the skin tones blend harmoniously.
Advanced Blending and Beyond Faces
The technique of Auto-Blend Layers is versatile. You can repeat the process, perhaps creating a larger transition area in step 6, to achieve even smoother results. Furthermore, this technique is not limited to faces. You can use it to merge any elements from different images. For instance, you could take a "50% sign" from a window shop advertisement and blend it into another scene to create a unique visual. When merging any two images in Photoshop, strive for as many technical similarities as possible, including lighting, perspective, and focal length.
8-Step GUIDE: Blend Images and Create Composites Like a Pro with Photoshop ✅🔥
Considerations for Ethical Use
It is important to acknowledge that while face-swapping in Photoshop offers immense creative potential, it also carries ethical implications. Neither Shotkit nor its contributors endorse the use of these editing techniques for unethical purposes, such as creating deceptive content or impersonating others. The intention behind learning this skill should be for artistic expression, legitimate photo correction, or enhancing visual content responsibly.
Frequently Asked Questions
How do you Photoshop a face onto another body for free?While Adobe Photoshop is a paid software, there are free alternatives like GIMP that offer similar functionalities for photo manipulation. However, for the most professional and seamless results, especially with advanced features like Auto-Blend Layers, Photoshop remains the industry standard. If you outsource the Photoshop face swap, you will also incur service costs.
Can you swap heads in Photoshop?Yes, absolutely. The process described above is essentially a head swap, where the face is meticulously selected, transferred, and blended onto a different body. This technique allows for a high degree of control, ensuring that no one will suspect your bestie wasn't smiling in that trip picture, or that a corrected group photo was ever anything less than perfect.